Instructions & Help
This page hopefuly contains all the needed instructions, tips, and help for users of this website. If anything needs clarified, feel free to contact me and ask for that.
If you're not an admin
If you cannot access any routes or add any routes, it is likely because you are not an Admin. There should be a banner at the top of the home page if that is the case. To be added as an admin, you can ask anyone who is already an Admin or send a message via the Support page and ask. You may need to contact support to have specific routes added to your account.
Site Modes
This site has 3 modes available: Simple, Default, and Advanced. This can be changed from the Options menu. All the modes use the same interface, and look the same but differ in the features available. This setting does propogate accross all your devices.
Simple
Simple mode is designed to be easier to use and have most of the more advanced features disabled or hidden.
Default
Default Mode is designed to have more advanced features and cater to users who want more features. This is the default the first time you use the site. The following is a list of features that the Default Mode enables over Simple Mode. There may be some that have gotten missed.
- Location Search
- Auto Hide Controls
- Geolocation Controls
- Data caching settings
- Map Settings
- Routing settings
- Browser settings
- Box records
- List View
- Moving Stops
Advanced
Advanced Mode enables all the features the site has. This will add more complexity but also allow the site to be used in more ways. The following is a list of features that the advanced mode enables over Default Mode. There may be some that have gotten missed.
- Routing settings
- Manual Routes
- Multiple vehicles in routes
Home Screen
The Home Screen is the page where you will spend most of your time on this site. You can add, edit, and manage your routes from here.
Below is a basic guide of the features on the home screen. There will be section further down that go into more detail on some of the sections. Keep in mind that not all options are available in all Site Modes.
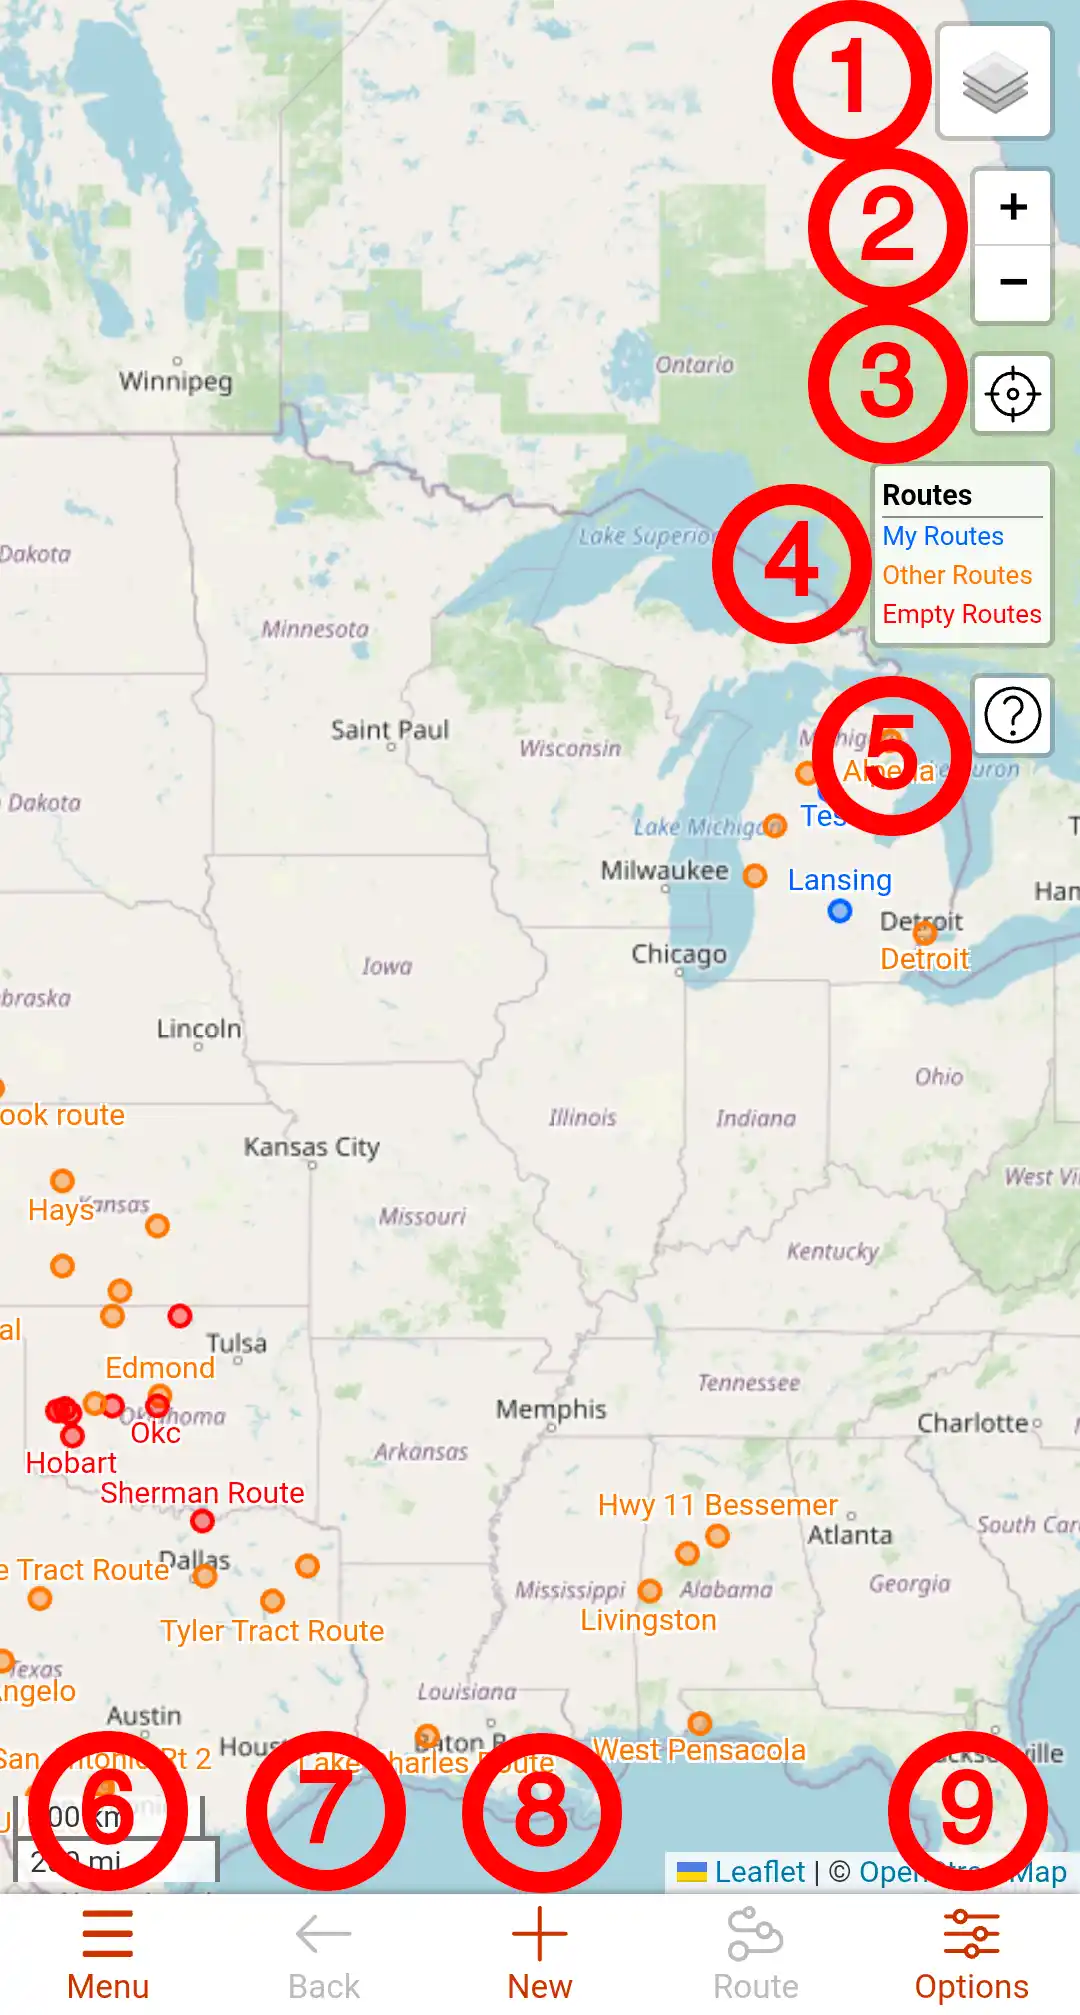
- Layers Control
- Zoom Control
- Geolocation Control
- List View
- Help Button
- Index
- Menu
- Map Back Button
- New Point Button
- Route Optimization
- Options Menu
All the stop markers and route lines are clickable and bring up actions or data about the feature.
The sections below will give an overview of the features on the Home page.
Menu Bar
The Menu bar is the bar on the top or bottom of tha page depending on the device. On most phones it should be on the bottom of the screen, and most tablets and computers it should be on the top. When on the top, the Menu button will be on the Left side and the remaining buttons will be on the right hand side of the bar.
Menu Button
This button opens the main page menu
Options Button
This button opens the options menu. There are map settings and other features in this menu. There is a section dedicated to the Options Menu further down the page.
Back Button
This will navigate the page back to the main map when viewing a route. This button will be disabled when you don't have a route open.
Route Button
This is for creating an optimized route. There is a section dedicated to routing further down this page. This button will be disabled when you don't have a route open.
New Button
This is for adding a new stop or route, depending on the page you are on. If you are on the main map page it will let you create a new route. When viewing a route, it will allow you to add a stop. Click the button and when it is green, click on the map where you want the stop or route, and fill in the data in the dialog that pops up and submit it.
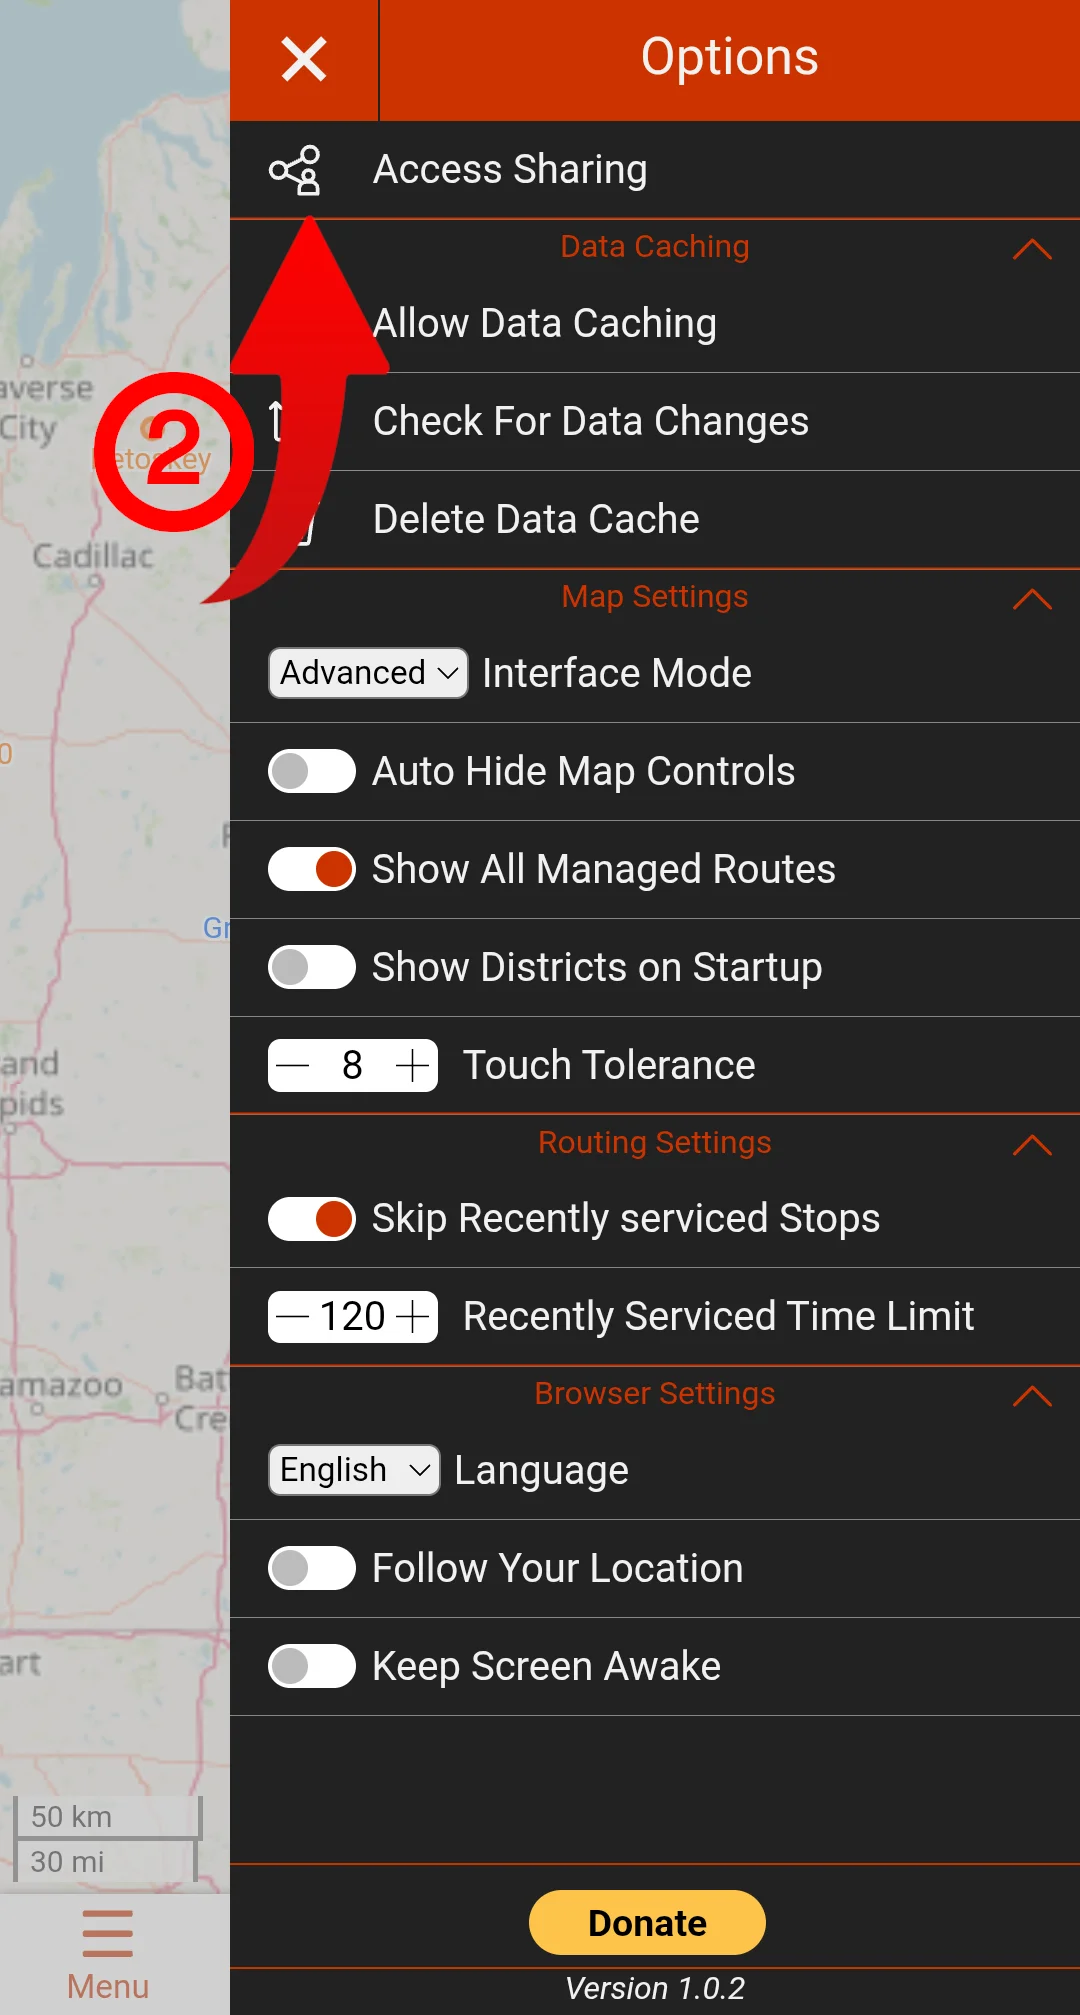
Options Menu
The Options Menu is where sharing, map settings, and other site setting are found. Keep in mind that not all options are available in all site modes.
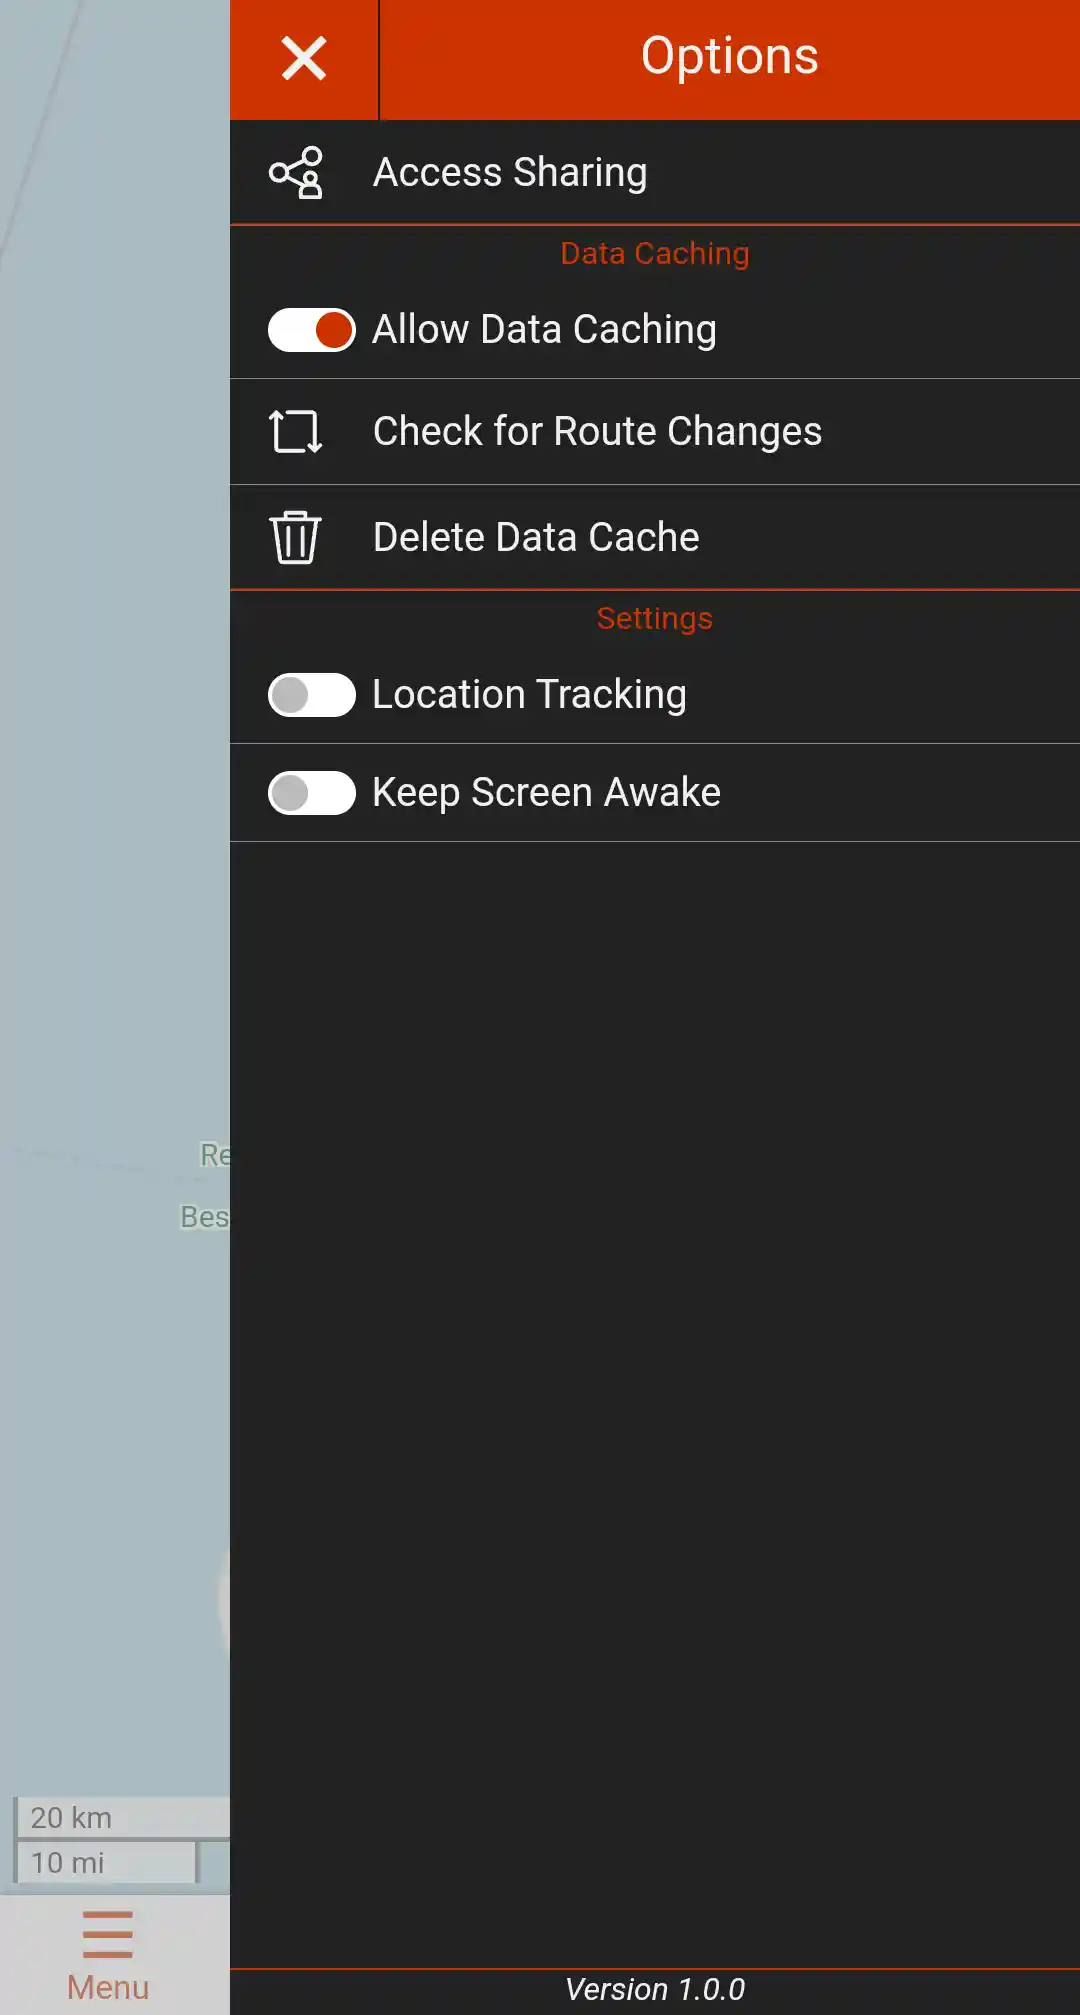
Access Sharing is for sharing the site with others. There is a section dedicated to sharing further down this page.
Data Caching
- Allow Data Caching will let the site store data on your device to speed up the site and allow limited offline use.
- Check For Data Changes will force the page to reload some of the data and make sure the rest isn't outdated.
- Delete Data Cache will delete all the data stored on your device. This can be usefull if you are having a hard time loading a route or to resolve other loading issues.
Map Settings
- Interface Mode lets a user chose between 3 different site modes:
- Simple: Only displays the basic features, making a simpler interface.
- Default: Include most features except the most advanced ones.
- Advanced: Includes all of the features on the site.
- Auto Hide Map Controls will set weather or not the Right side on screen buttons will hide when clicking the map.
- Show All Managed Routes sets whether the site will open all of your managed routes any time you open a route, or not. Only the current route can be edited. This can cause permormance issues if you have a lot of routes.
- Show Districts on Startup forces the site to display the tract districts as soon as the page loads.
- Use Smooth Zooming changes the way that scroll wheel zooming works. This is especially useful on macOS.
- This is only available on devices where a scroll wheel is present.
- Touch Tolerance allows a user to change the sensitivity of the onscreen elements such as points and route lines.
- This is only available on mobile and other devices with a touch interface.
Routing Settings
- Skip Recently Serviced Stops will force the site to skip stops that have been recently serviced when optimizing a route.
- Recently Serviced Time Limit sets the age at which stops are considered to be recently serviced.
Browser Settings
- The Language option will change the language of the main parts of the site. At this point the Help page will stay only English due to the complexity of translating it. If another language is needed for the site, reach out through the Support page
- Follow Location will keep your location centered on the map when you are using the geolocate feature.
- Keep Screen Awake will keep your screen awake while using the geolocate feature. This feature is not available on all devices.
Dontations are welcome, but not required.
Sharing Dialog
This dialog allows you to share access to the site with others. This can be used to give someone access to your routes even if they already have an account. Sharing a link can set someones account to be an admin even if they already have an account.
- Click the Options button in the Menu bar to open the Options menu.
- Click the Access Sharing option in the Options menu.
- Select any routes you wish to share. This is optional unless you are giving a person access to a route.
- Click the Share button.
- Use your browsers sharing options to send the link, or copy it to share some other way.
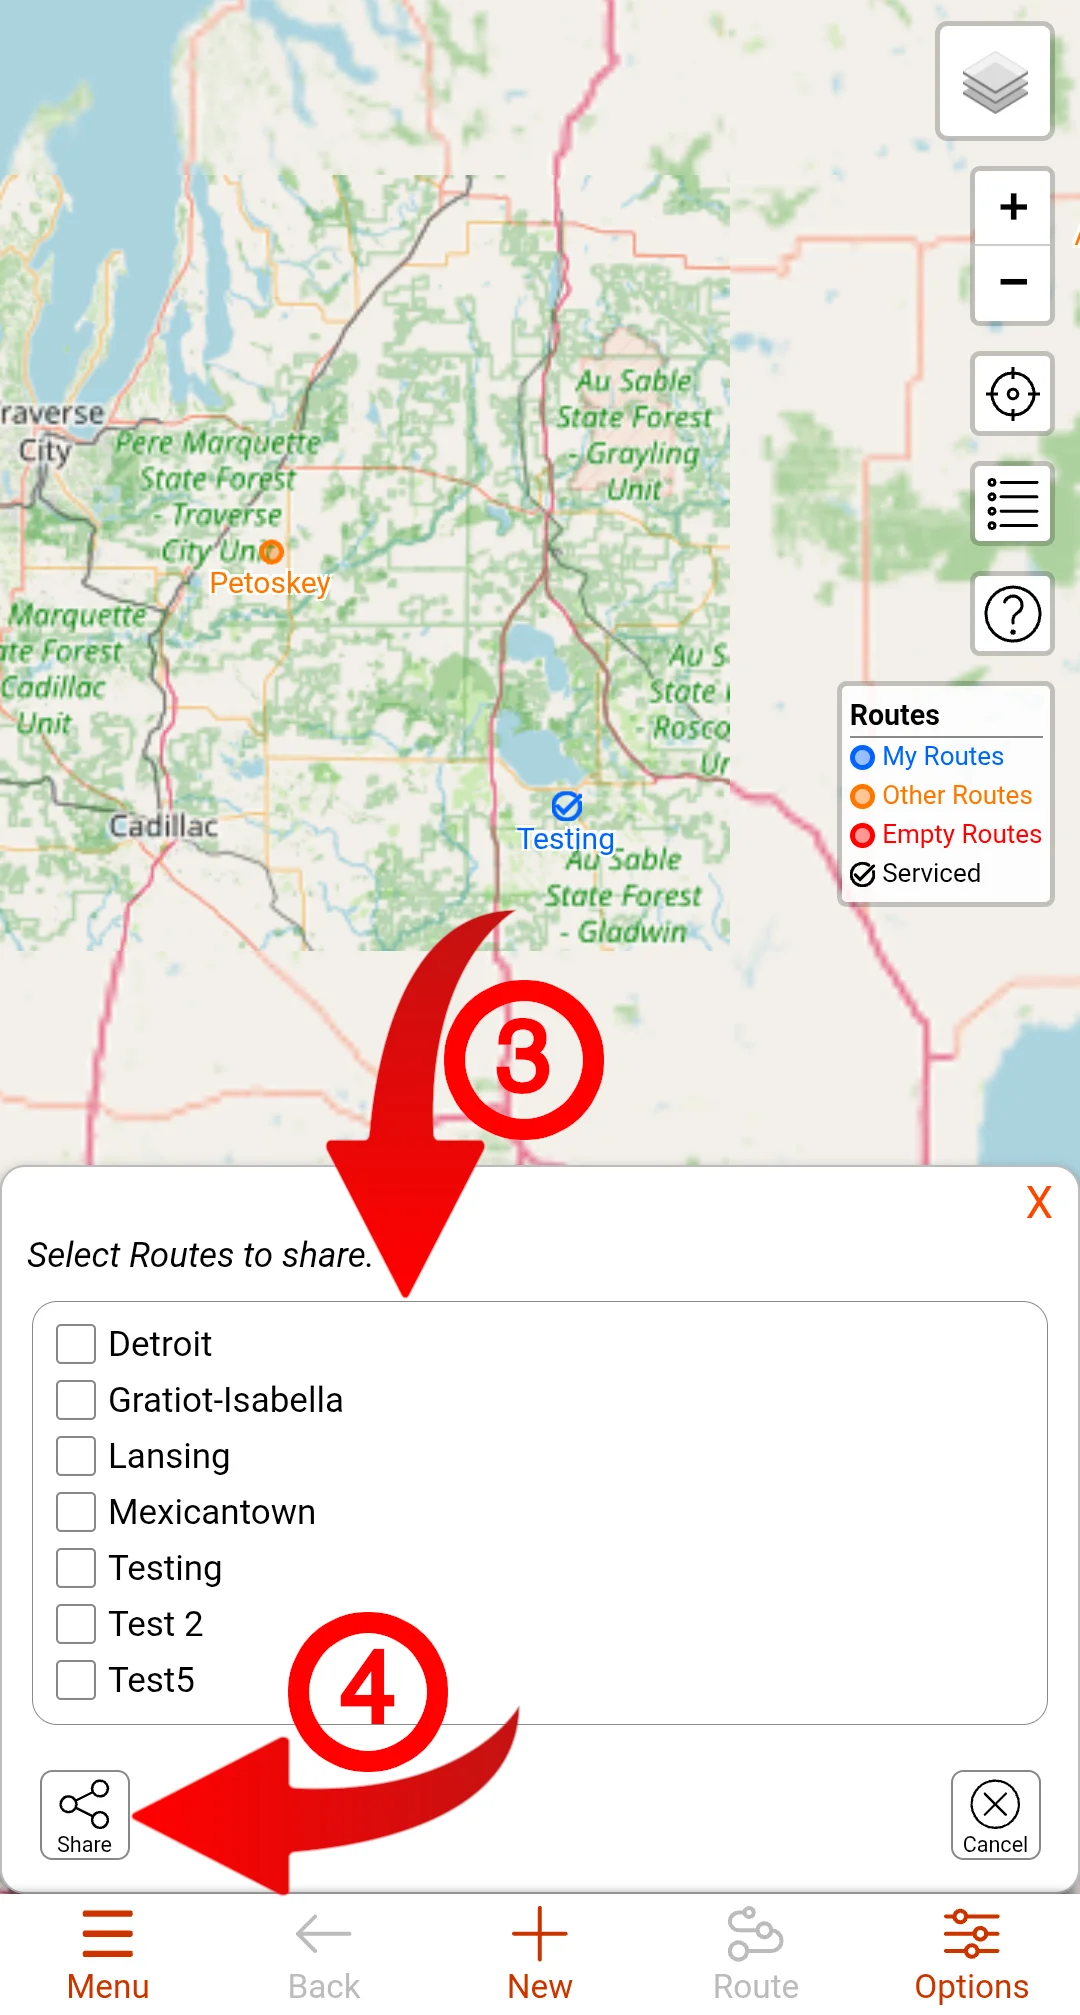
These links expire in 10 days, and can be passed on to multiple people unless you share a route, in which case, they are single use links and can't be passed on, but still expire in 10 days.
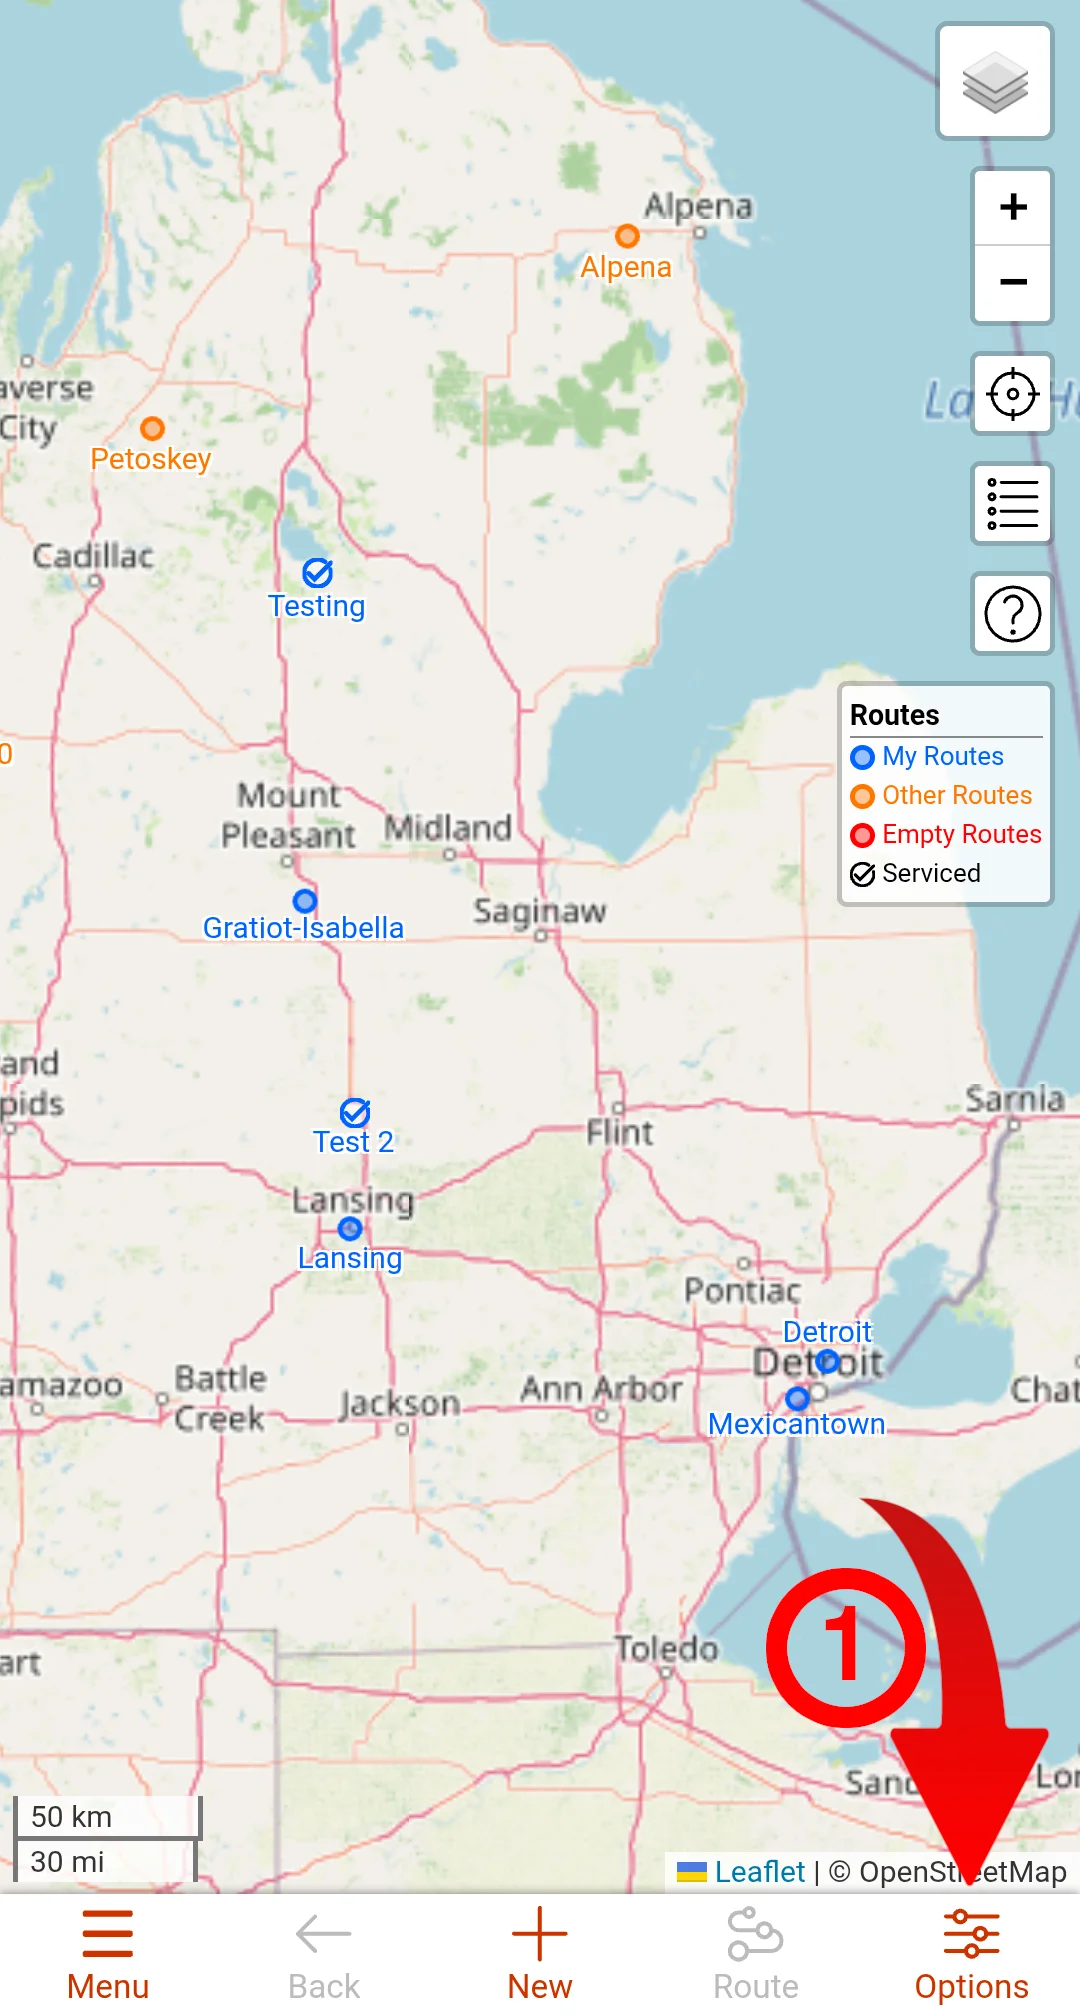
Routes
When you are on the main map, you can view all the routes that are on the site. You can tell which map you are viewing by looking at the Index control on the right side of the screen. If you are on the Main map, it will say Routes on the top, otherwise it will have the name of the Route you are viewing. The Index will also have the colors for the Route types.
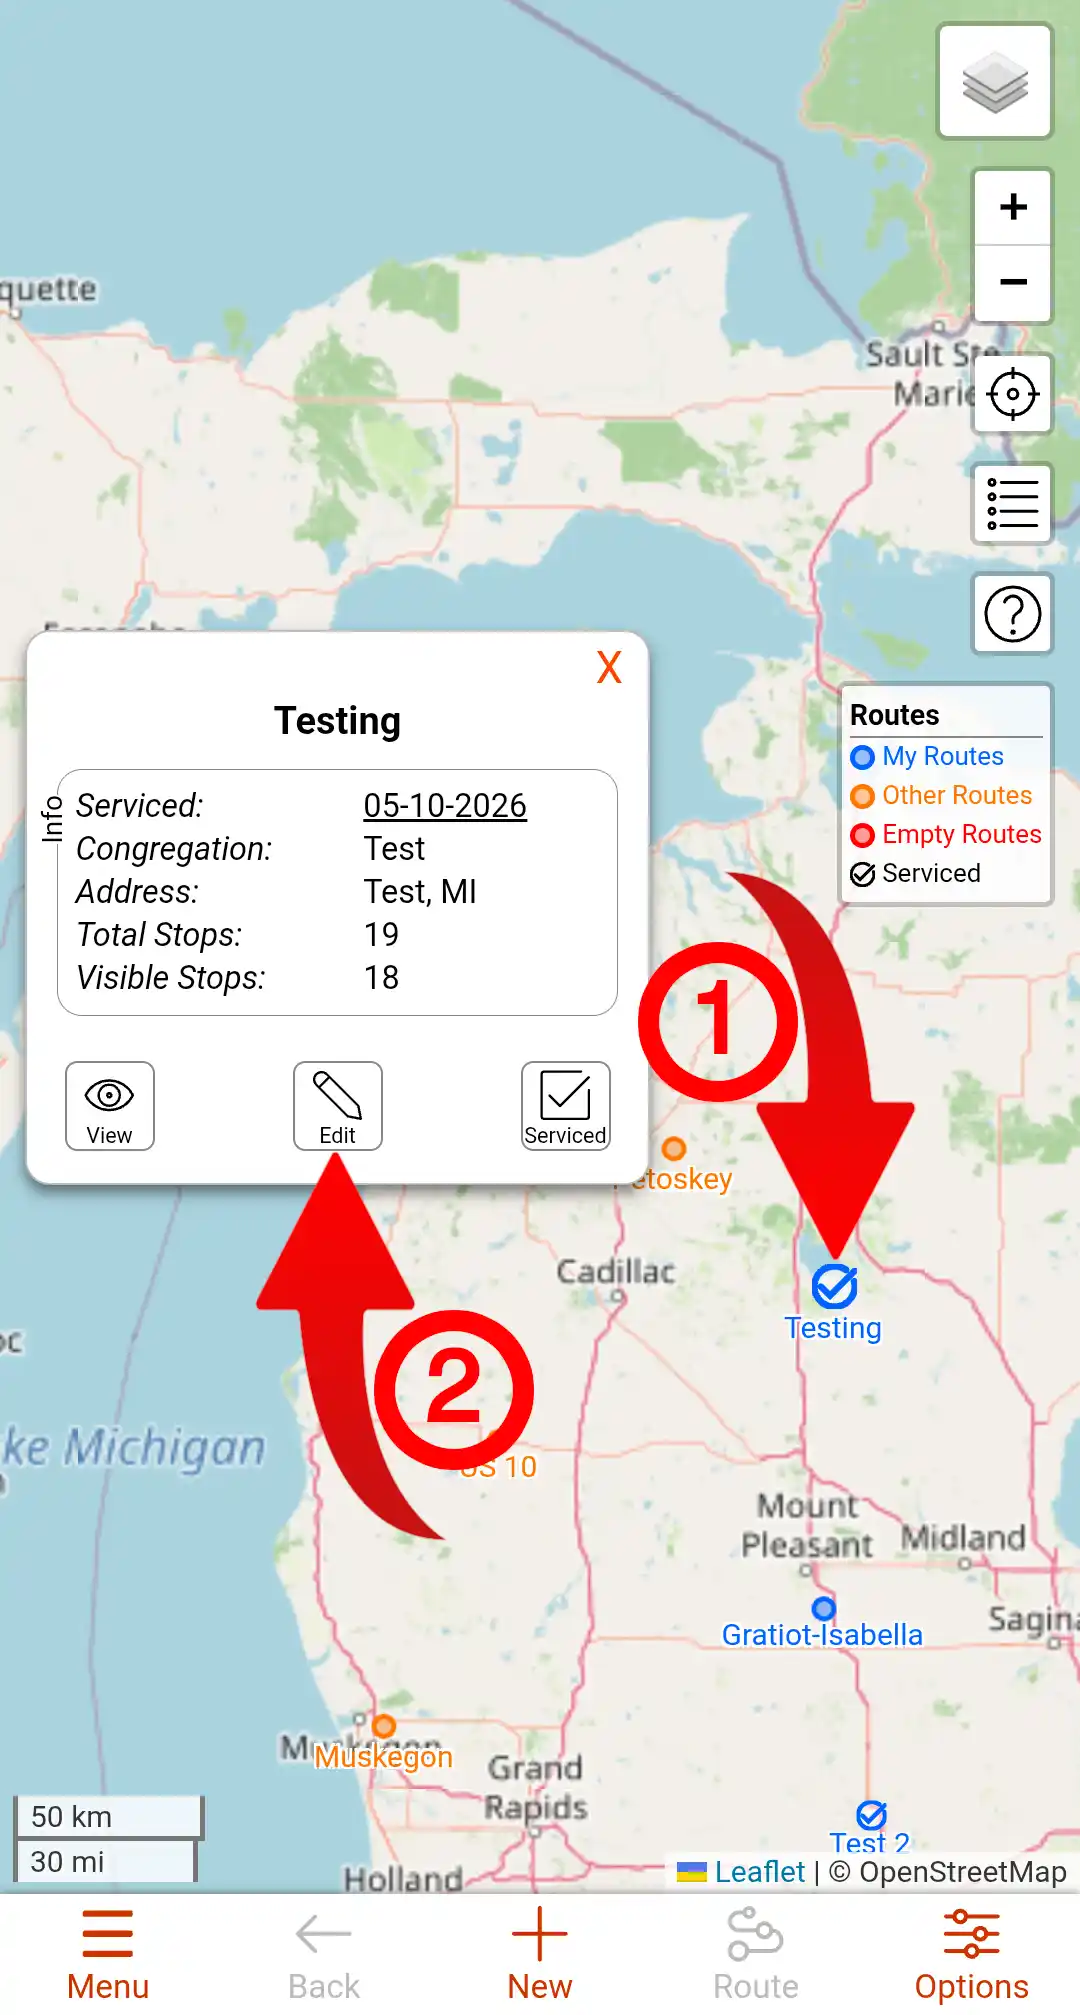
Route Dialog
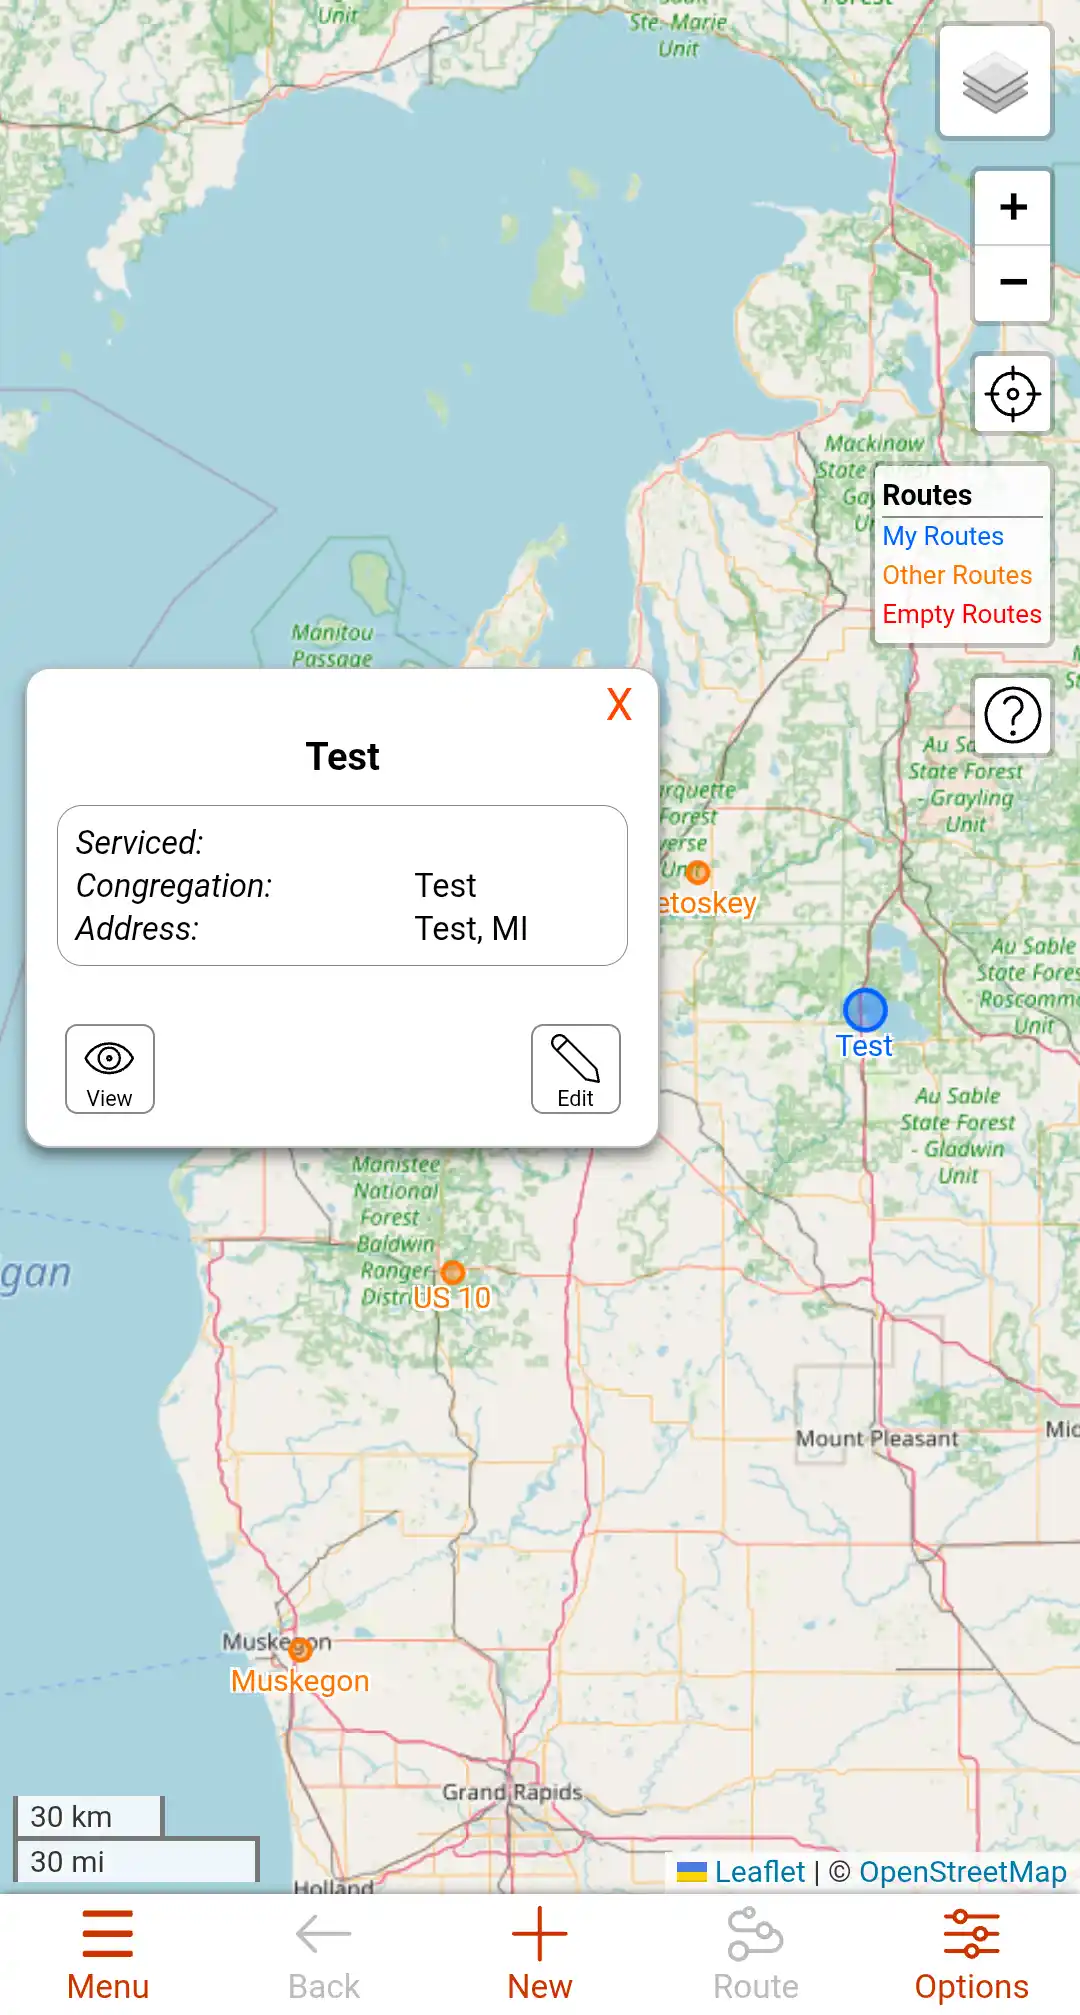
Clicking on any point while on the main map will make that point a little larger and will open a route dialog. The image above is of the dialog that opens when you click on a route that you manage. When clicking on a point for a Route that you don't manage, the dialog will look a little different due to you having less access to that route.
The first section in the route dialog is the details section. It has the last serviced date, along with any information entered for that Route and also the number of total stops and visible stops. This data can be entered or edited by using the Edit button on the bottom of the Route dialog.
The Serviced button will mark the Route as serviced. You can see the past dates when that route was serviced by clicking on the Serviced date in the Info section of the Route dialog.
The View button will open the Route that you have selected.
Opening a Route
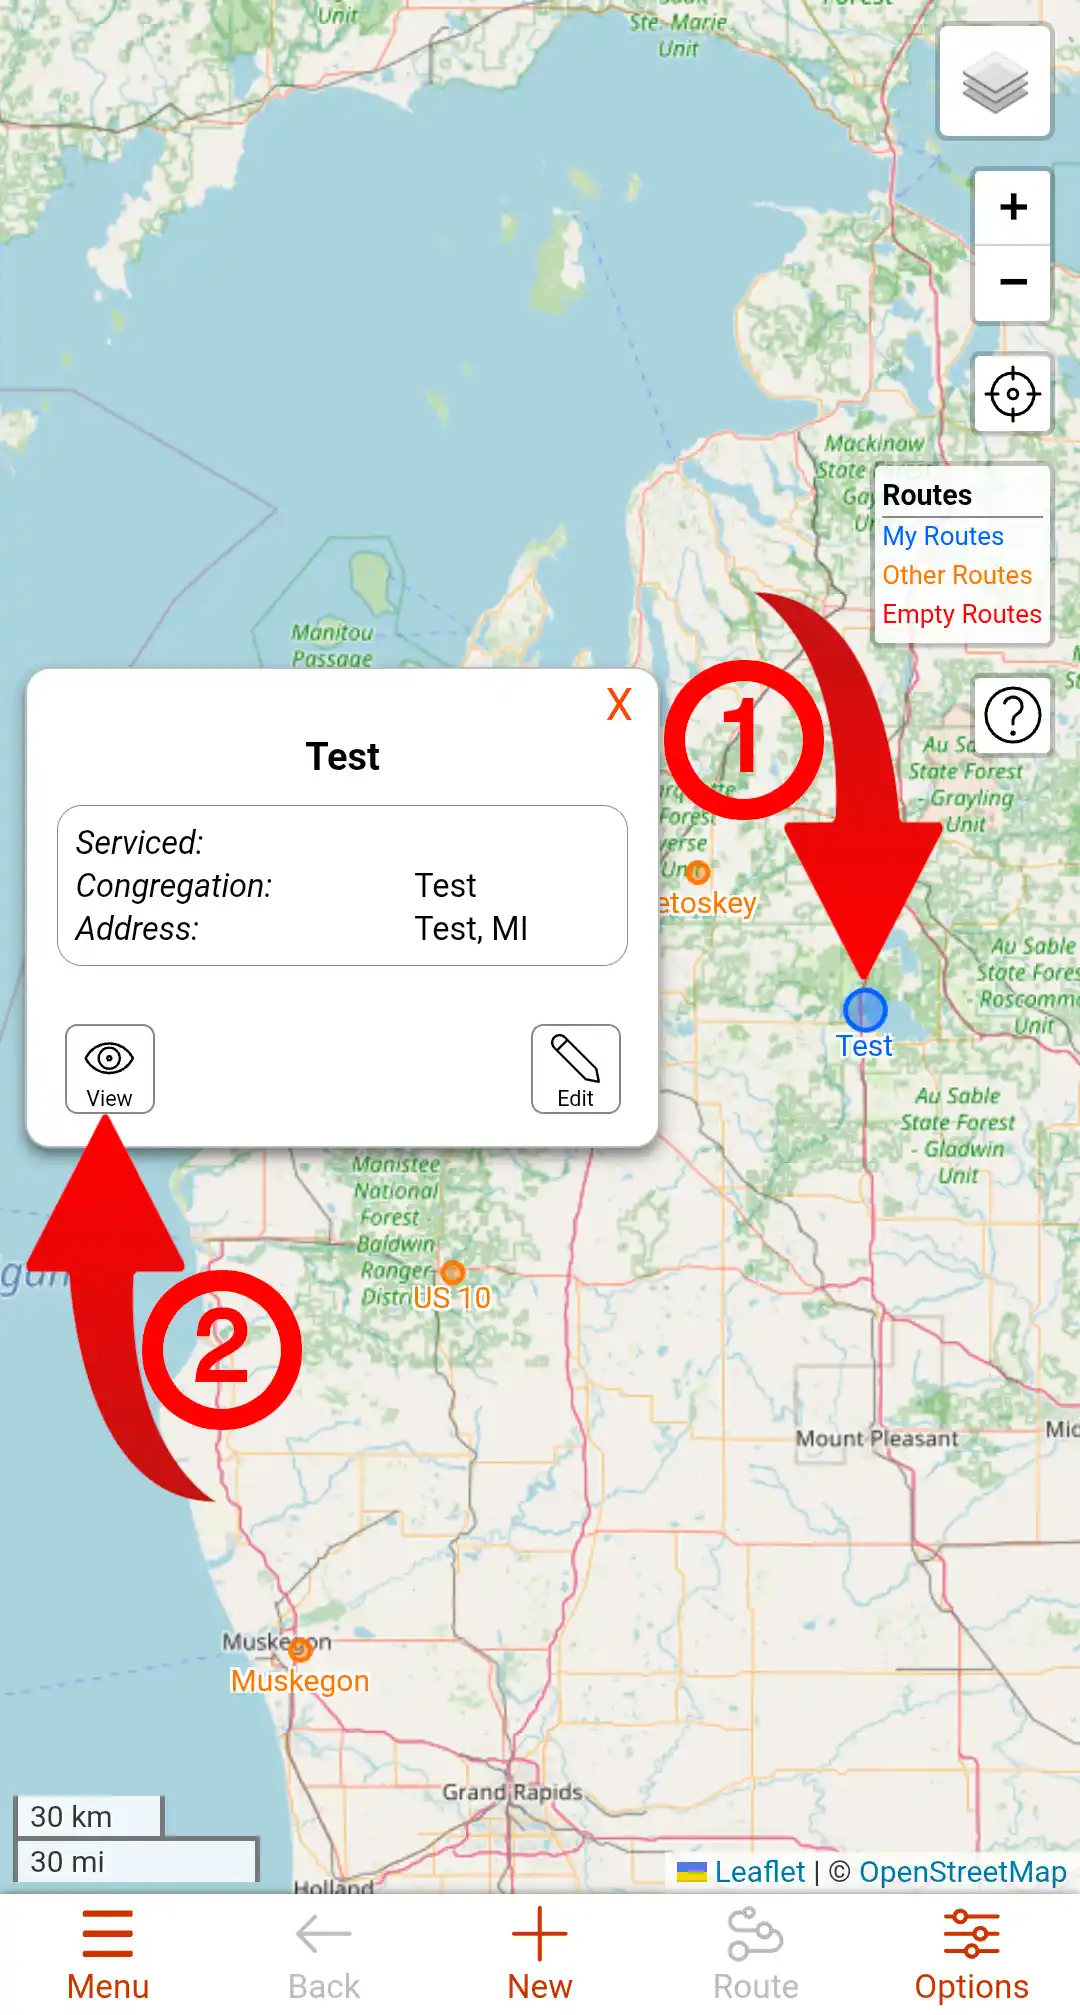
To open a route, click on the point for the route you want to open, then click the View button in the dialog that opens. For details on the adding and managing stops within a route you can read the sections about stops below.
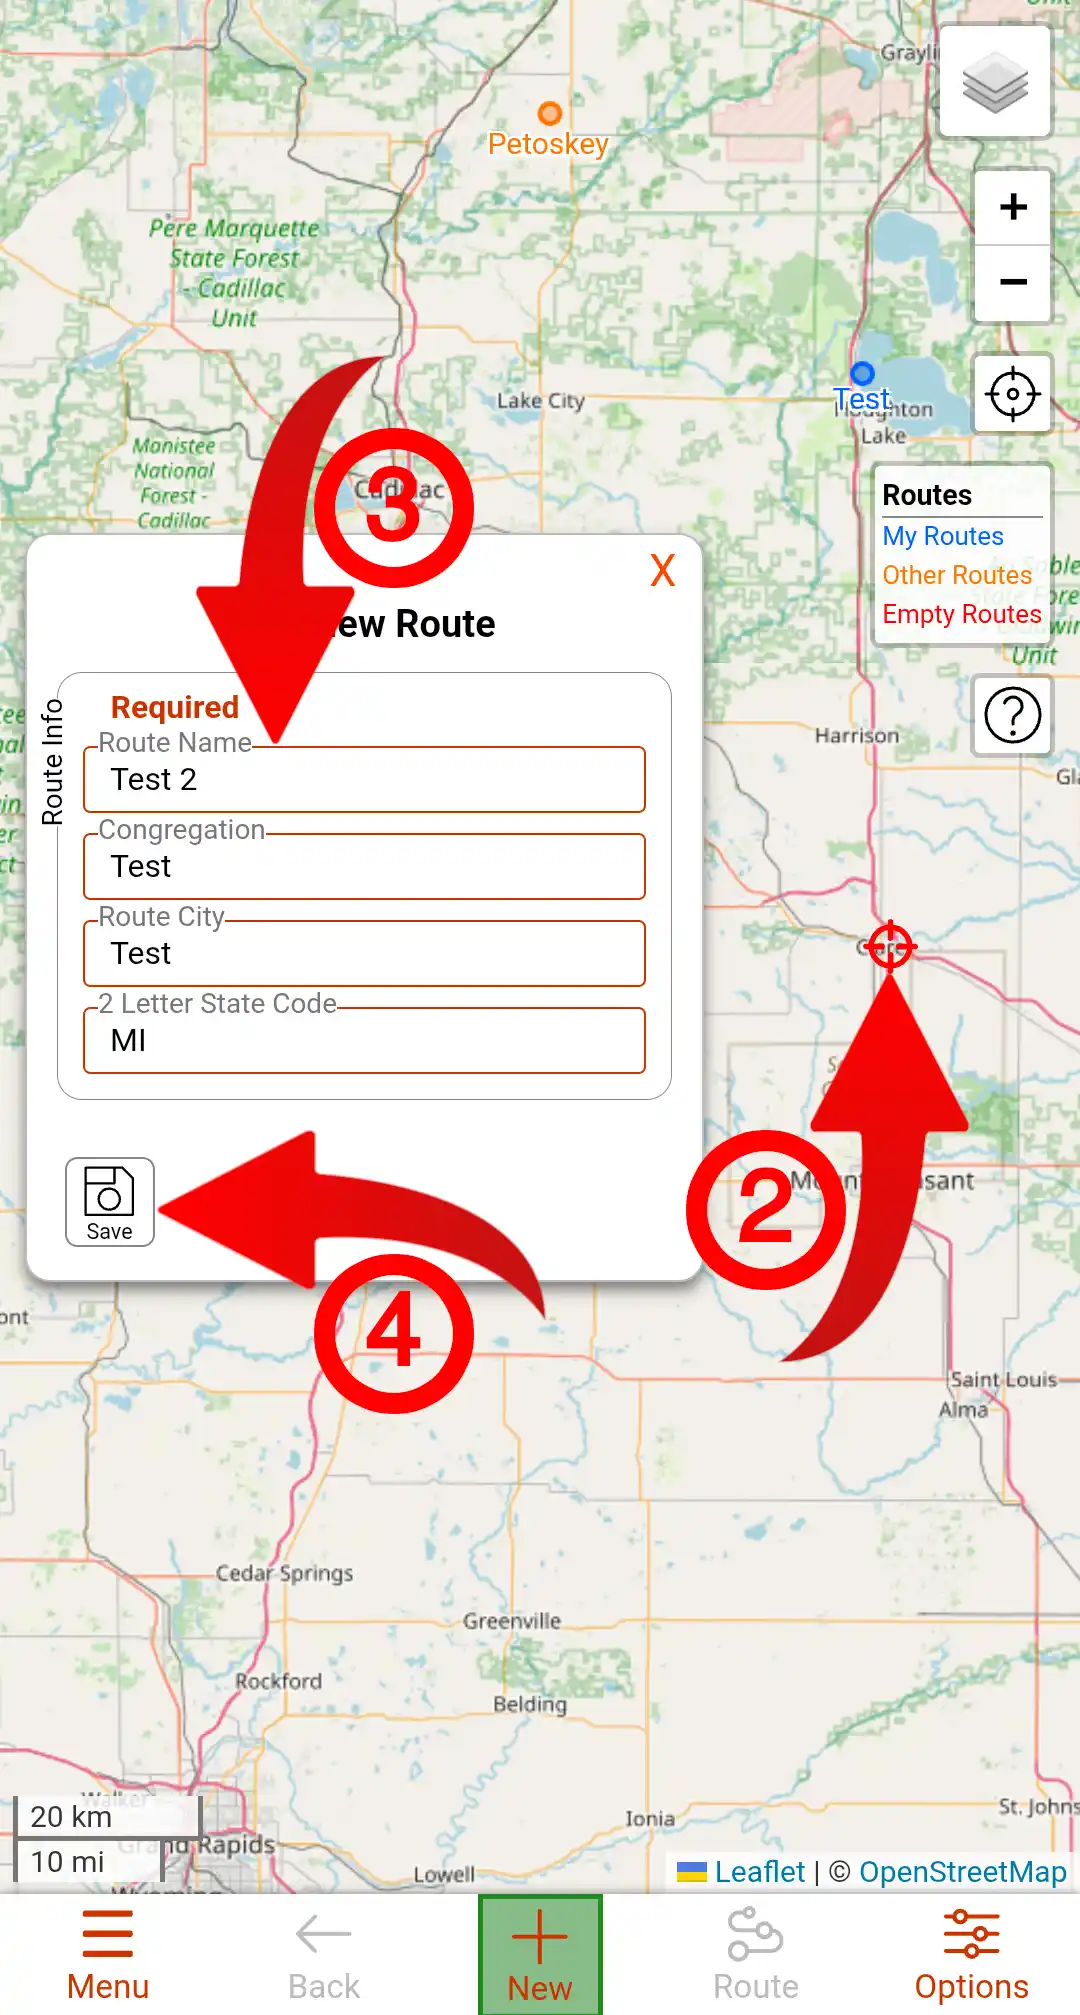
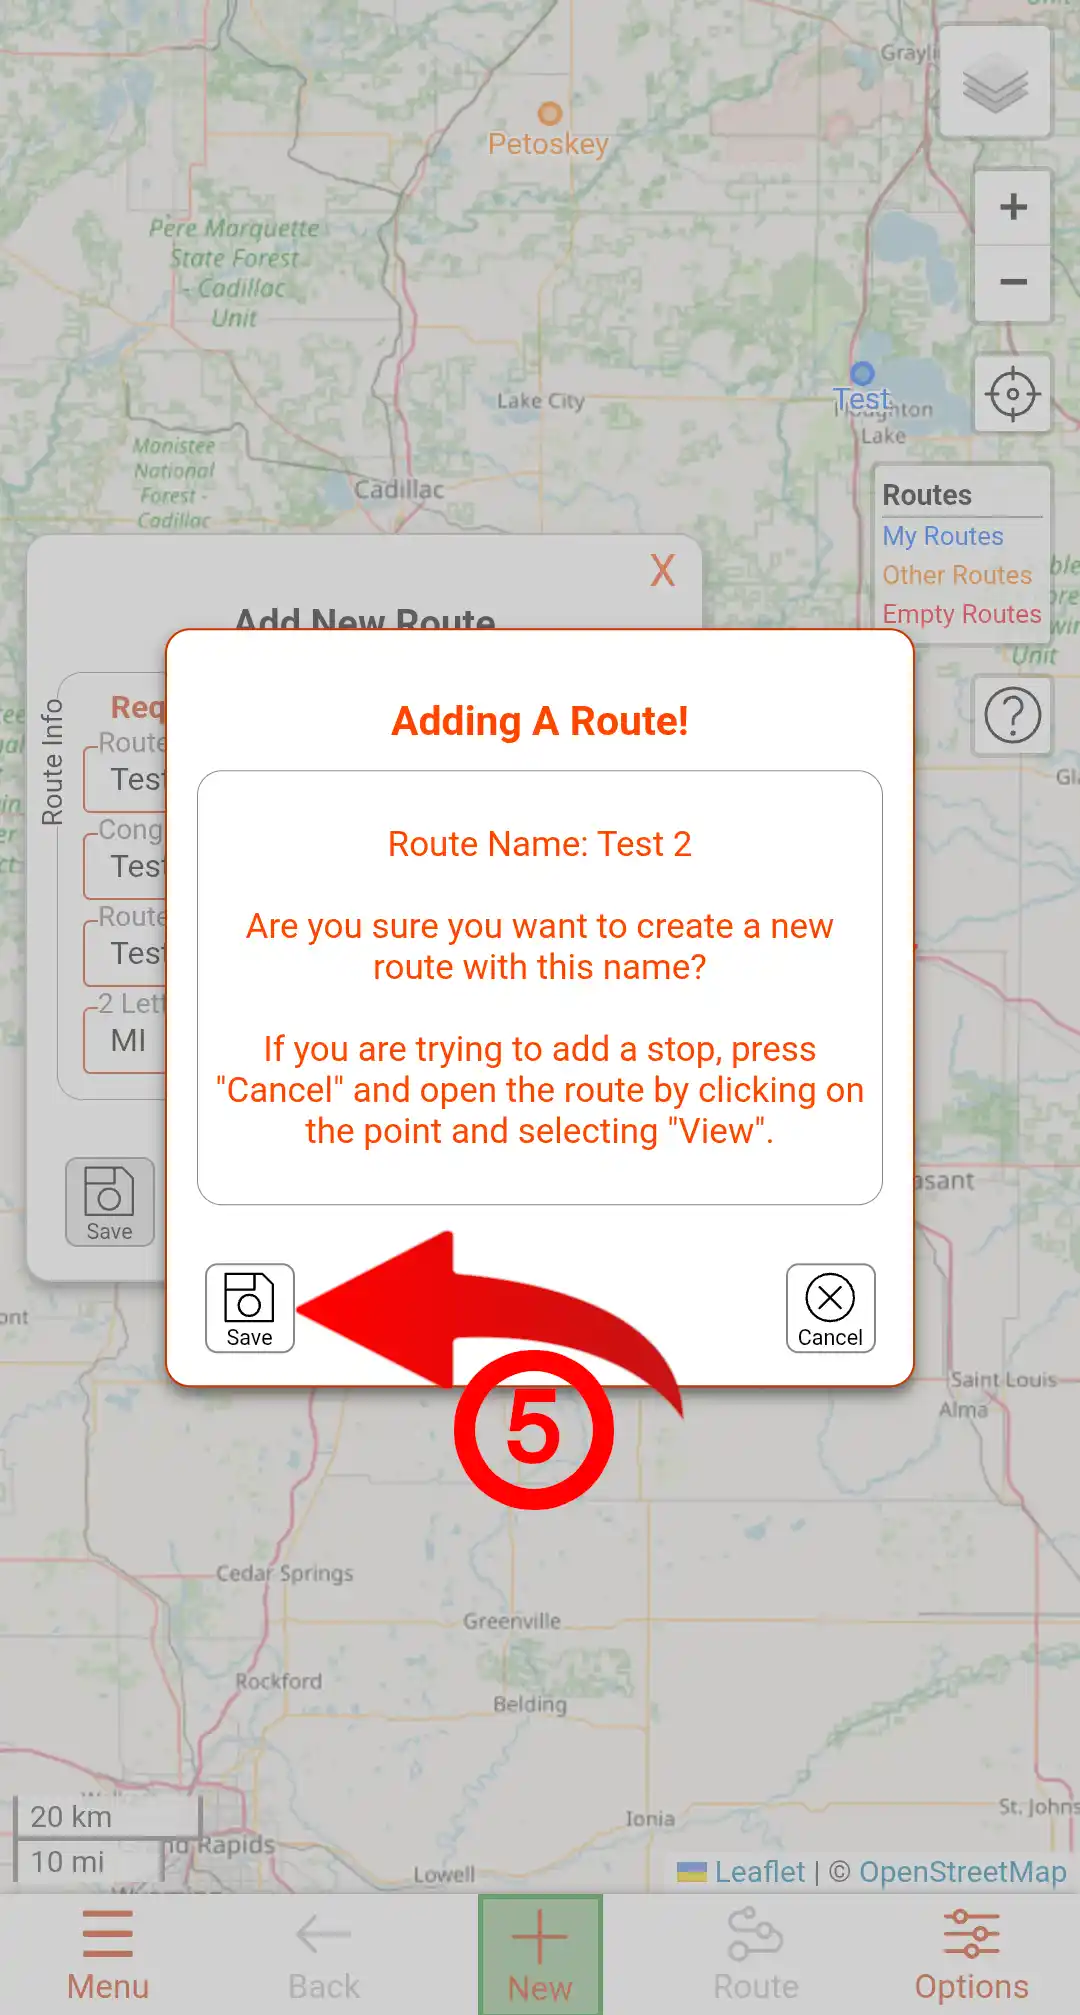
Adding a New Route
To add a new Route you must start on the Main map. If you are not on the main map you can get there by clicking the Back button on Menu bar.
Follow the Step-by-Step instruction below to create a new Route.
- Click the New button in the Menu bar. It should turn green. Clicking it while it's green will turn off the route adding workflow.
- Click on the Map in the general location where you want the Route to be. This does not have to be precise.
- Fill out the information in the dialog that opens. Any input that has a red outline is required.
- Click the Save button.
- Verify that you do want to add a new Route by clicking the Save button in the new dialog that opens.

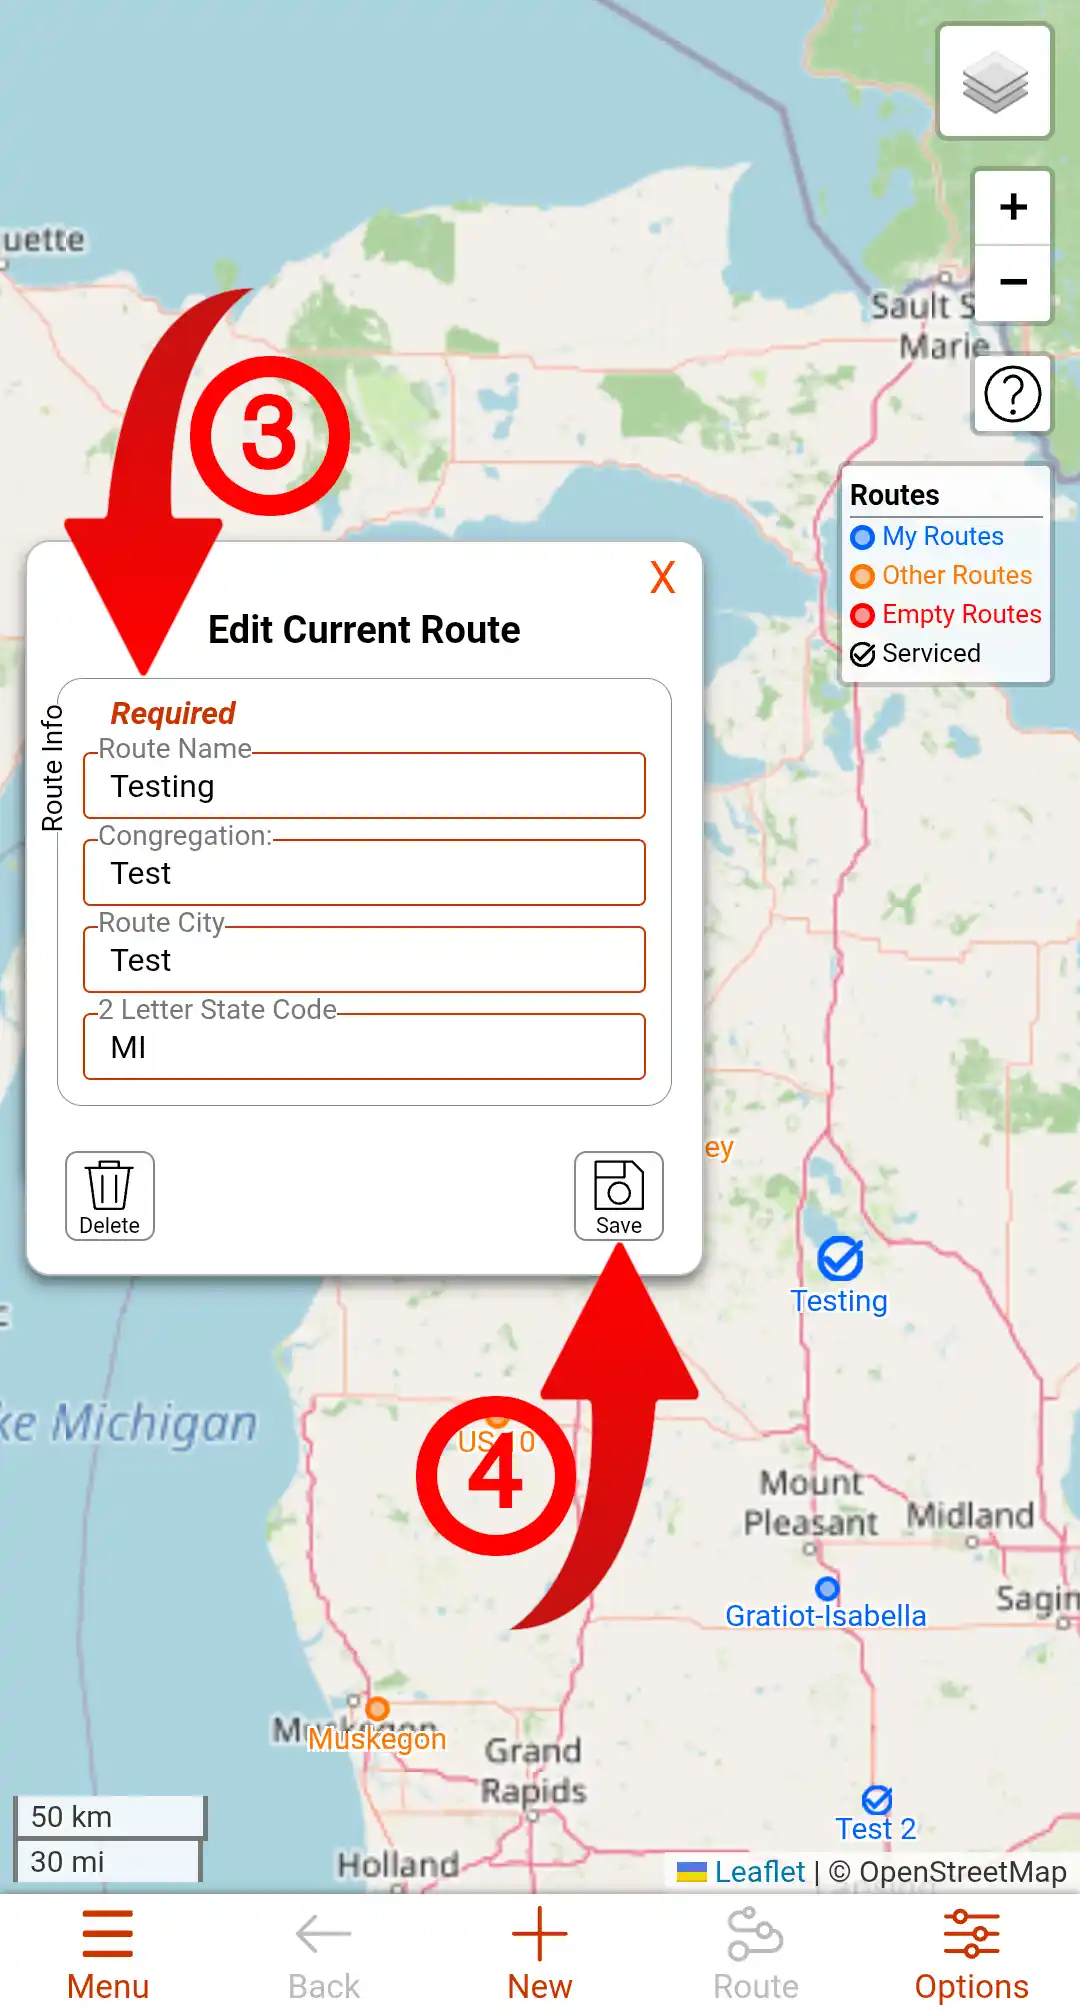
Editing a Route
To Edit a Route you must start on the Main map. If you are not on the main map you can get there by clicking the Back button on Menu bar.
Follow the Step-by-Step instruction below to edit a Route.
- Click on the Route point of the route you want to edit
- Click the Edit button on the dialog that opens.
- Make any changes to the info in the Edit dialog that opens
- Scroll down the Edit dialog to the bottom and click the Save button.
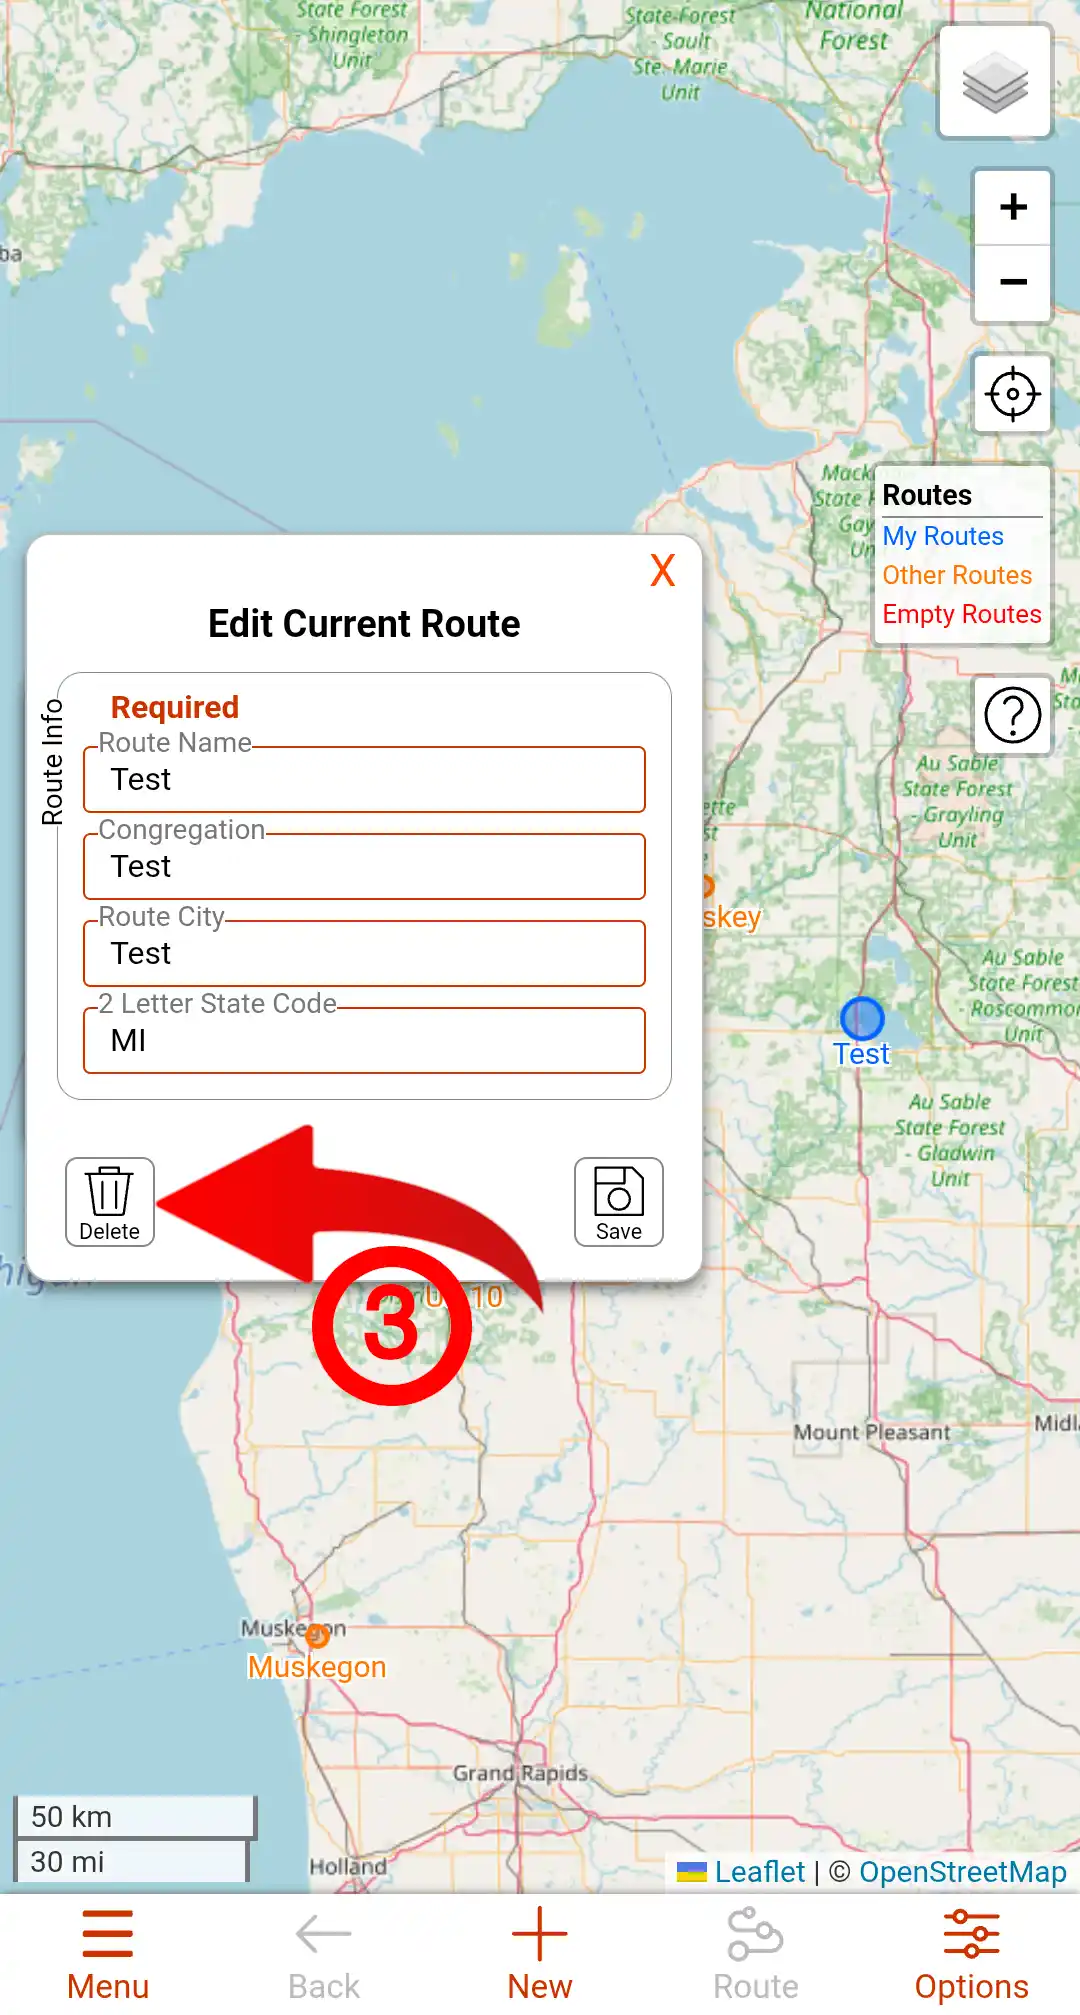
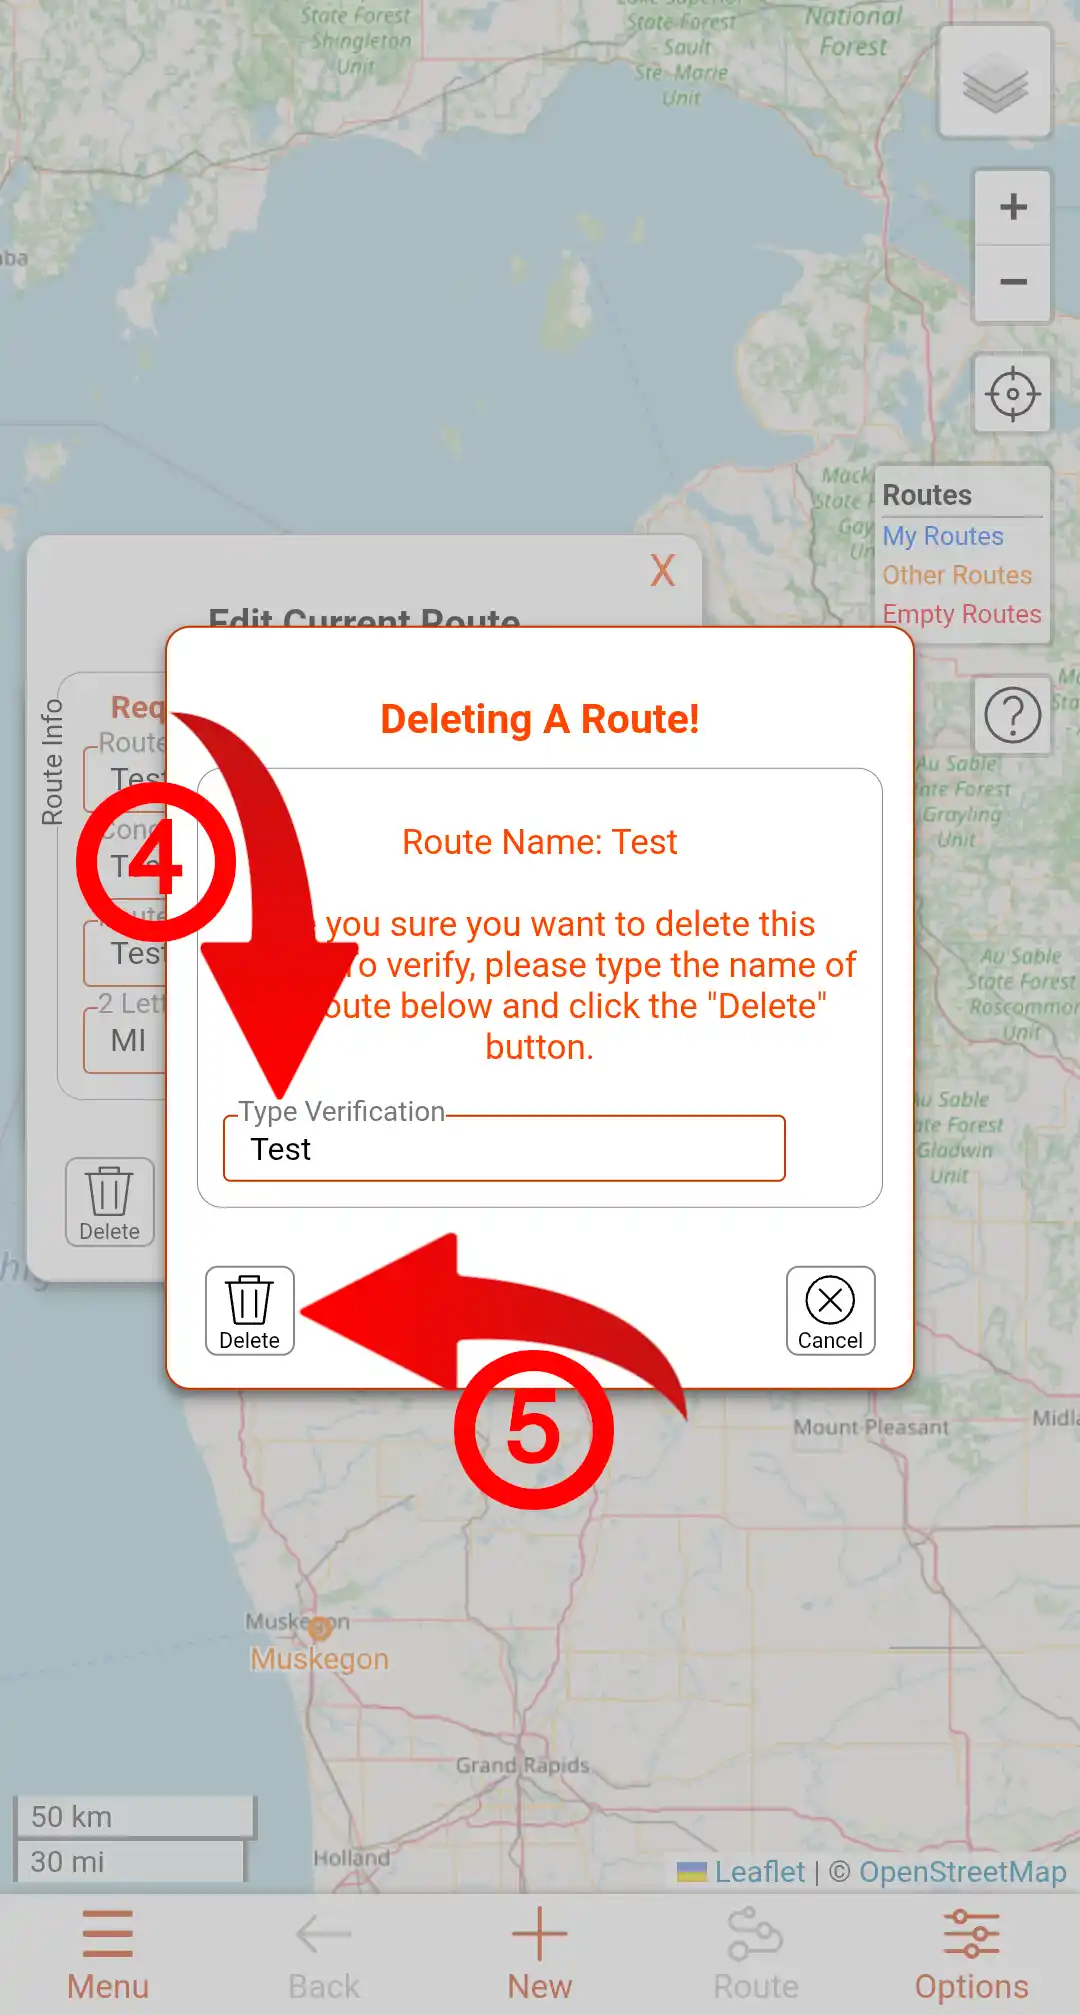
Deleting a Route
To Delete a Route you must start on the Main map. If you are not on the main map you can get there by clicking the Back button on Menu bar.
Follow the Step-by-Step instruction below to delete a Route.
- Click on the Route point of the route you want to delete.
- Click the Edit button on the dialog that opens.
- Click the Delete button in the Edit dialog that opens.
- You will be asked to type the name of the route as a verification.
- Click the Delete button.

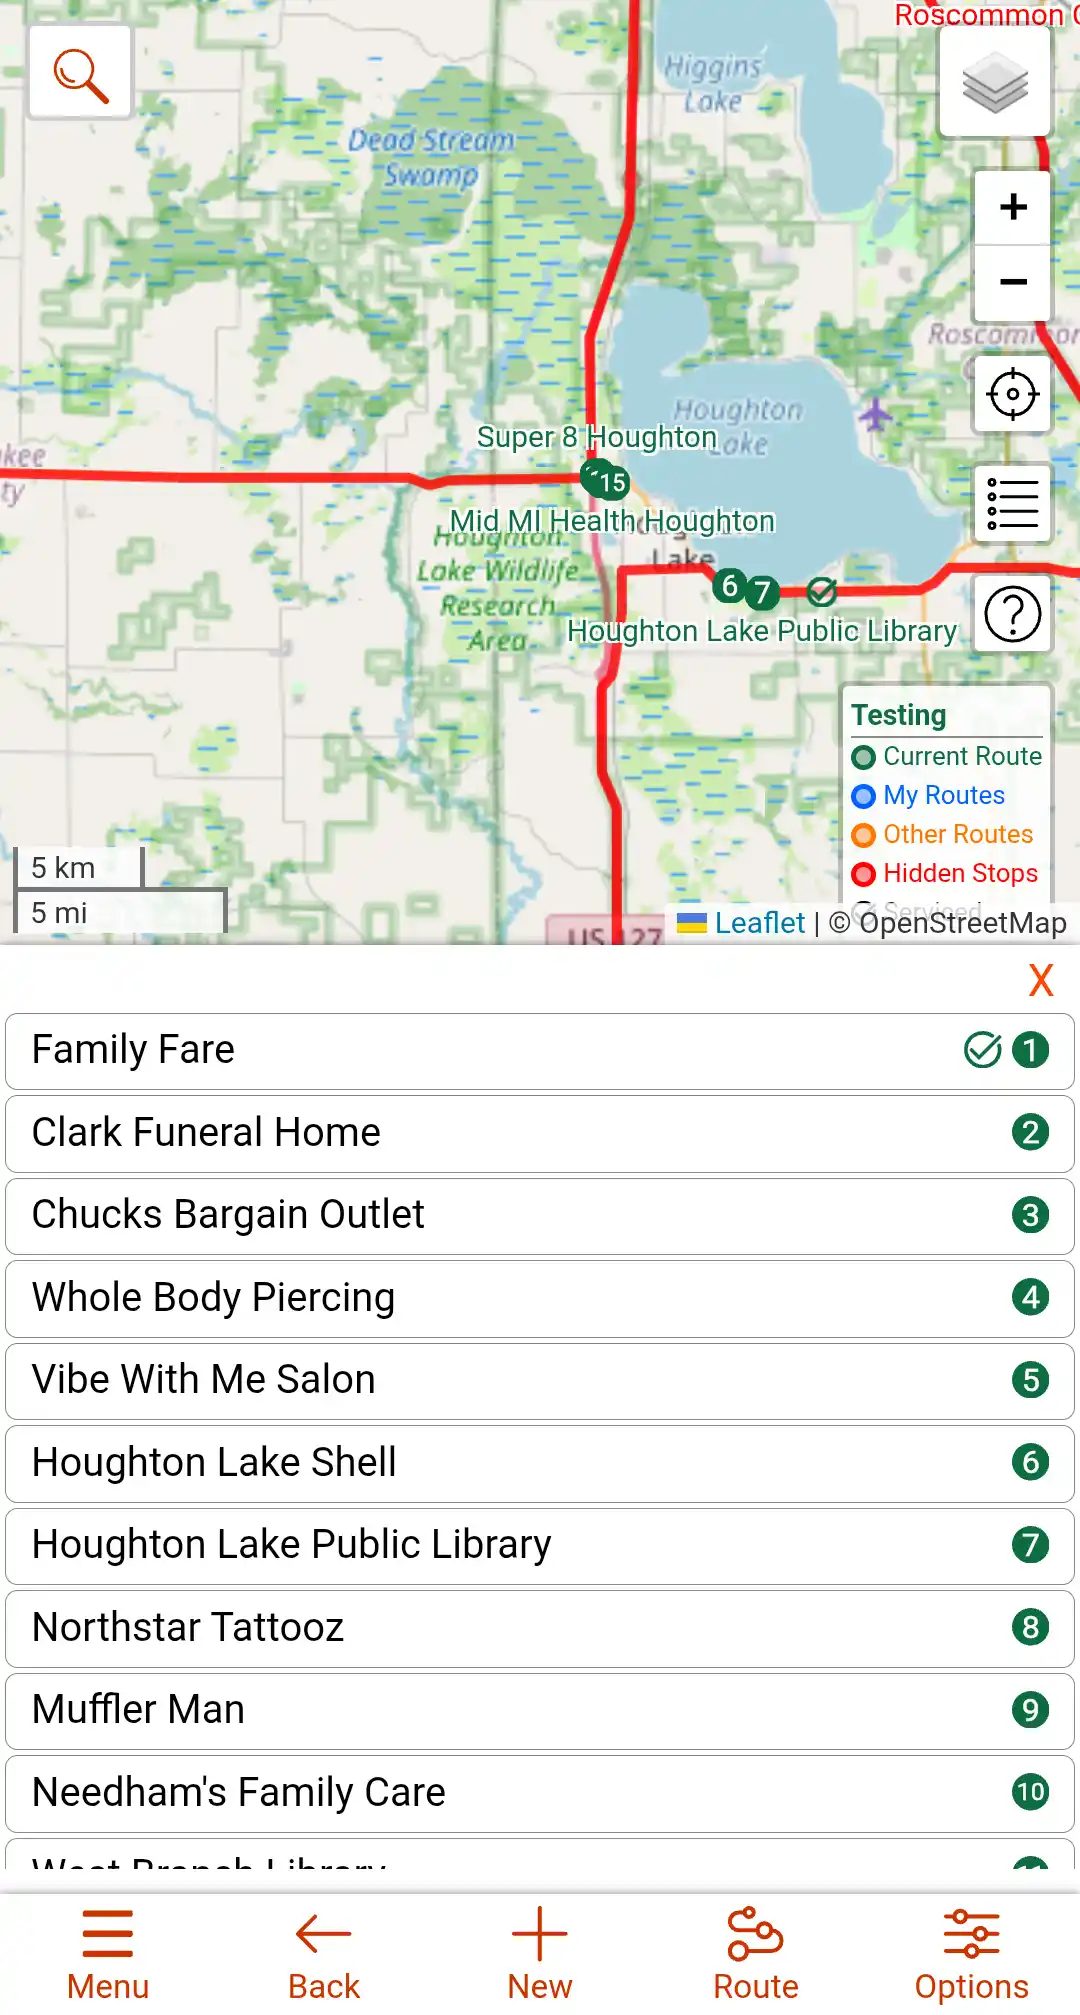
Stops View
The Stops View is the page that shows you the stops within a route.
Below is a basic guide of the features in this view. There will be sections further down the page that go into more detail on some of the features.
- Index
- Map Back Button
- New Point Button
- Route Button
- Search
All the stop markers and route lines are clickable and bring up actions or data about the feature.
The sections below will give an overview of the features on the Home page.
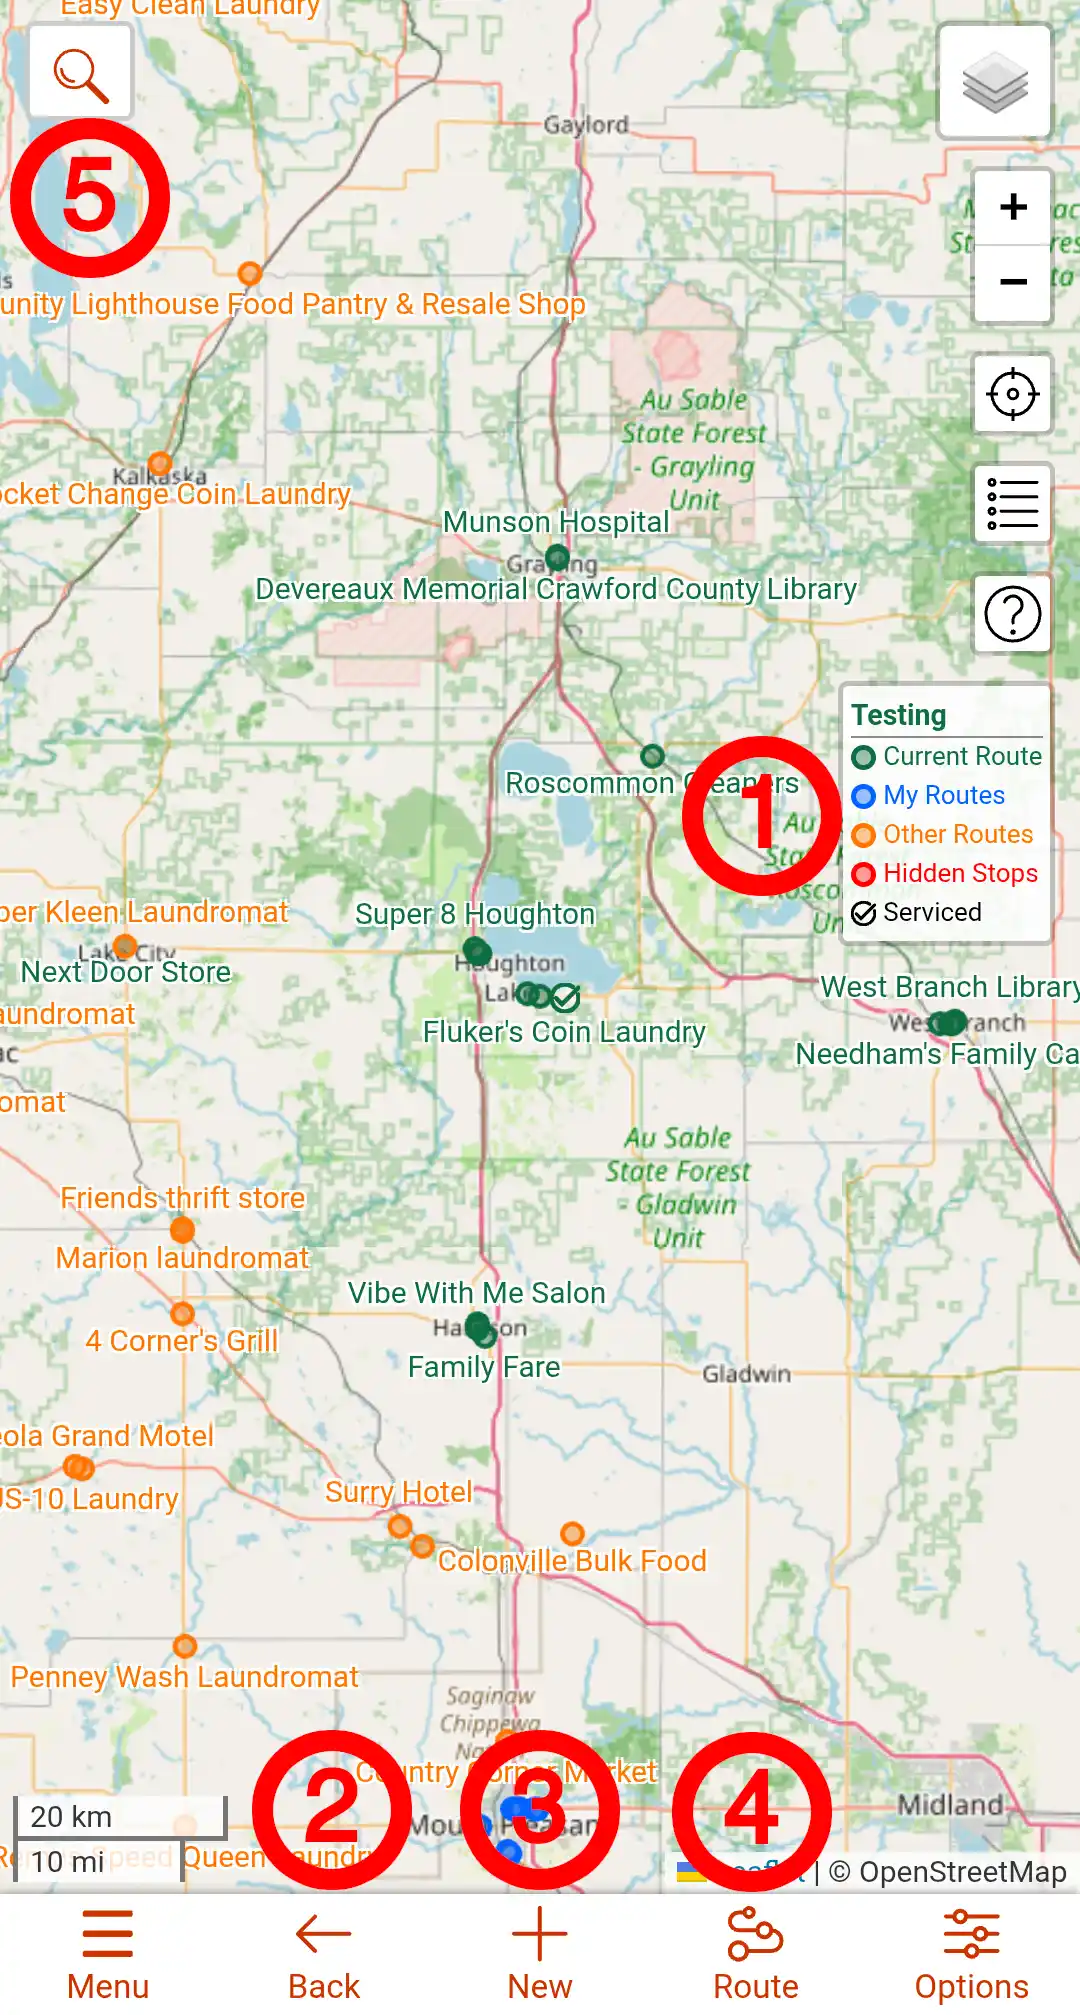
Index
The index shows what the different color points mean and also shows what page you are on. If you are on the main screen it will say "Routes" at the top. When you have a route open, it will have the route name on the top.
Back Button
This will navigate the page back to the main map when viewing a route. This button will be disabled when you don't have a route open.
Route Button
This is for creating an optimized route. There is a section dedicated to routing further down this page. This button will be disabled when you don't have a route open.
New Button
This is for adding a new stop or route, depending on the page you are on. If you are on the main map page it will let you create a new route. When viewing a route, it will allow you to add a stop.
Search Box
This search box allows you to search for and add businesses or other searchable locations to a route. You can search for business names, addresses, and loctaion types, such as "Tire Repair", or "Laundromat". There is more information in the section for Adding a New Stop.
Stops
When you are viewing a route, you can view all the stops that are in that route along with any stops in your other routes and any other routes that nearby. You can tell which map you are viewing by looking at the Index control on the right side of the screen. If you are on the Main map, it will say Routes on the top, otherwise it will have the name of the Route you are viewing. The Index will also have the colors for the Stop types. To open a Stop, start by clicking on the point for that Stop.
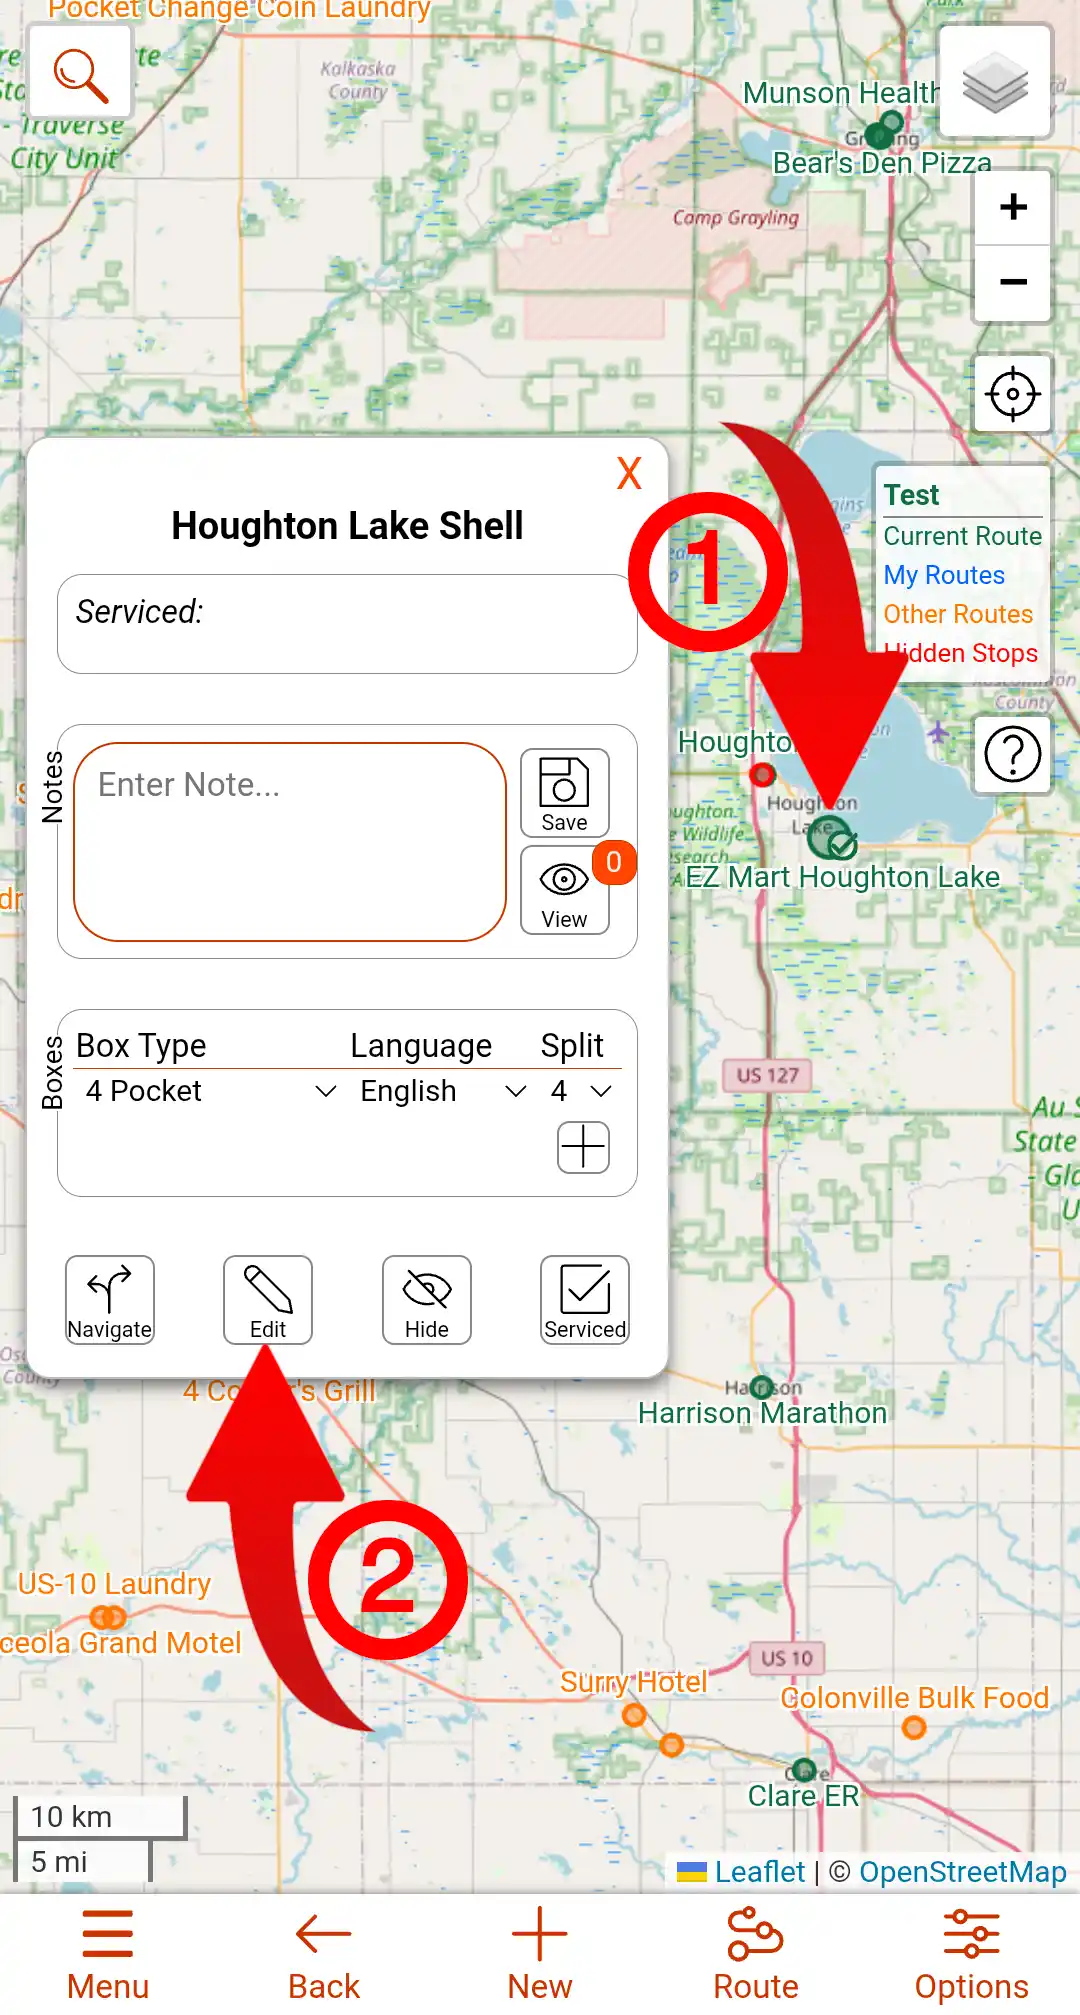
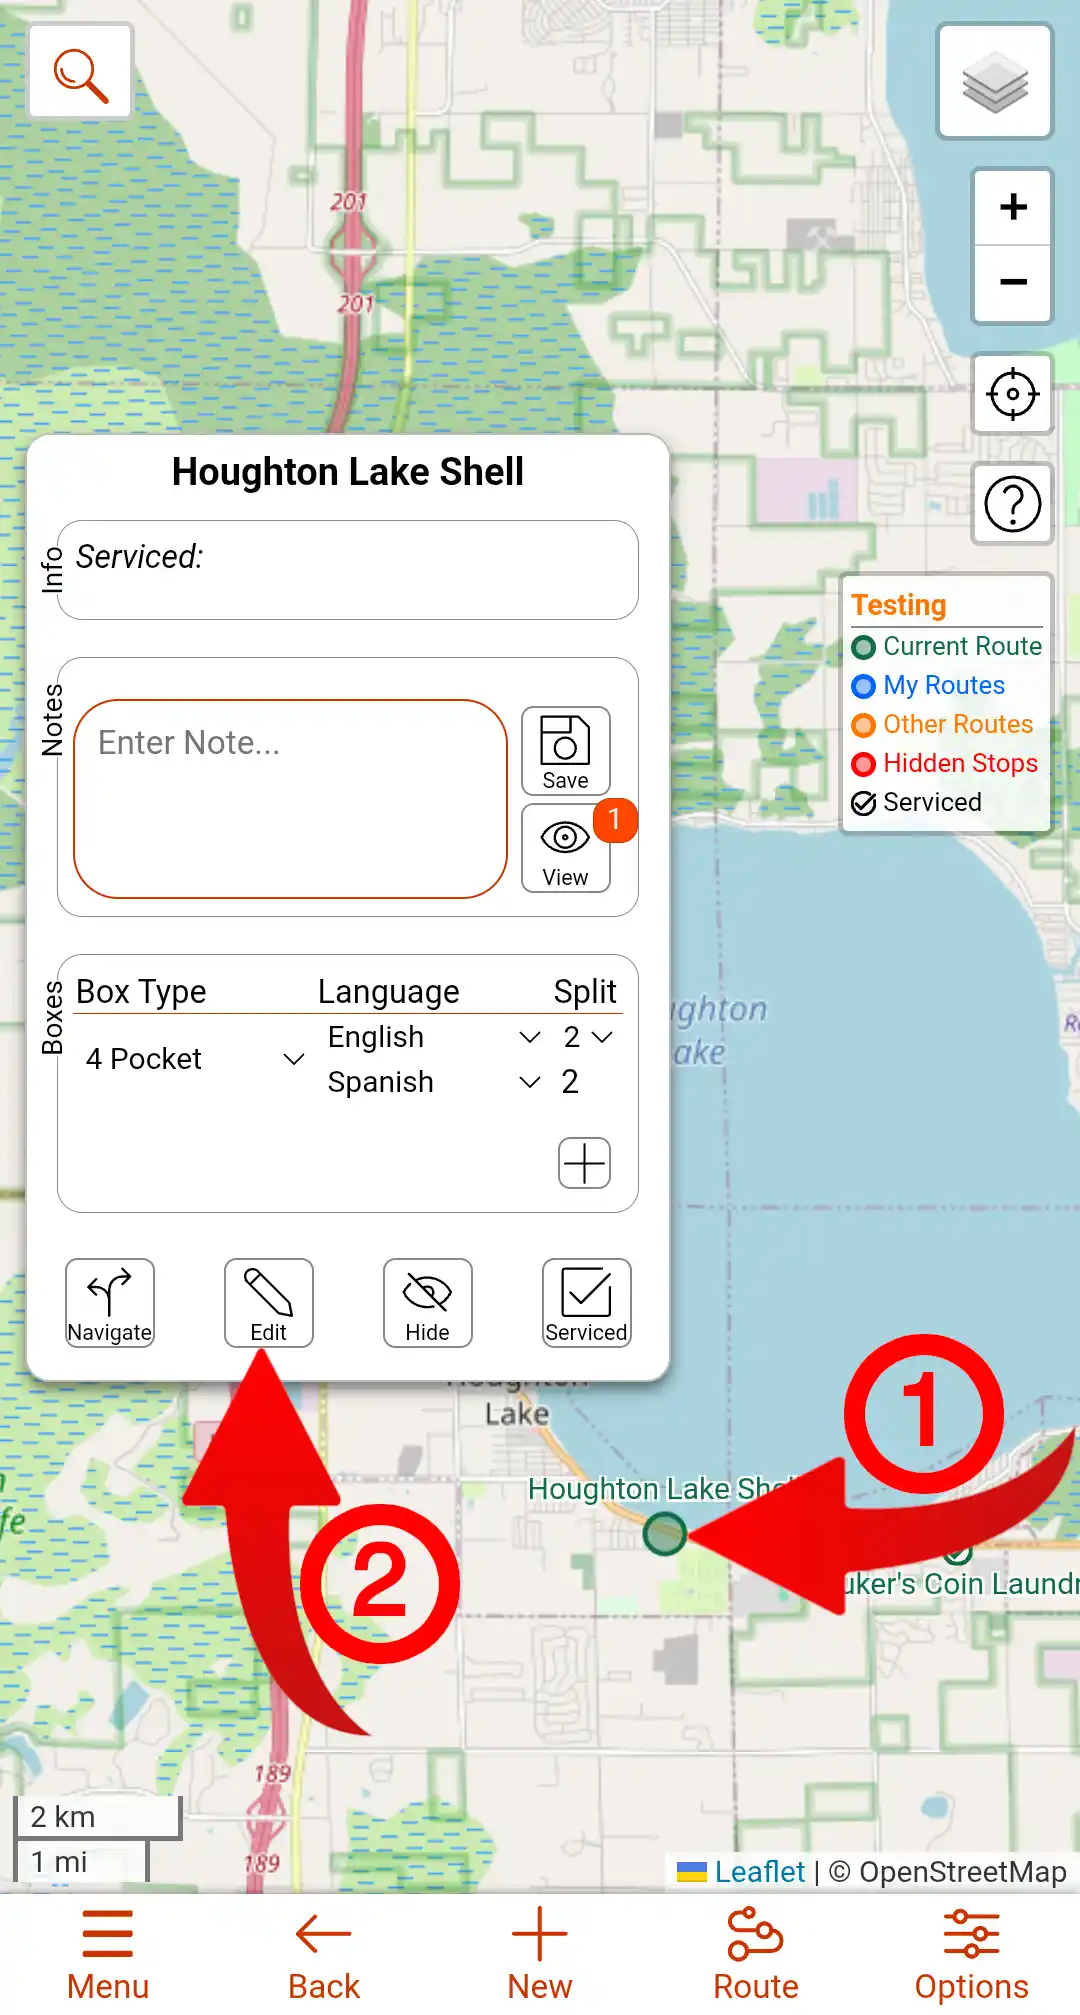
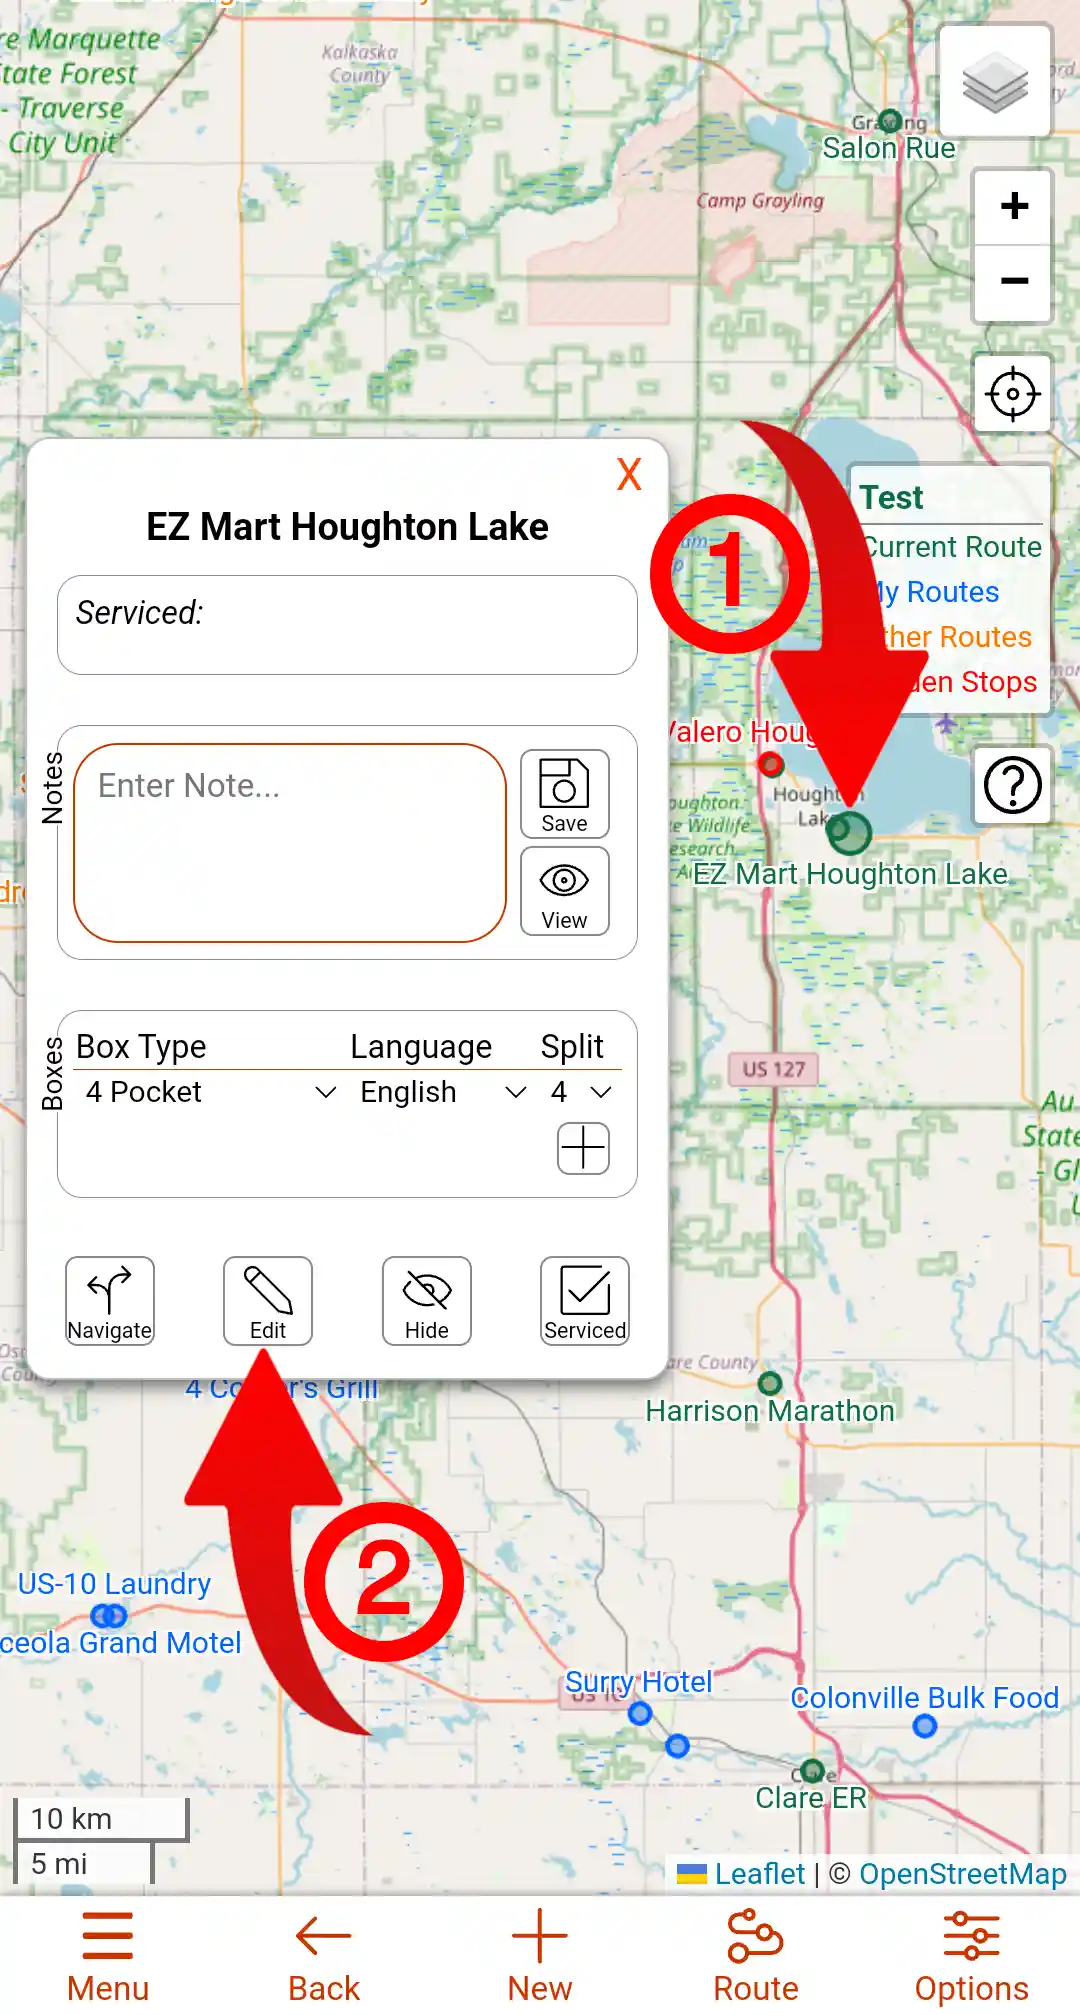
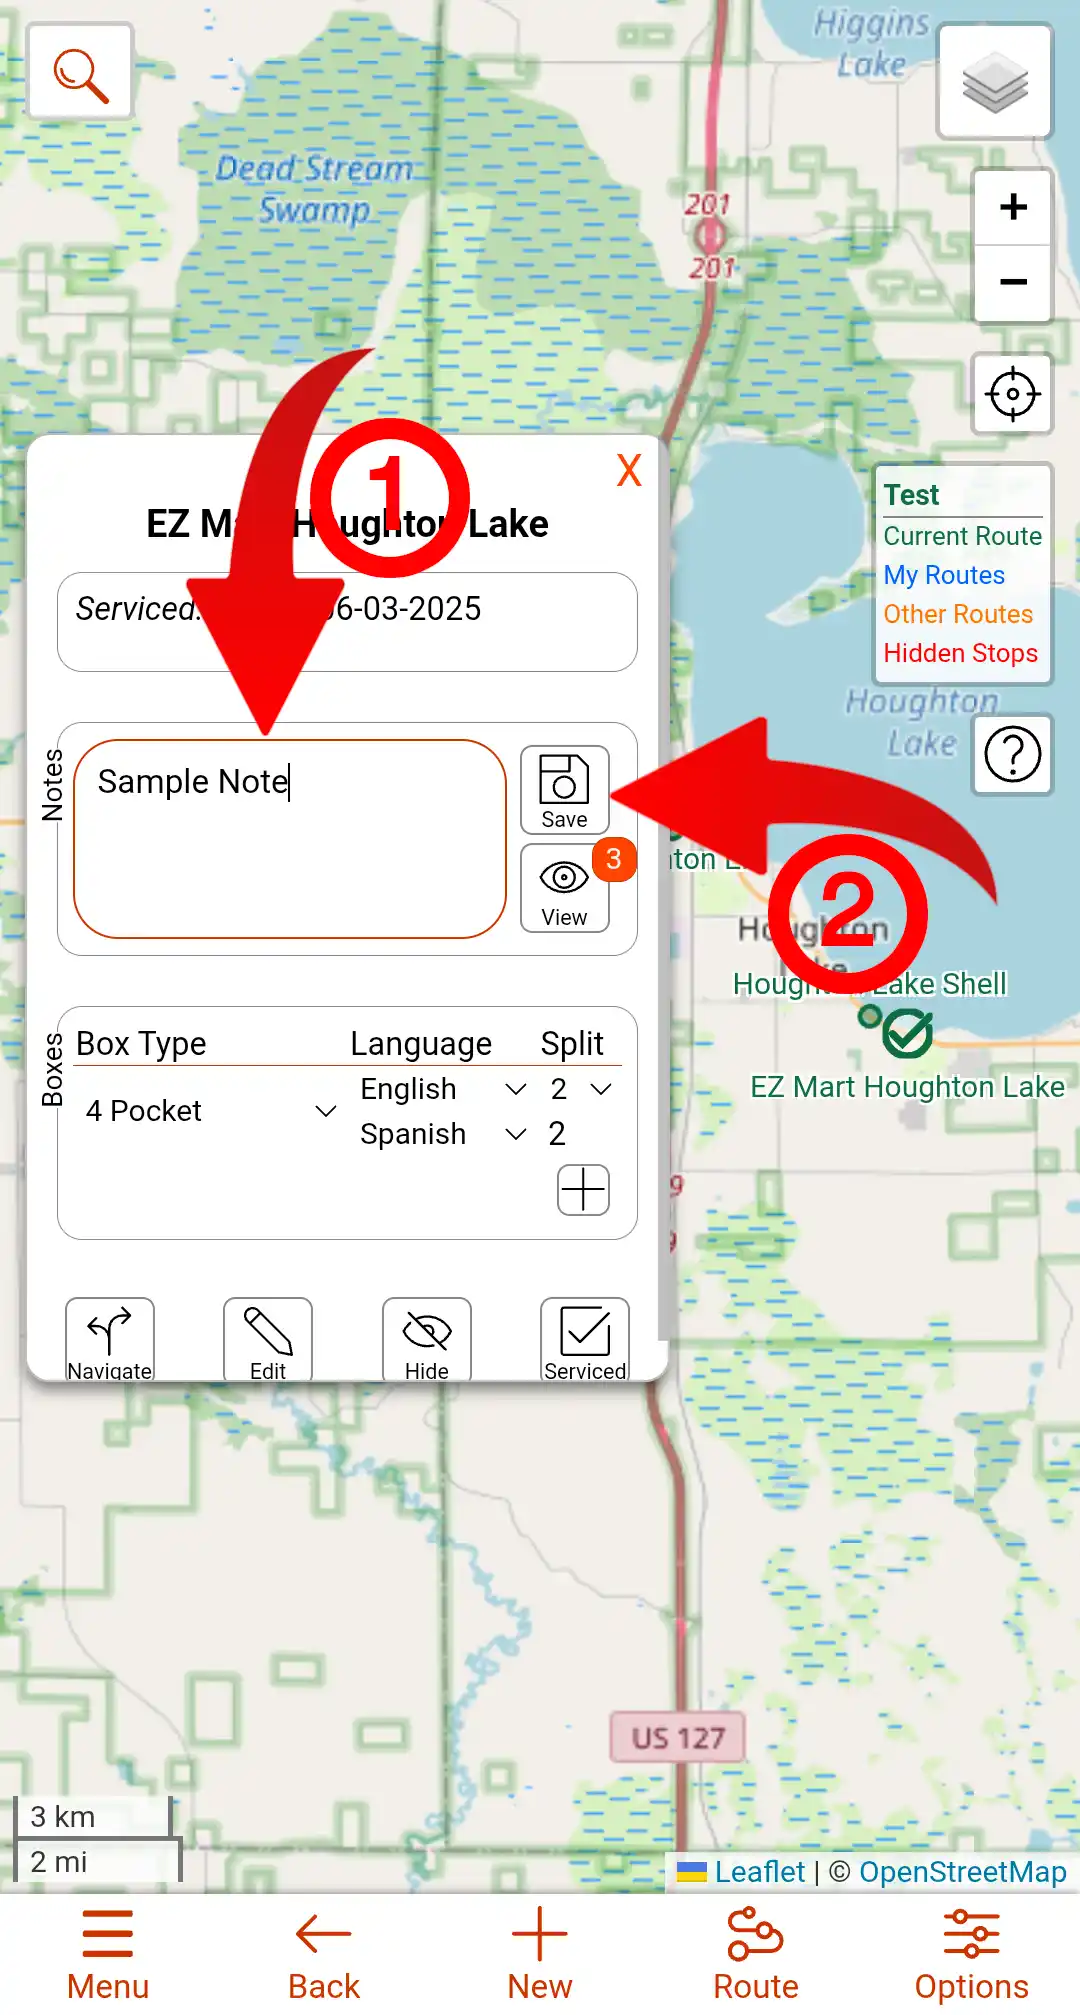
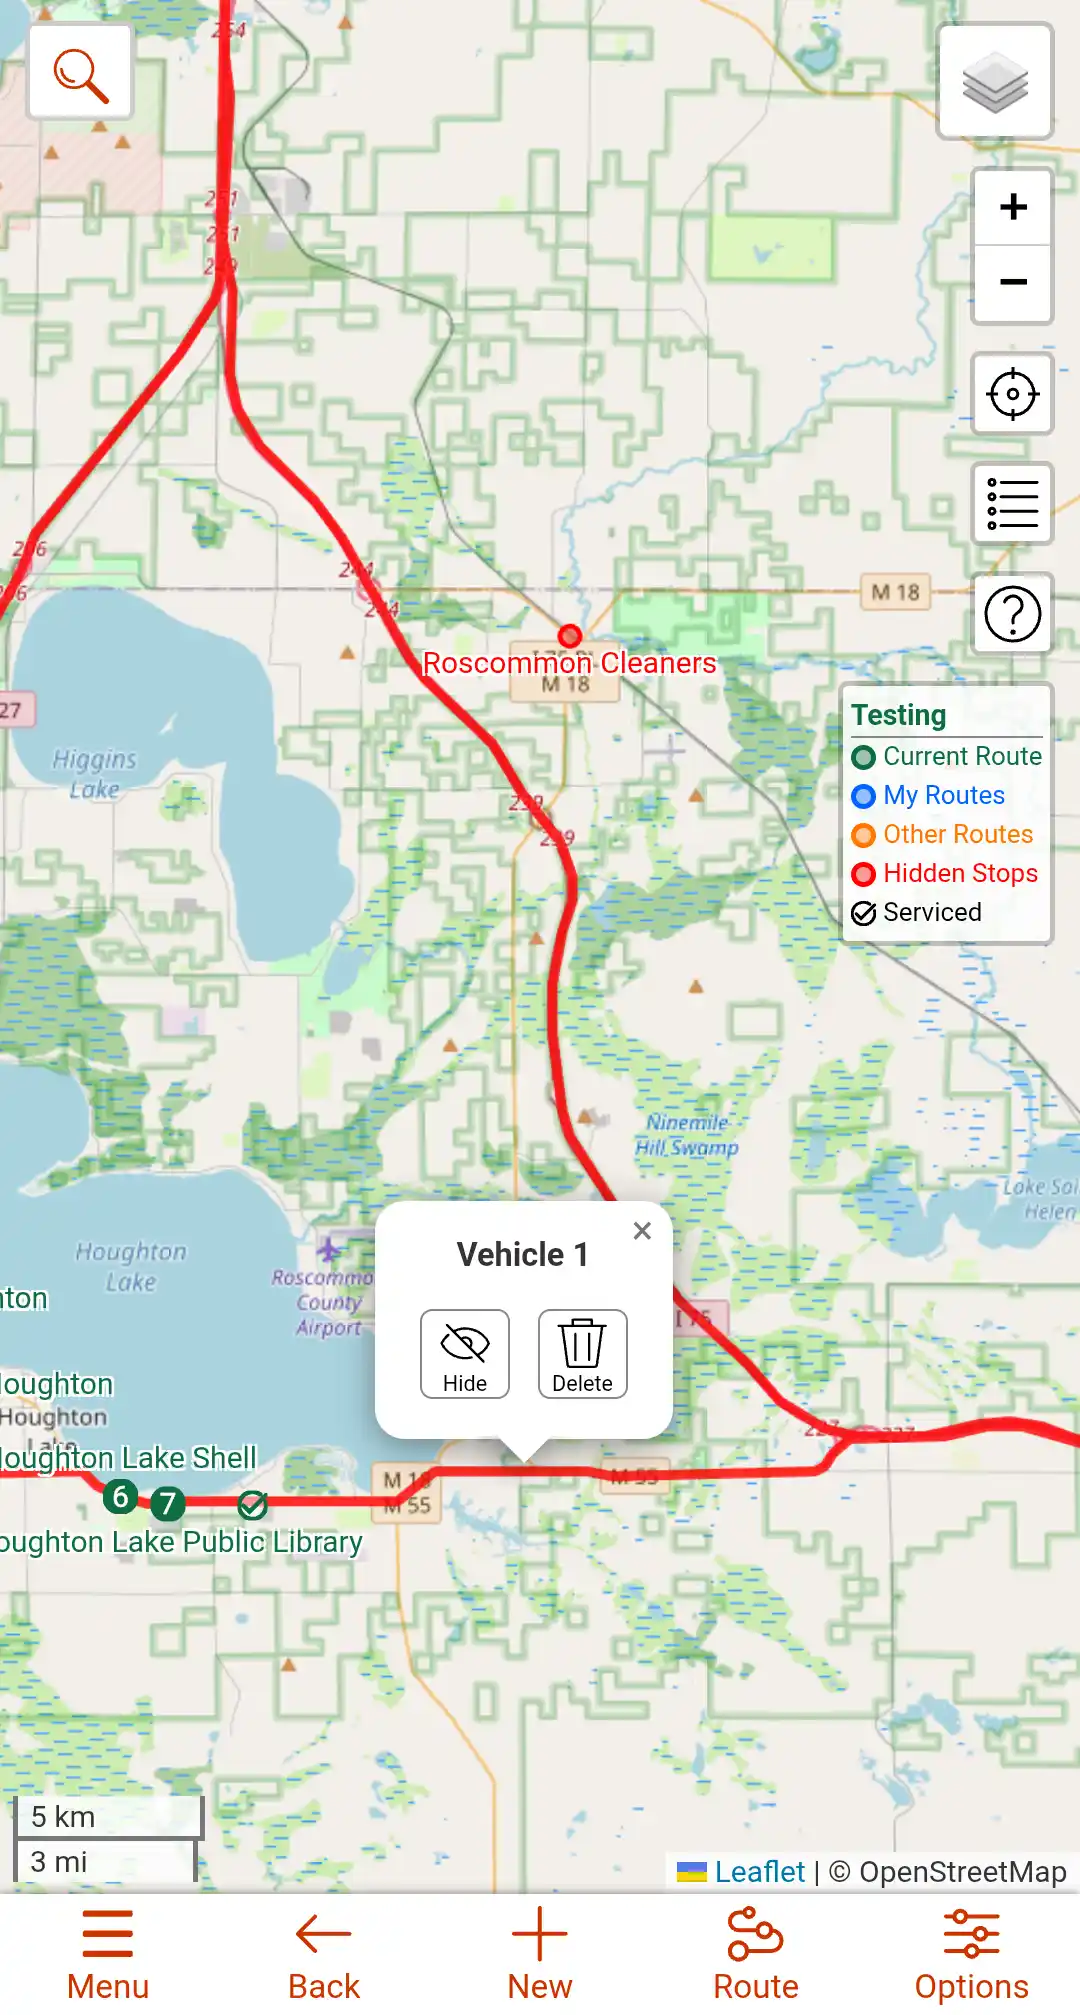
Stop Dialog

Clicking on any point while viewing a Route will make that point a little larger and will open a Stop dialog. The image above is of the dialog that opens when you click on a Stop that you manage. When clicking on a point for a stop that you don't manage, or is not in your current route, the dialog will look a little different due to you having less access to that Stop and the Route it is in.
The first section in the Stop dialog is the details section. It has the last serviced date, along with any information entered for that Stop. This data can be entered or edited by using the Edit button on the bottom of the Stop dialog.
The second section is the Notes section. Here you can add Notes, or view notes that have been added by clicking the View button. There is more information on managing notes in a section furthur down this page.
The third section is the Boxes section. Here you can add and manage records for the boxes that you leave a stop. There is more information on managing boxes in a section furthur down this page. This option is not availble in Simple Site Mode.
Below is an overview of the buttons on the bottom of the Stop dialog.
Navigate
The Navigate button will open navigation to that stop using the app of your choice.
Edit
This button opens the Editing dialog for the current stop. This lets you edit the details of the stop, along with deleting it if needed.
Hide
This will leave the stop on the map, but the site will ignore it for anything that uses a list of the stops within the route. It can be used to mark a stop as inactive, or "Do Not Stop". On a hidden stop, this button will unhide it.
Serviced
Clicking this button will mark the stop as being serviced with the current date. This is not editable.
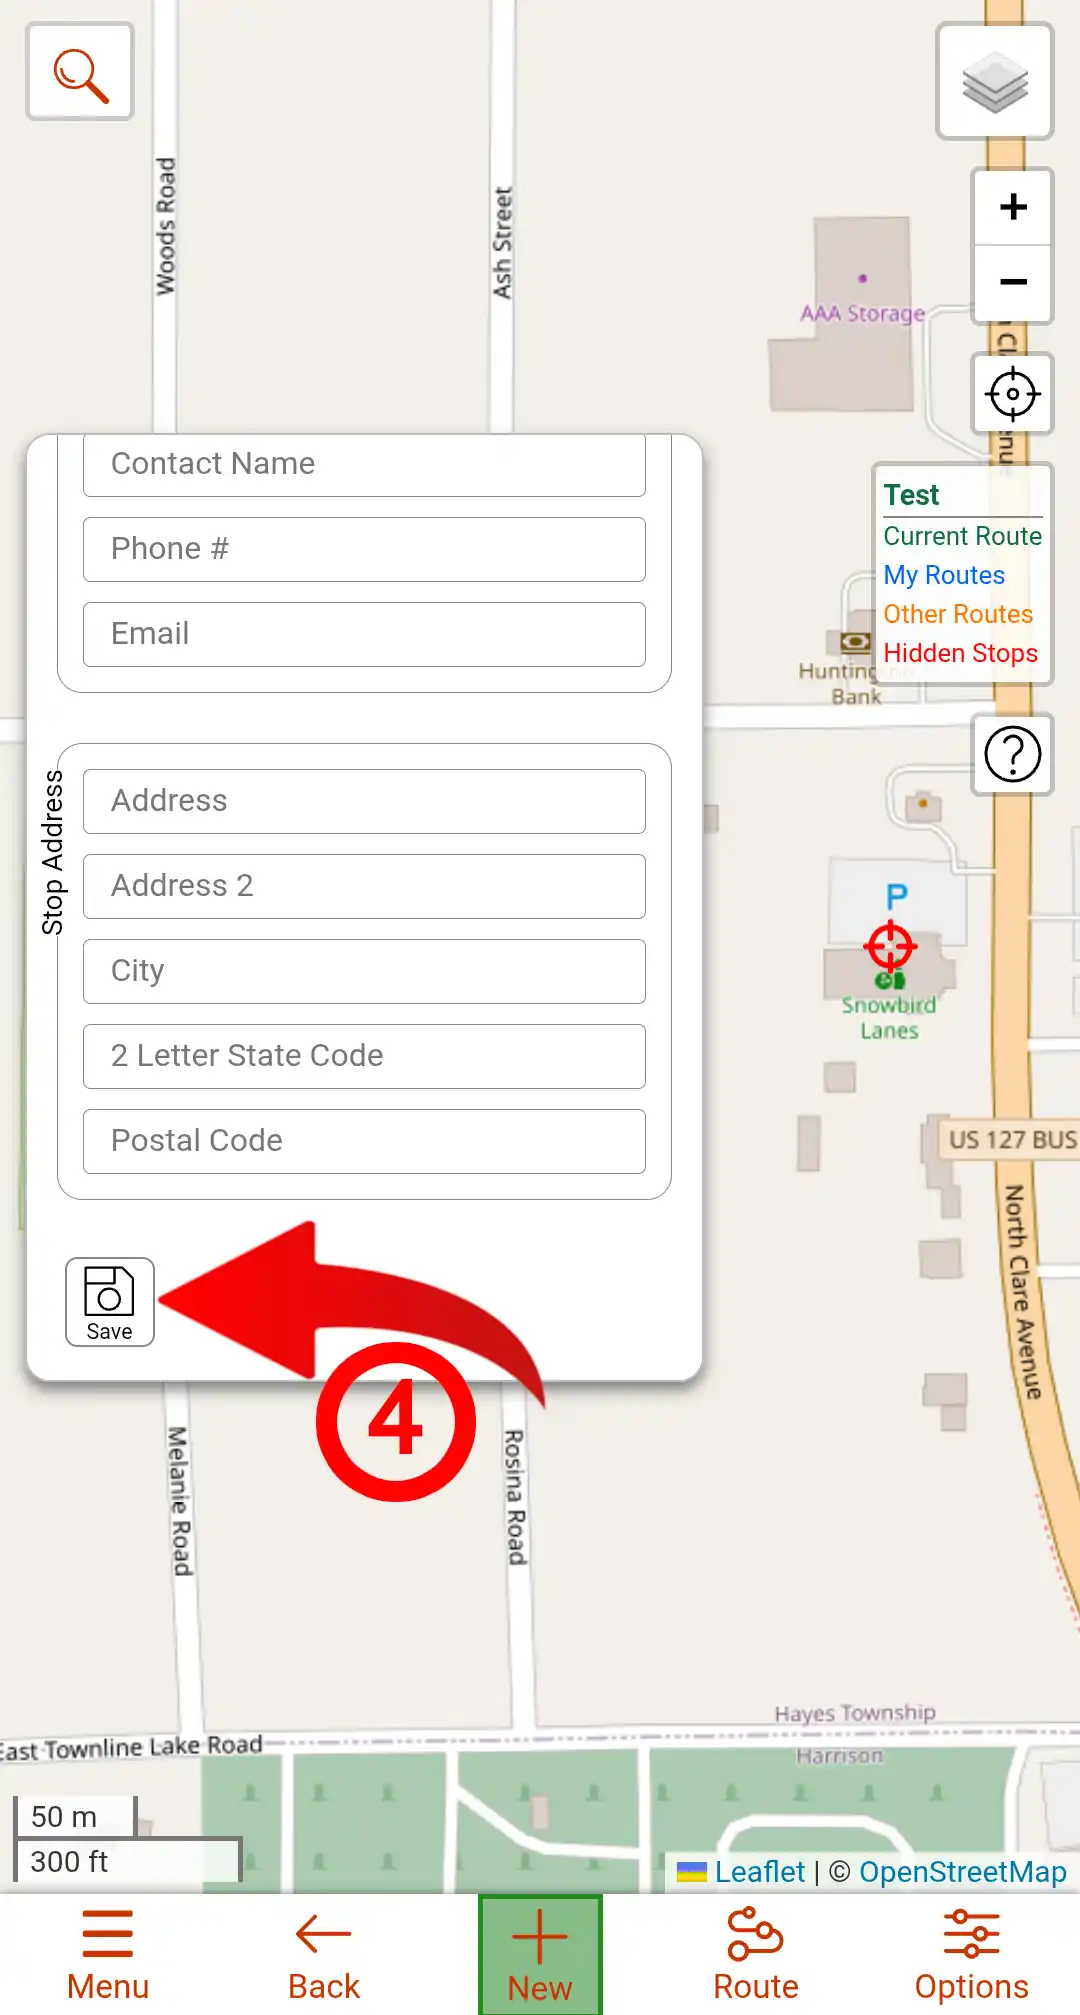
Adding a New Stop
To add a new Stop you must have a Route open. If you do not have a route open you can open or create one by following the instructions in the Routes section.
Follow the Step-by-Step instruction below to create a new Stop.
- Click the New button in the Menu bar. It should turn green. Clicking it while it's green will turn off the stop creation workflow.
- Click on the Map in the location where you want the Stop to be. This should be quite precise.
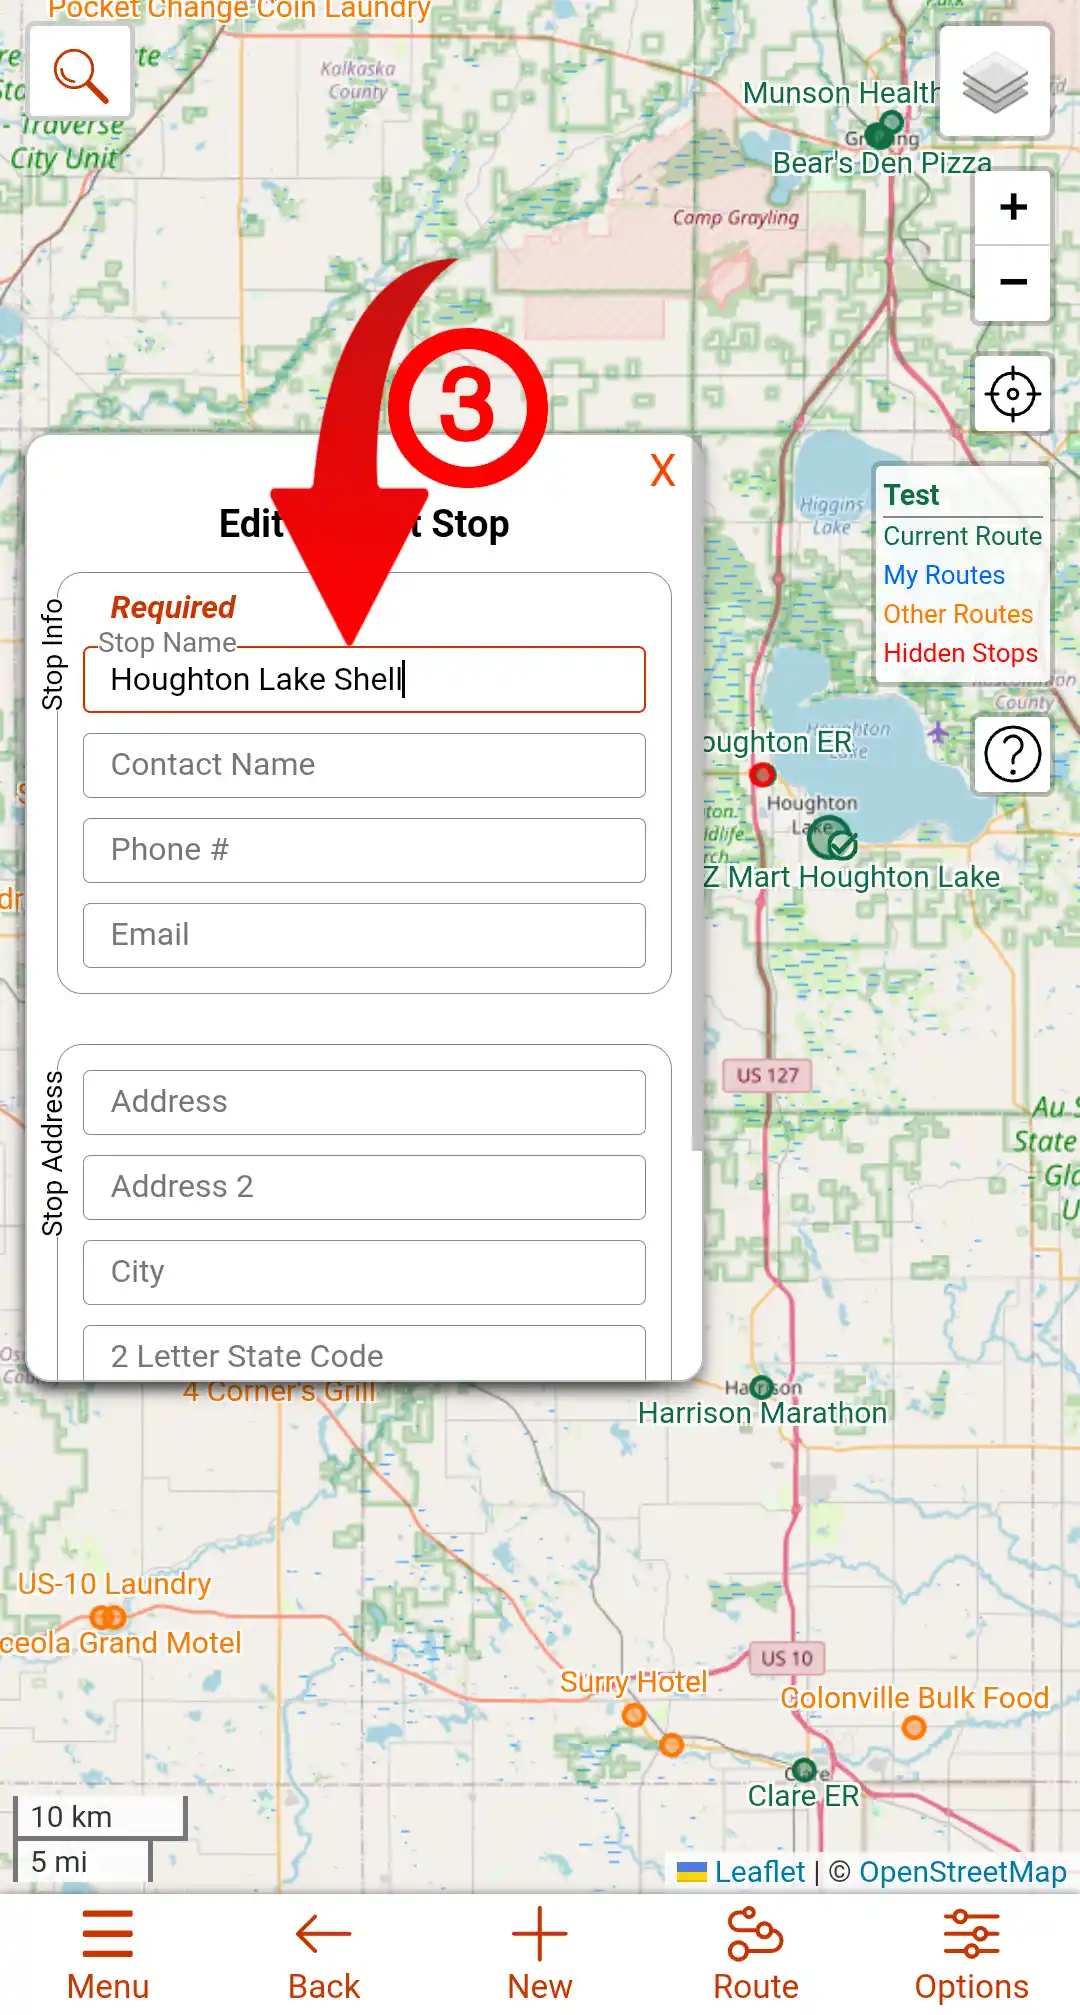
- Fill out the information in the dialog that opens. Any input that has a red outline is required. This data is for contact info for the stop, not the route owner.
- Scroll down the dialog and click the Save button.


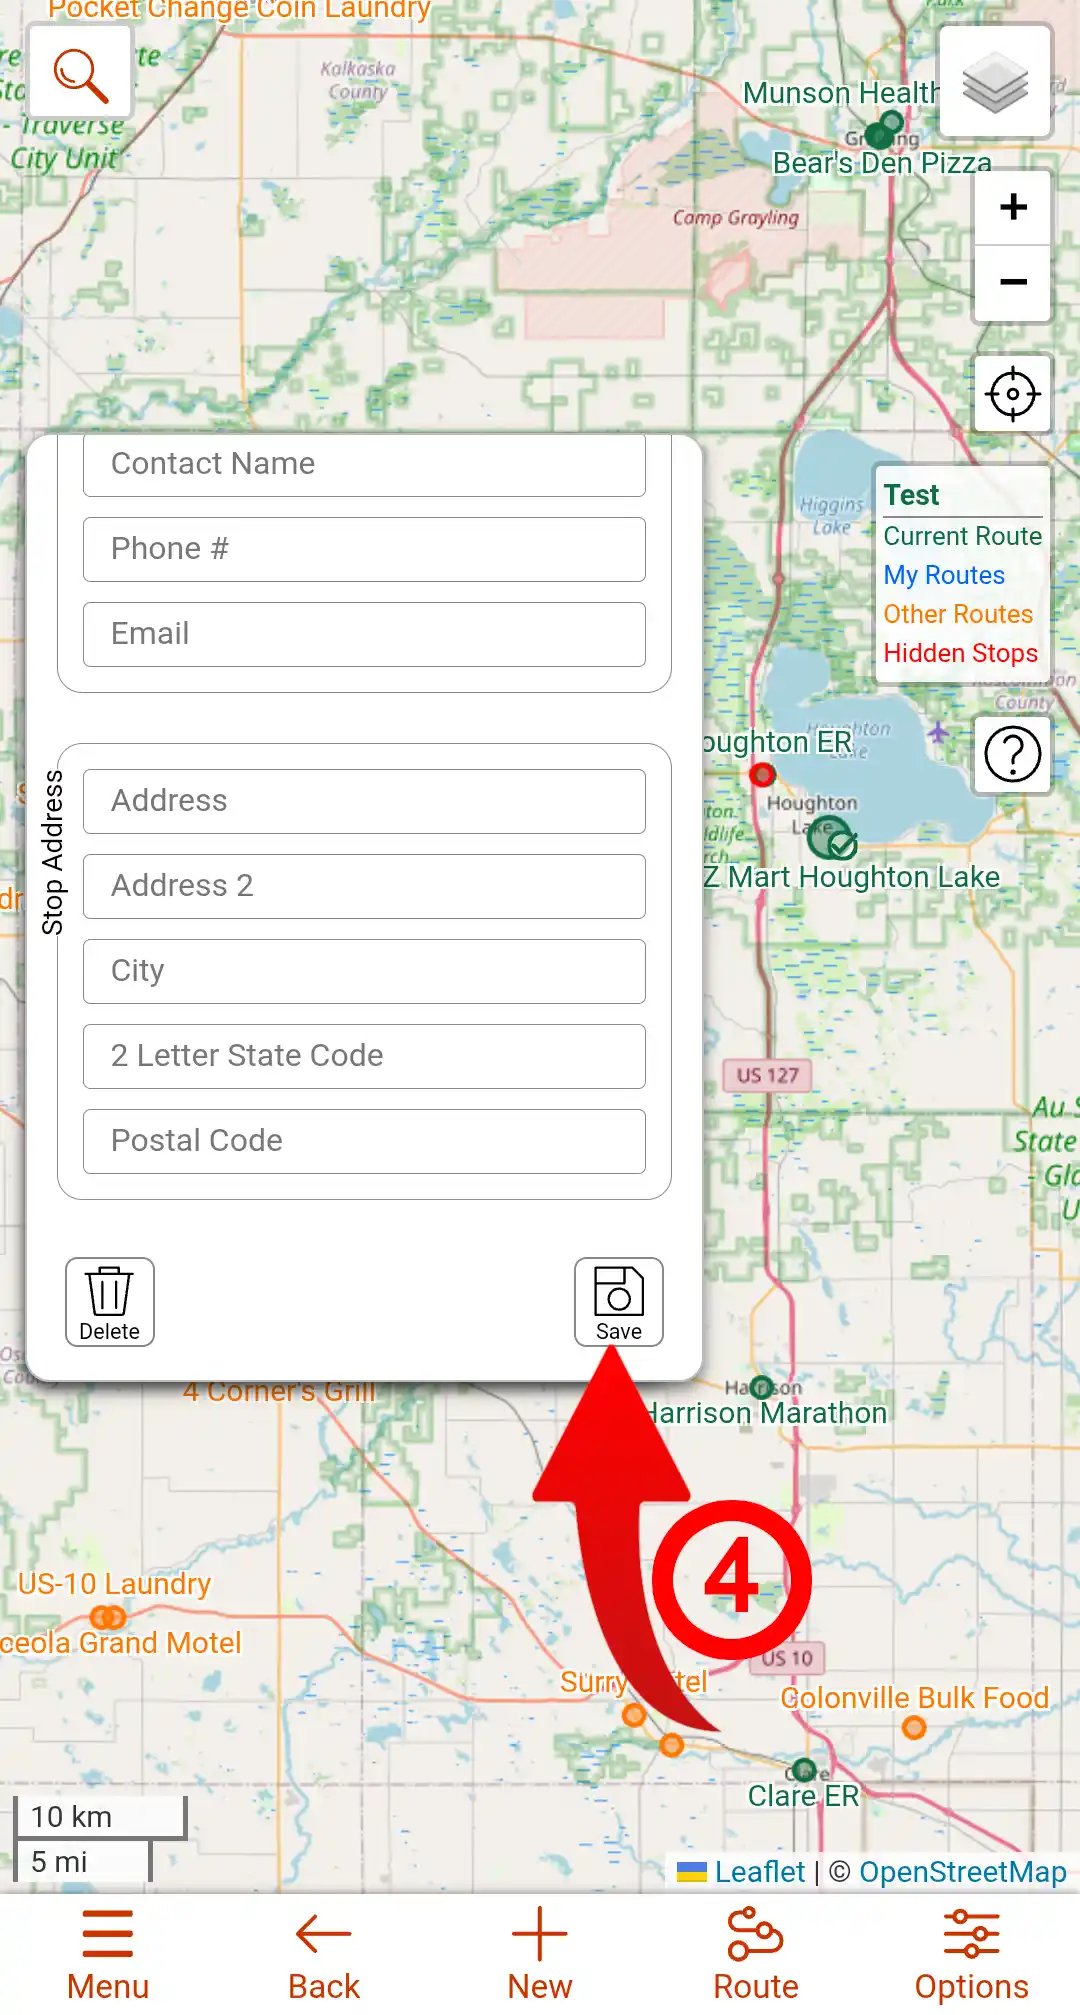
Editing a Stop
Follow the Step-by-Step instruction below to edit a Stop.
- Click on the Stop point of the Stop you want to edit
- Click the Edit button on the dialog that opens.
- Make any changes to the info in the Edit dialog that opens. Any input with a red border is required to be filled out. This data is for contact info for the stop, not the route owner.
- Scroll down the Edit dialog to the bottom and click the Save button.
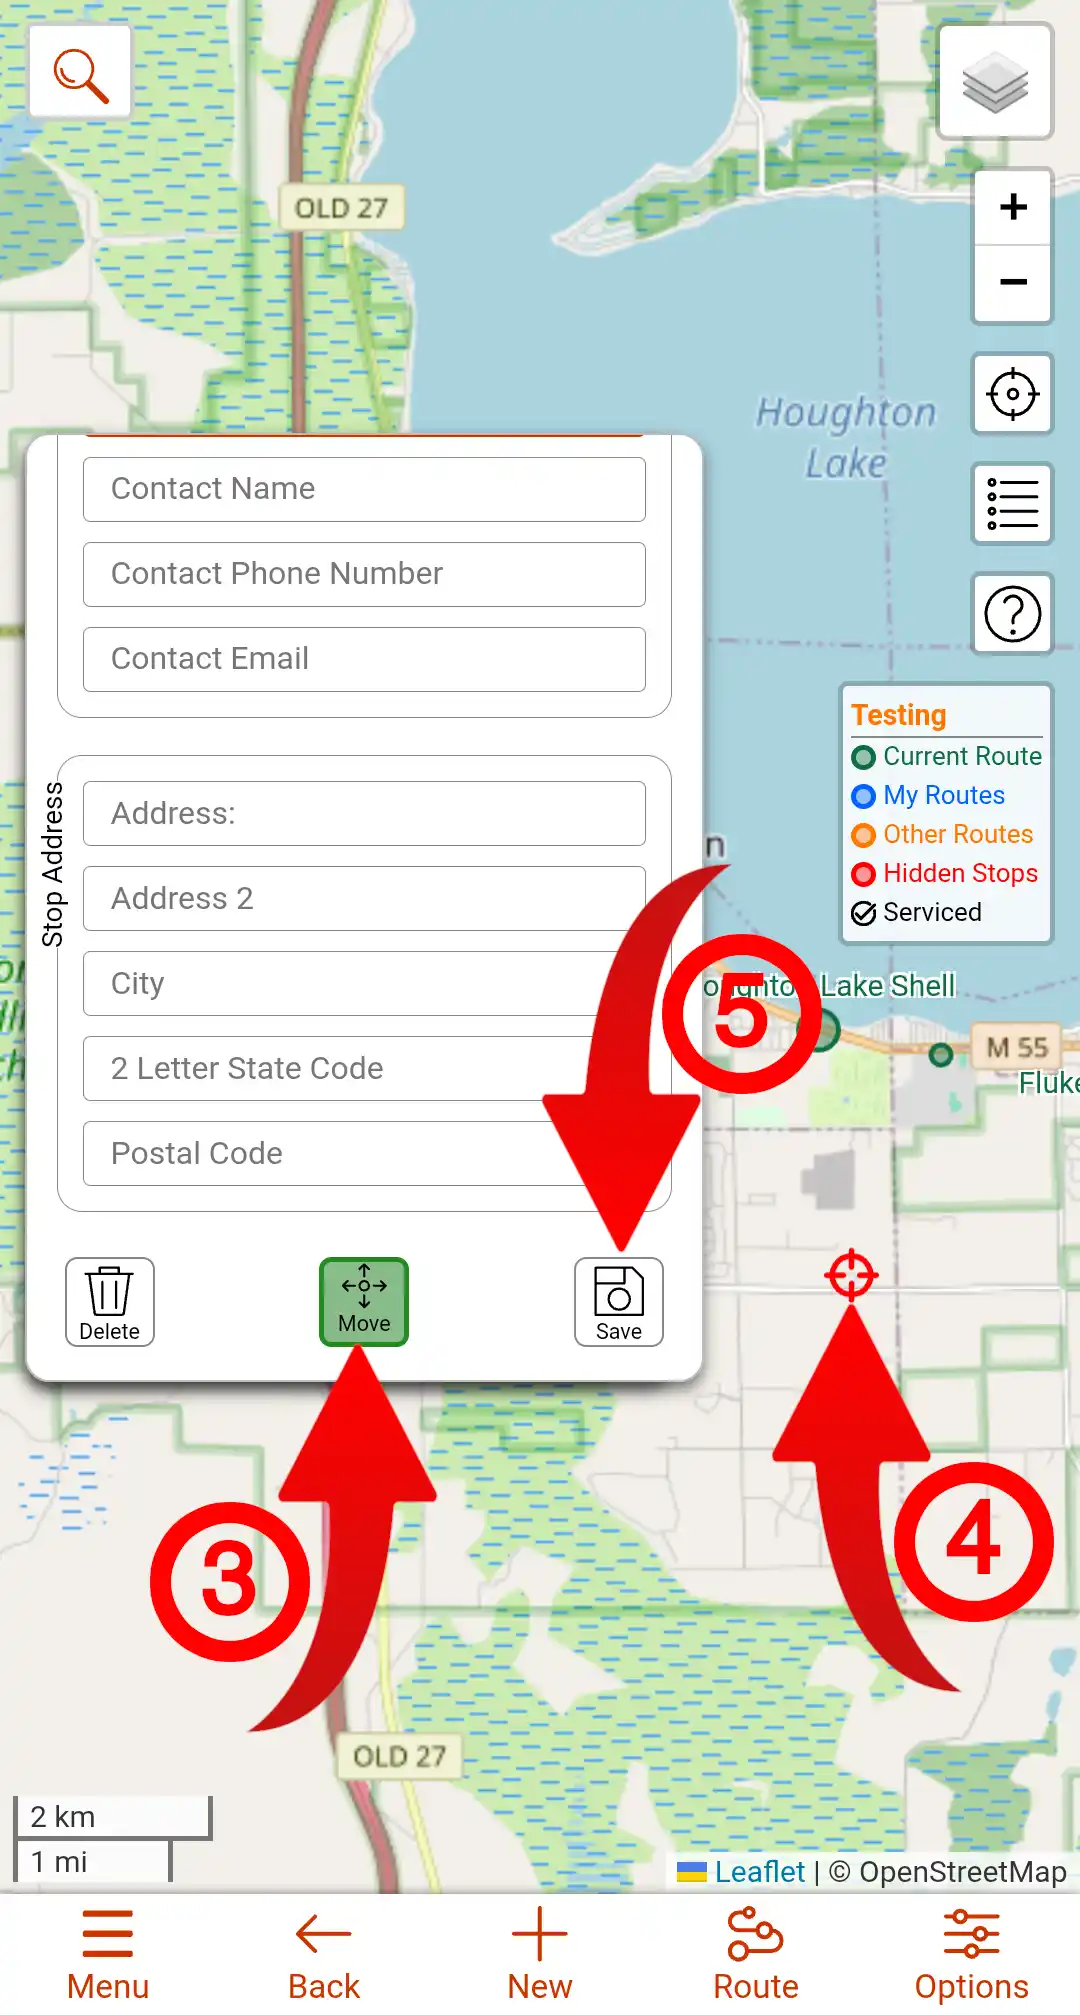
Moving a Stop
Follow the Step-by-Step instruction below to Move a Stop. This option is only available in the Advanced Site Mode.
- Click on the Stop point of the Stop you want to move
- Click the Edit button on the dialog that opens.
- Scroll to the bottom of the Edit dialog and click the Move button. It should turn green. You can click it again to cancel.
- Click on the map where you want to move the stop to.
- In Edit dialog click the Save button.
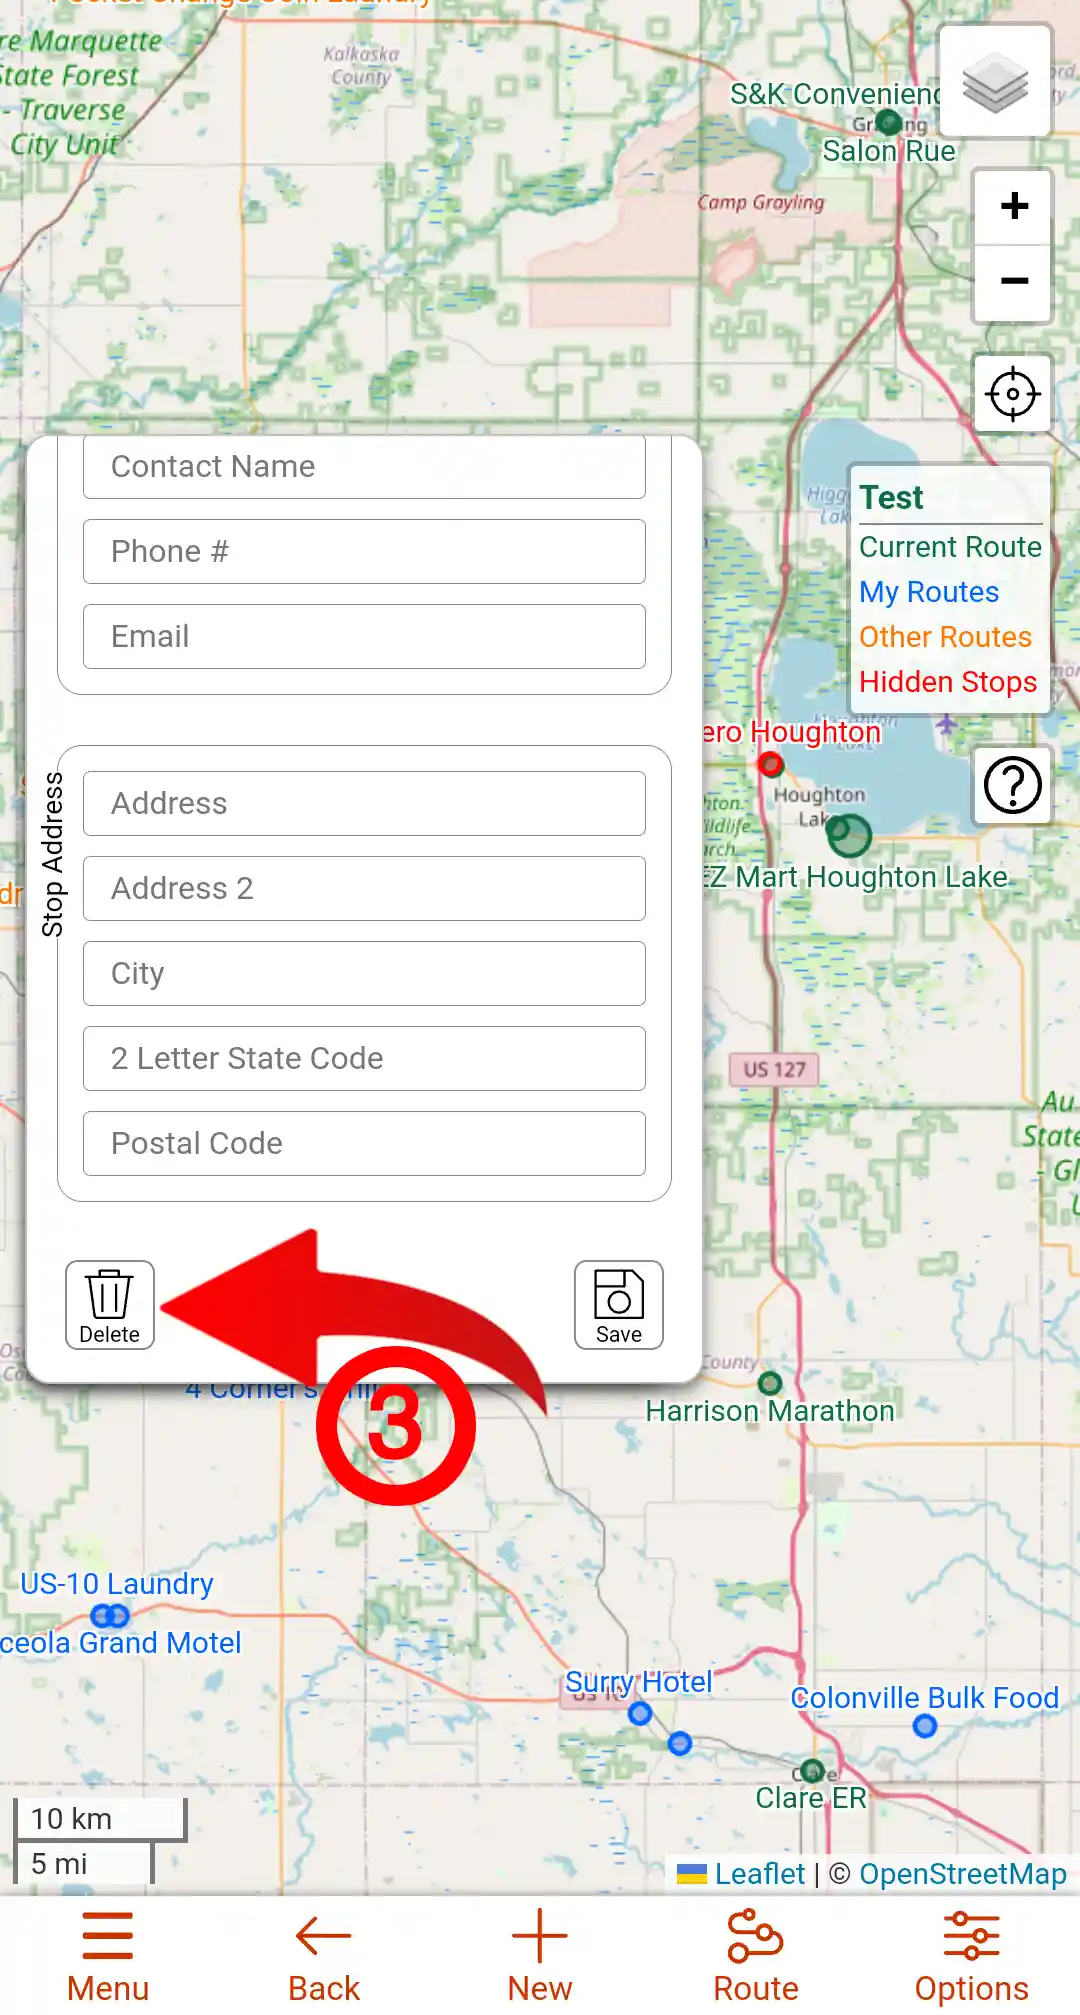
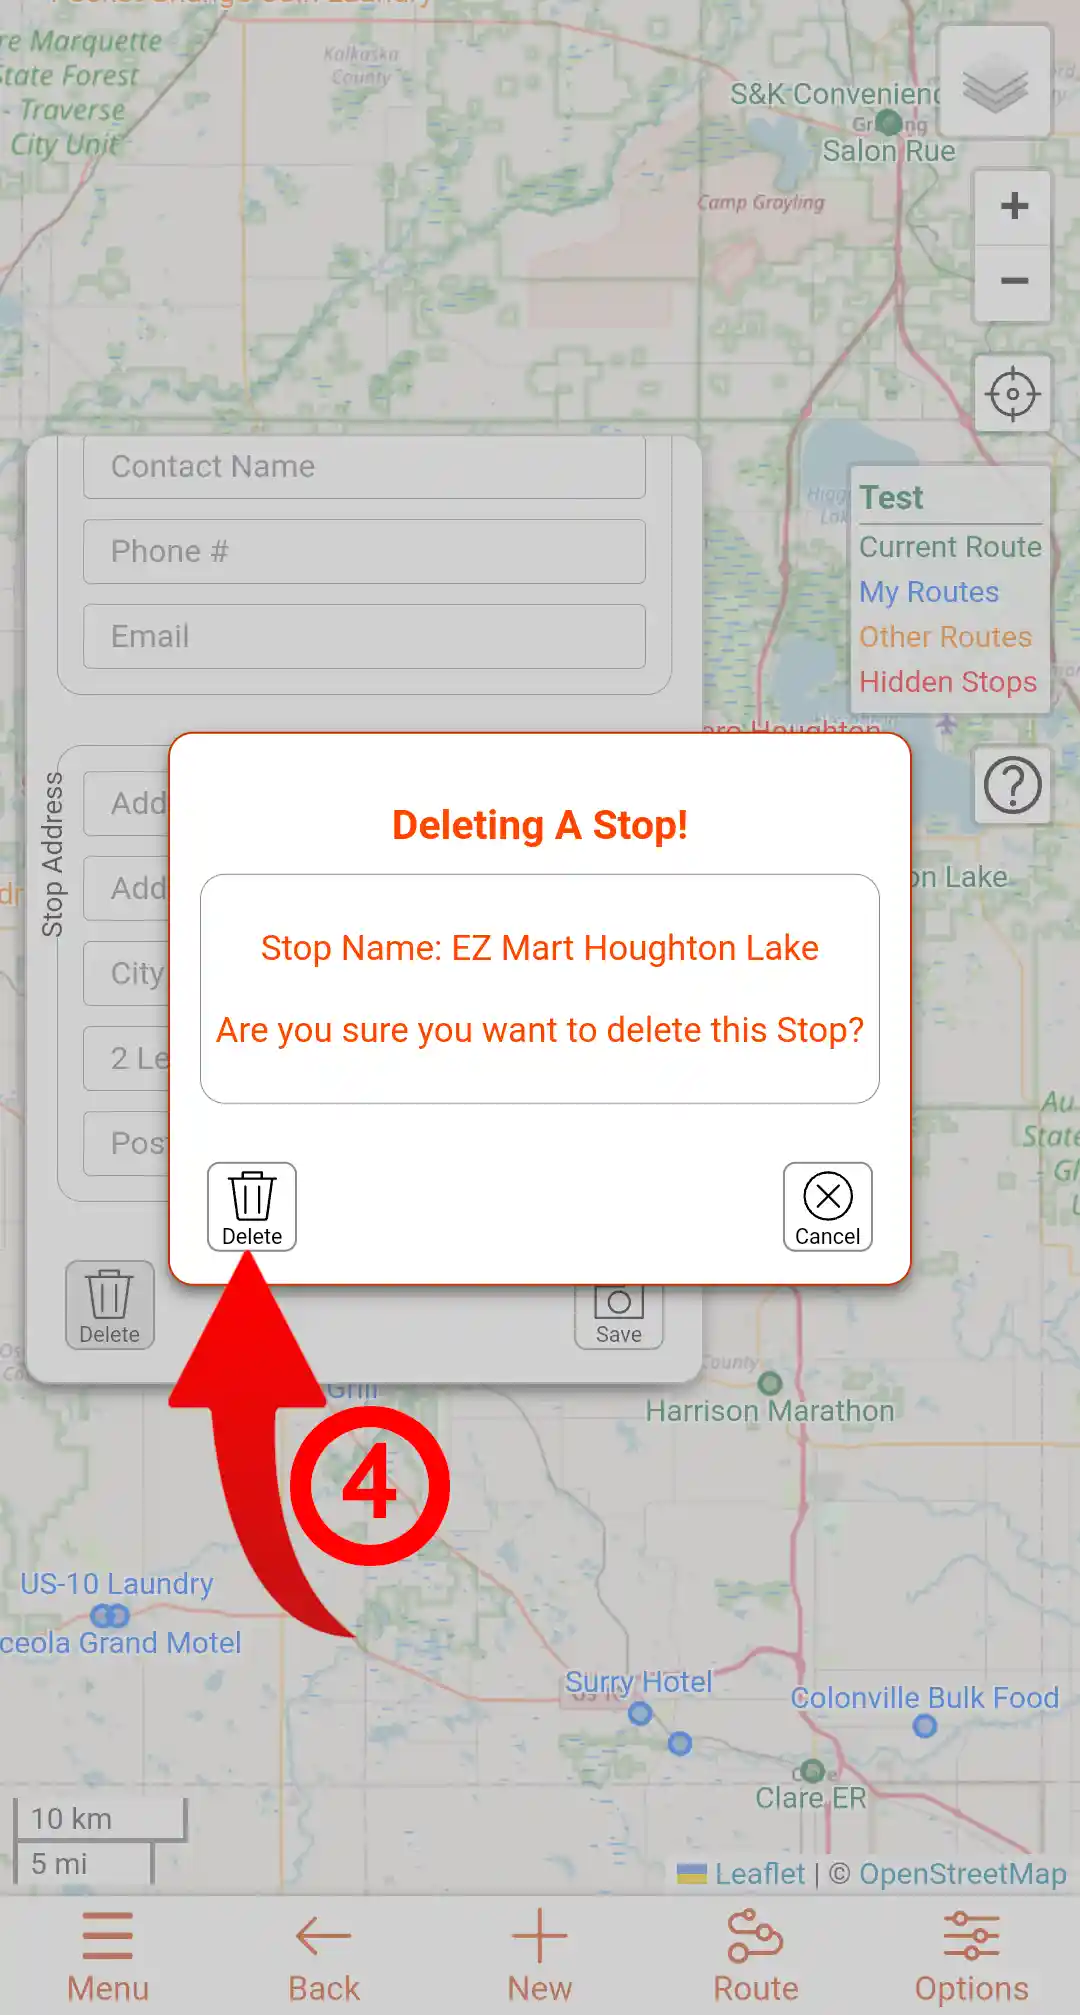
Deleting a Stop
To delete a Stop you must have a Route open. If you do not have a route open you can open one by following the instructions in the Routes section.
Follow the Step-by-Step instruction below to delete a Stop.
- Click on the Stop point of the Stop you want to delete
- Click the Edit button on the dialog that opens.
- Scroll down and click the Delete button in the Edit dialog that opens.
- Click the Delete button in the verification dialog that opens.
Notes Section
The following requires that the Stop dialog is open.
Adding a Stop note
Follow the Step-by-Step instruction below to add a note.
- From the Stop dialog, enter the note you want to add.
- Click the Save button.
- There will be a notice that Note is saved.
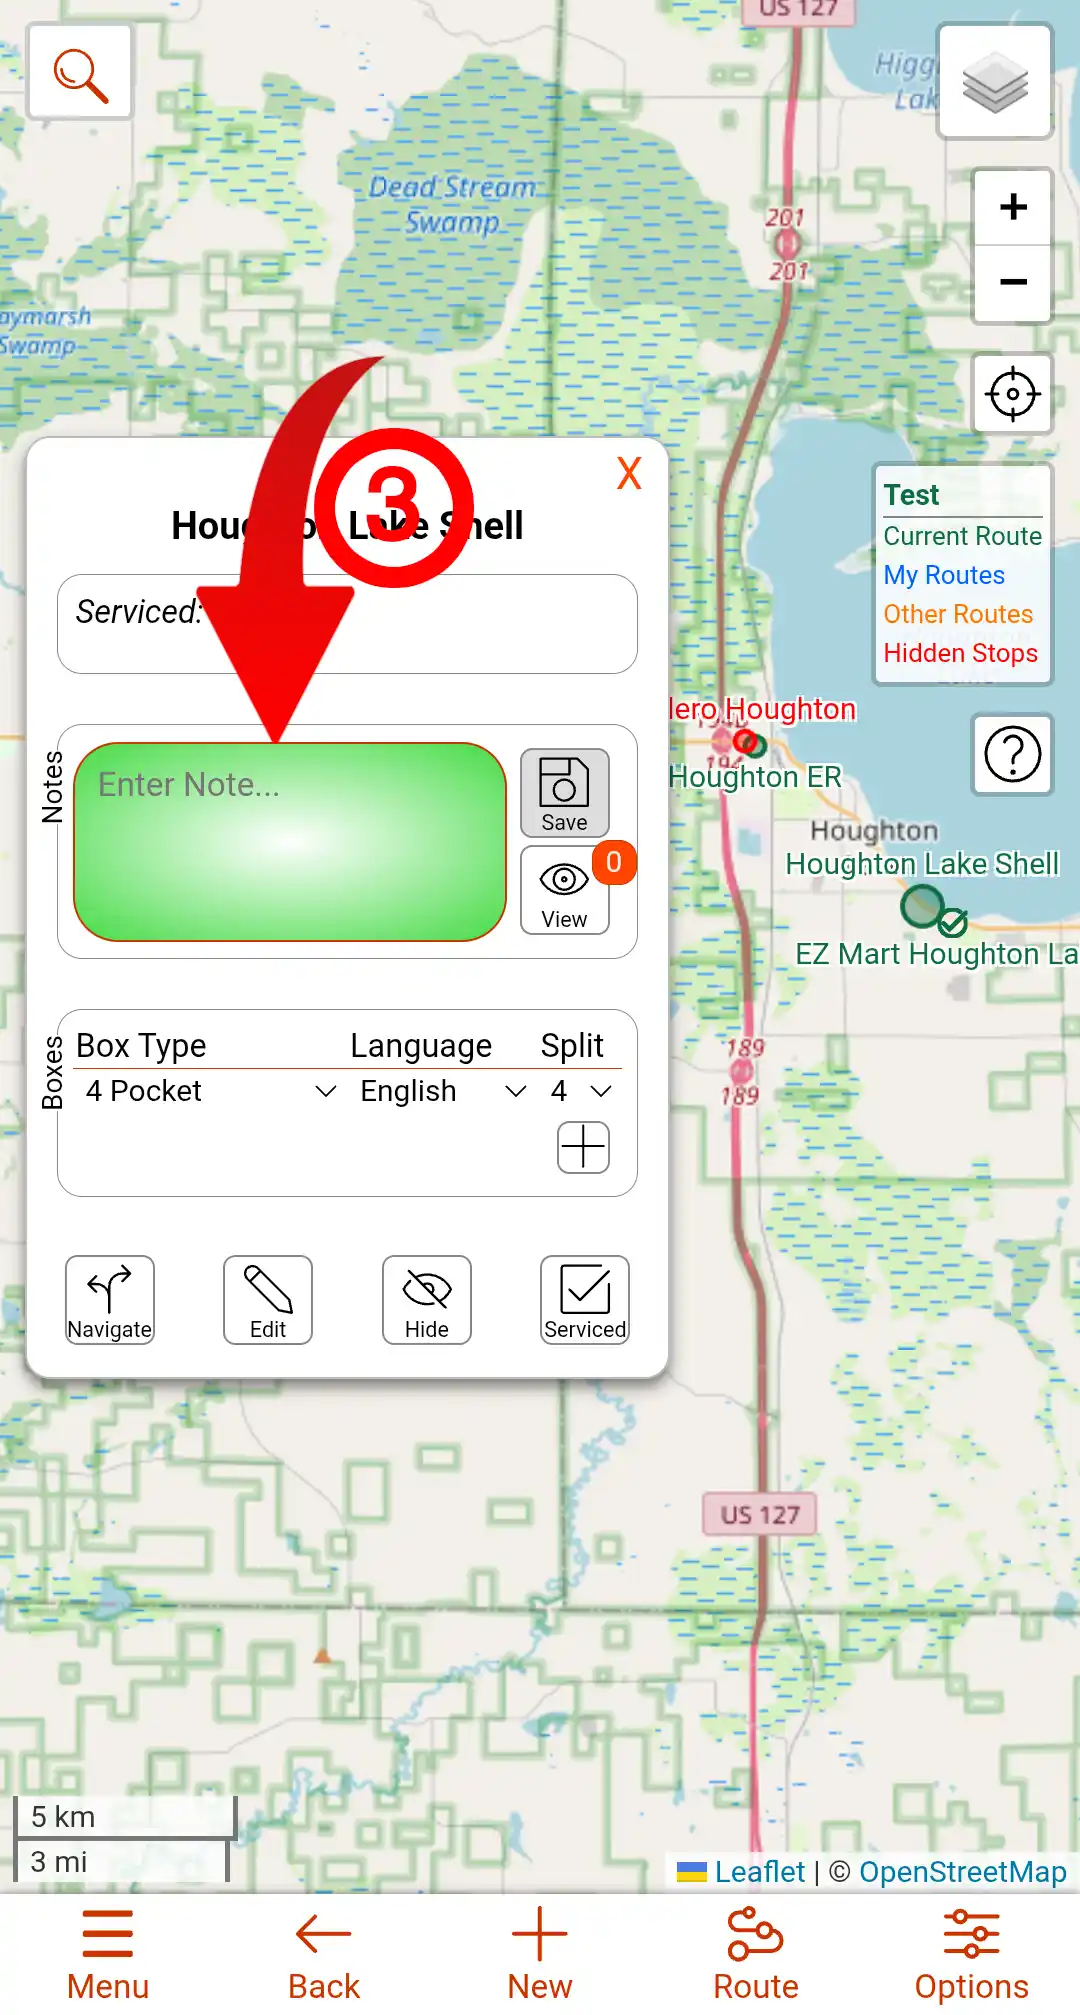
Viewing Stop notes
To view the notes for a stop, click the View button in the Notes section of the Stop dialog. If there are notes for that stop, the Note List will open. The View button has a badge that shows the number of notes for that stop.
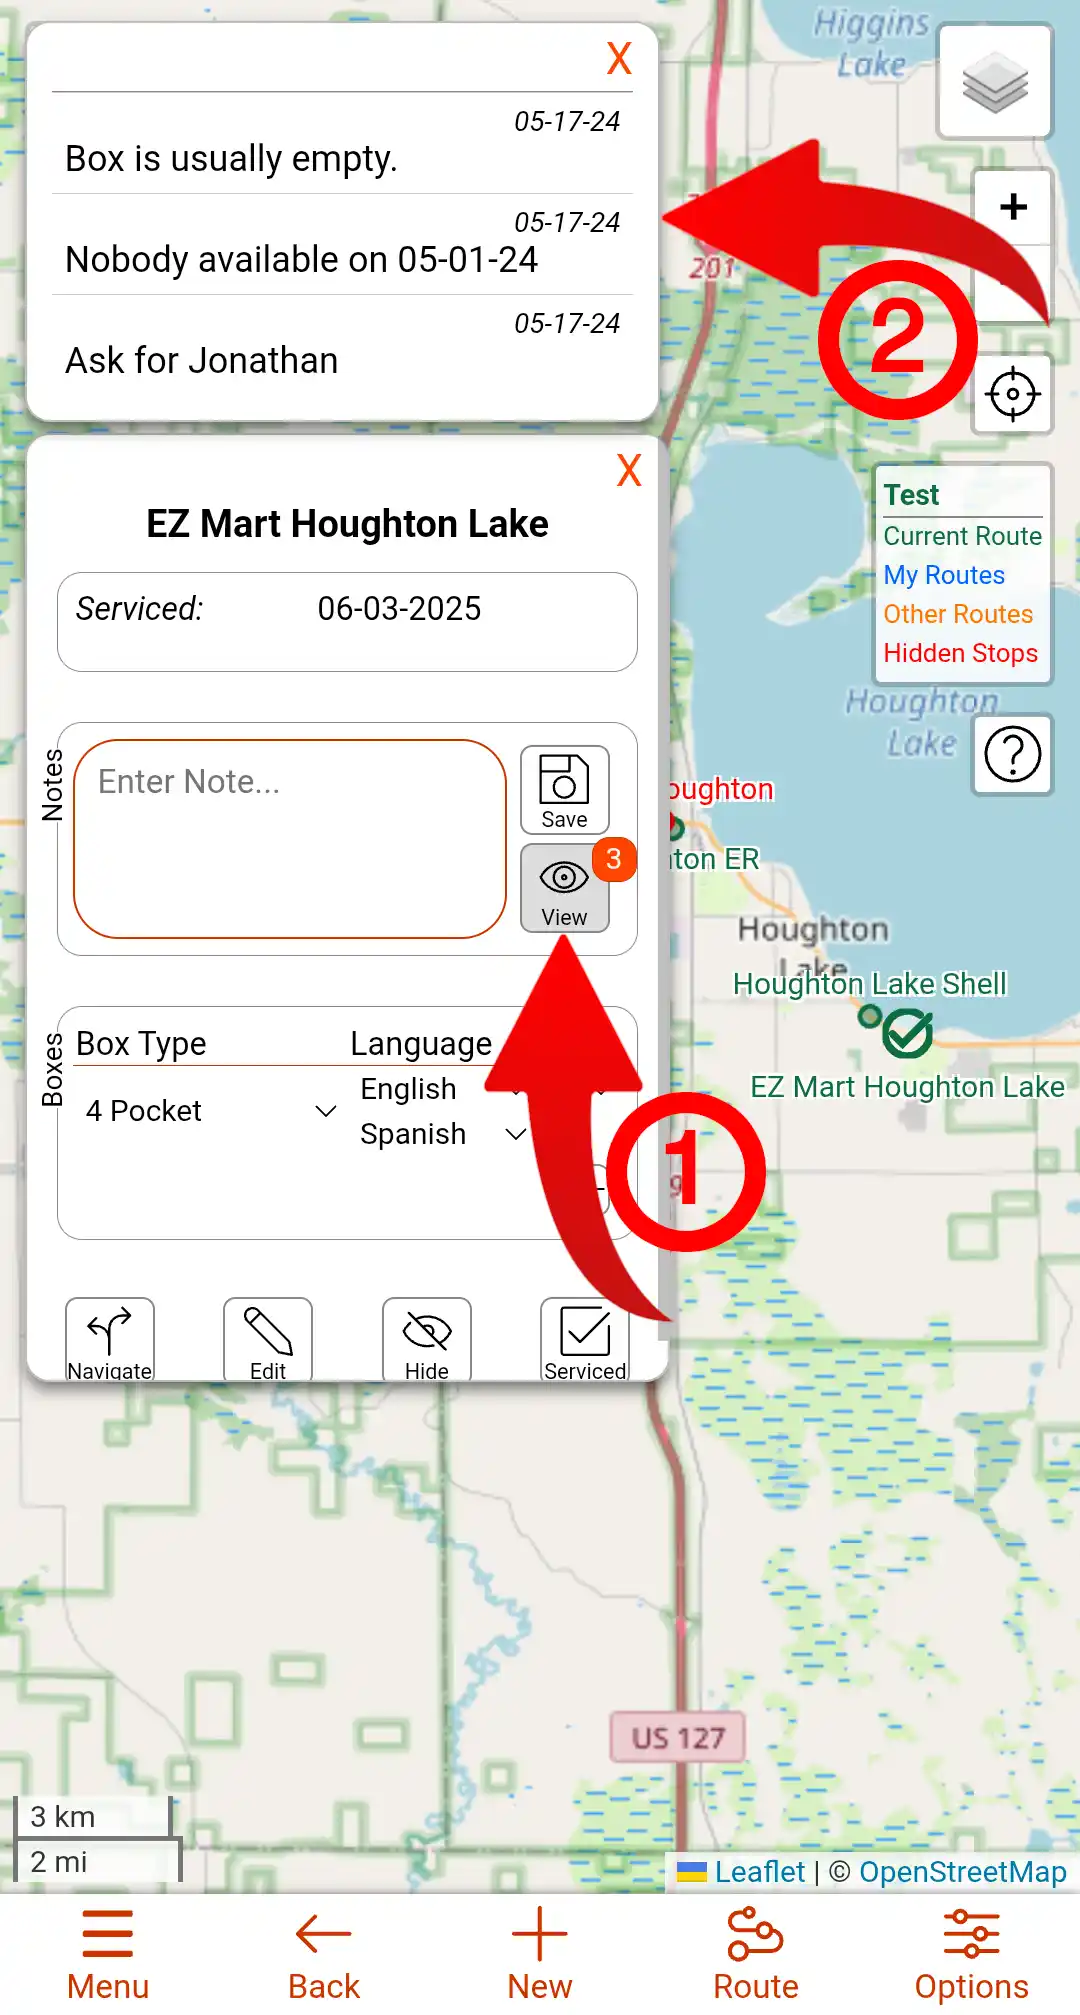
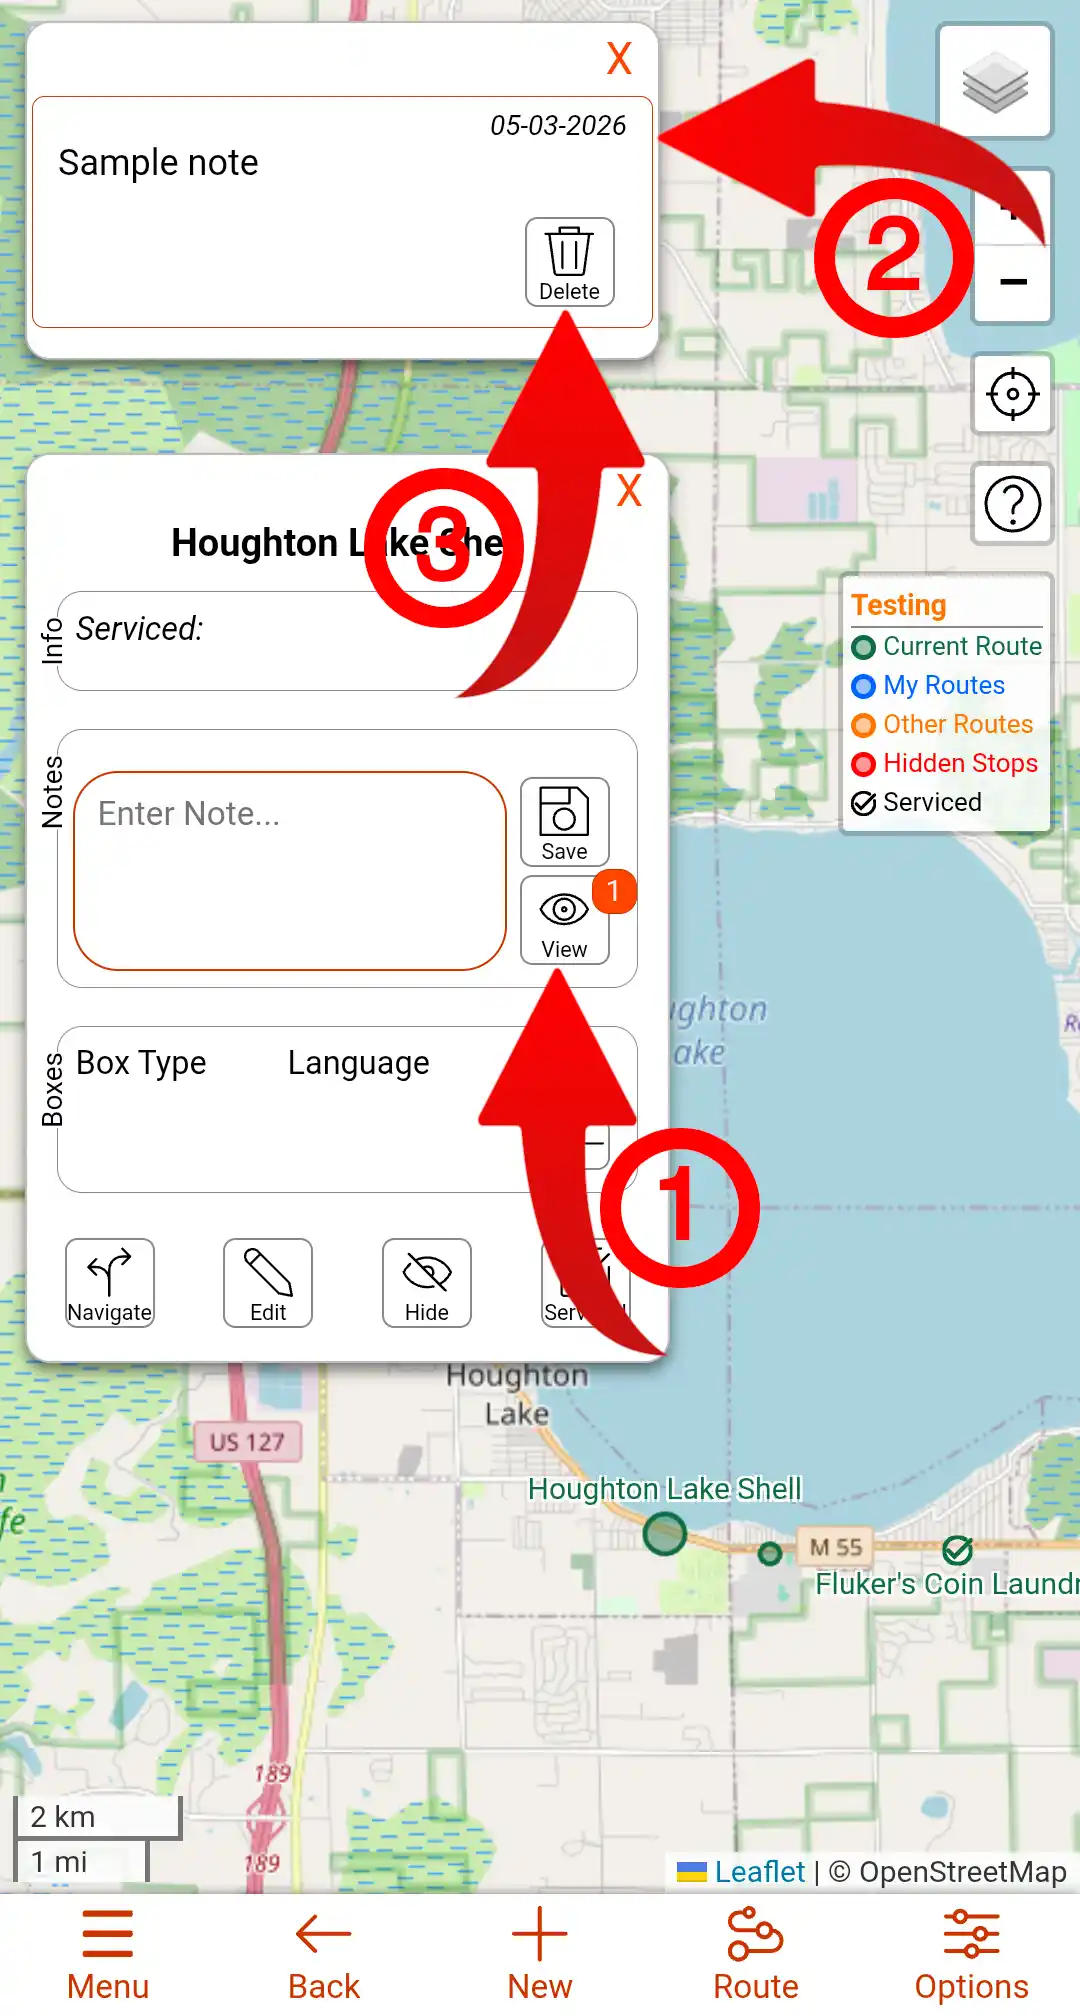
Deleting Stop notes
Follow the steps below to delete a Stop note.
- From the Stop dialog click on the View not button
- In the Note list, click the note you want to delete.
- Click the Delete button.
Manage Boxes
The boxes management feature is part of the Stop dialog. It is not available in the Simple Site Mode.
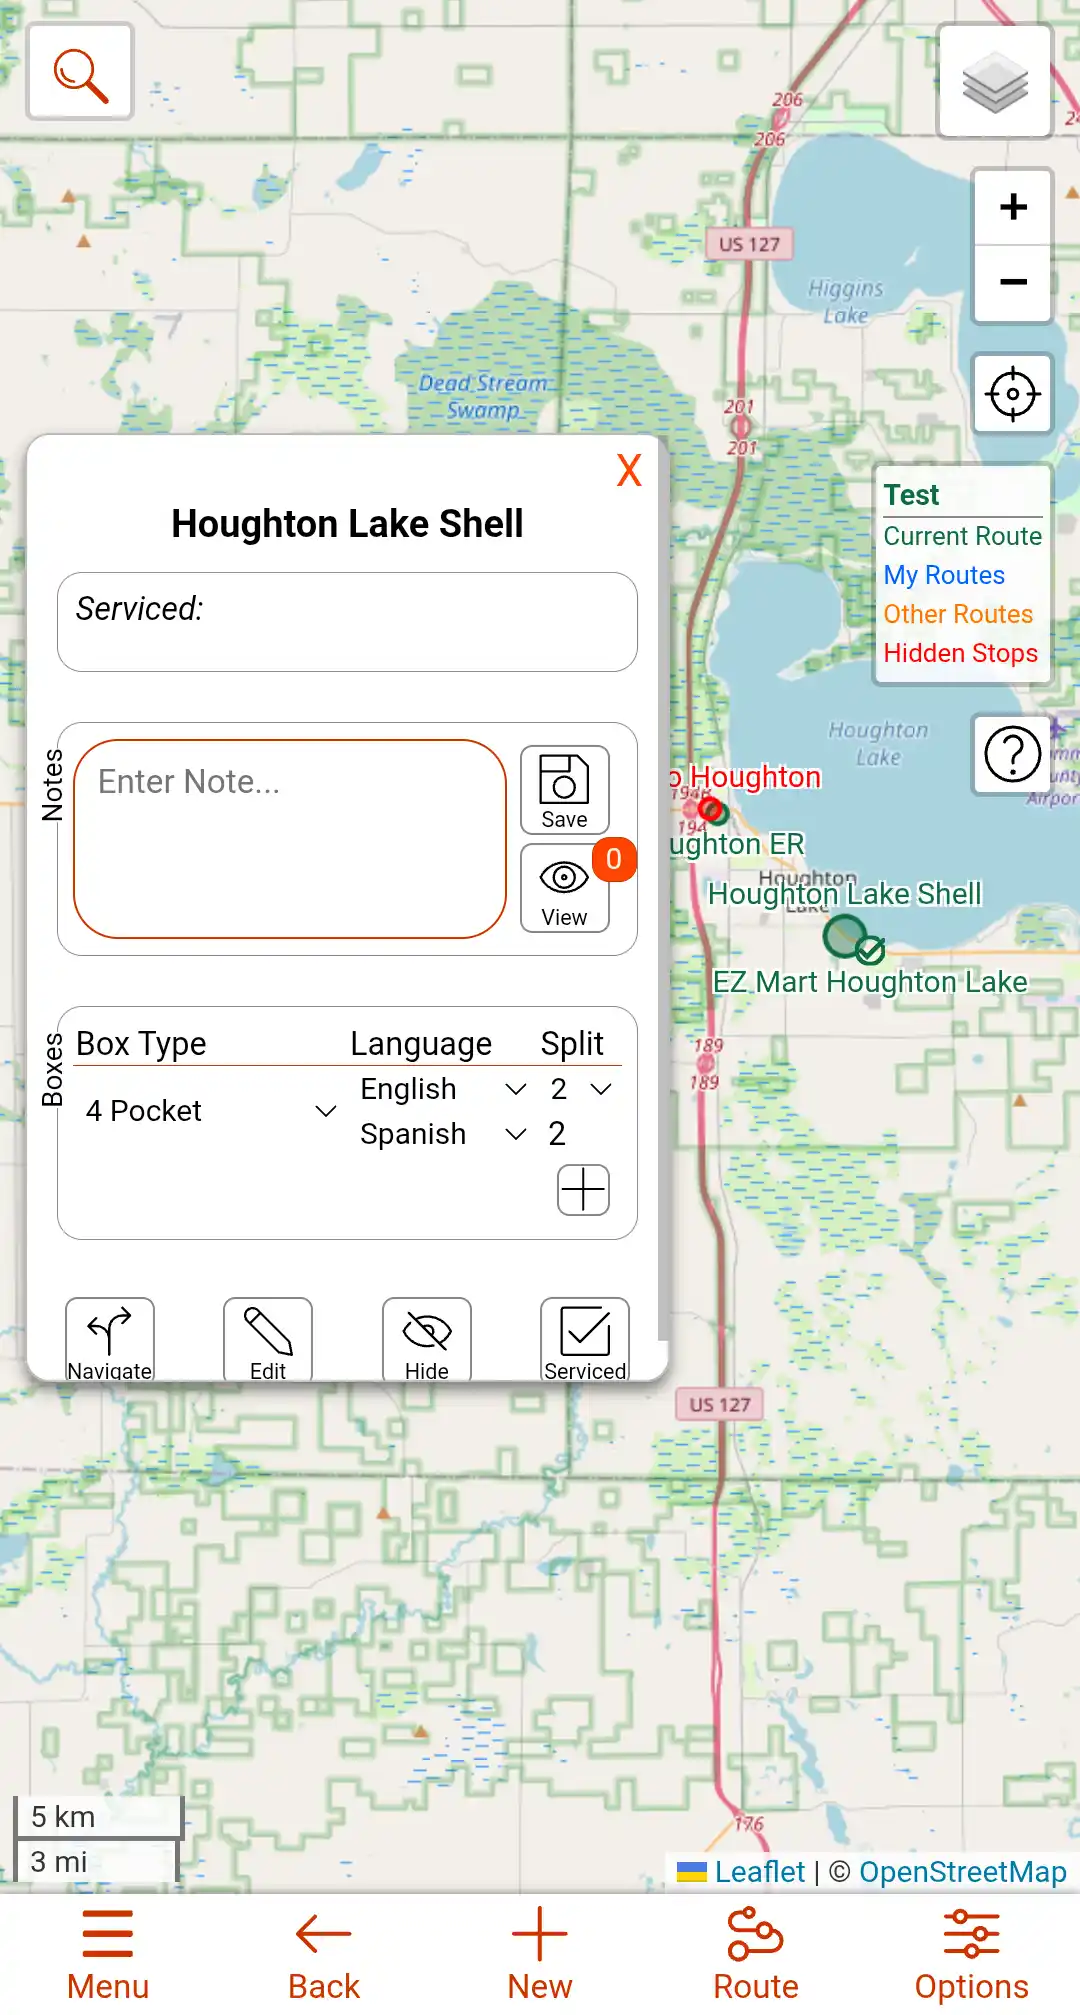
You can add multiple boxes to each stop, to add a box, click the + button in the boxes section. You can then change the box type and language, or split a box between 2 languages using the dropdowns in each column. To split a box between multiple languages select the appropriate number of pockets of the first language under the Split column.
To remove a box, select Remove Box from the dropdown in the Box Type column.
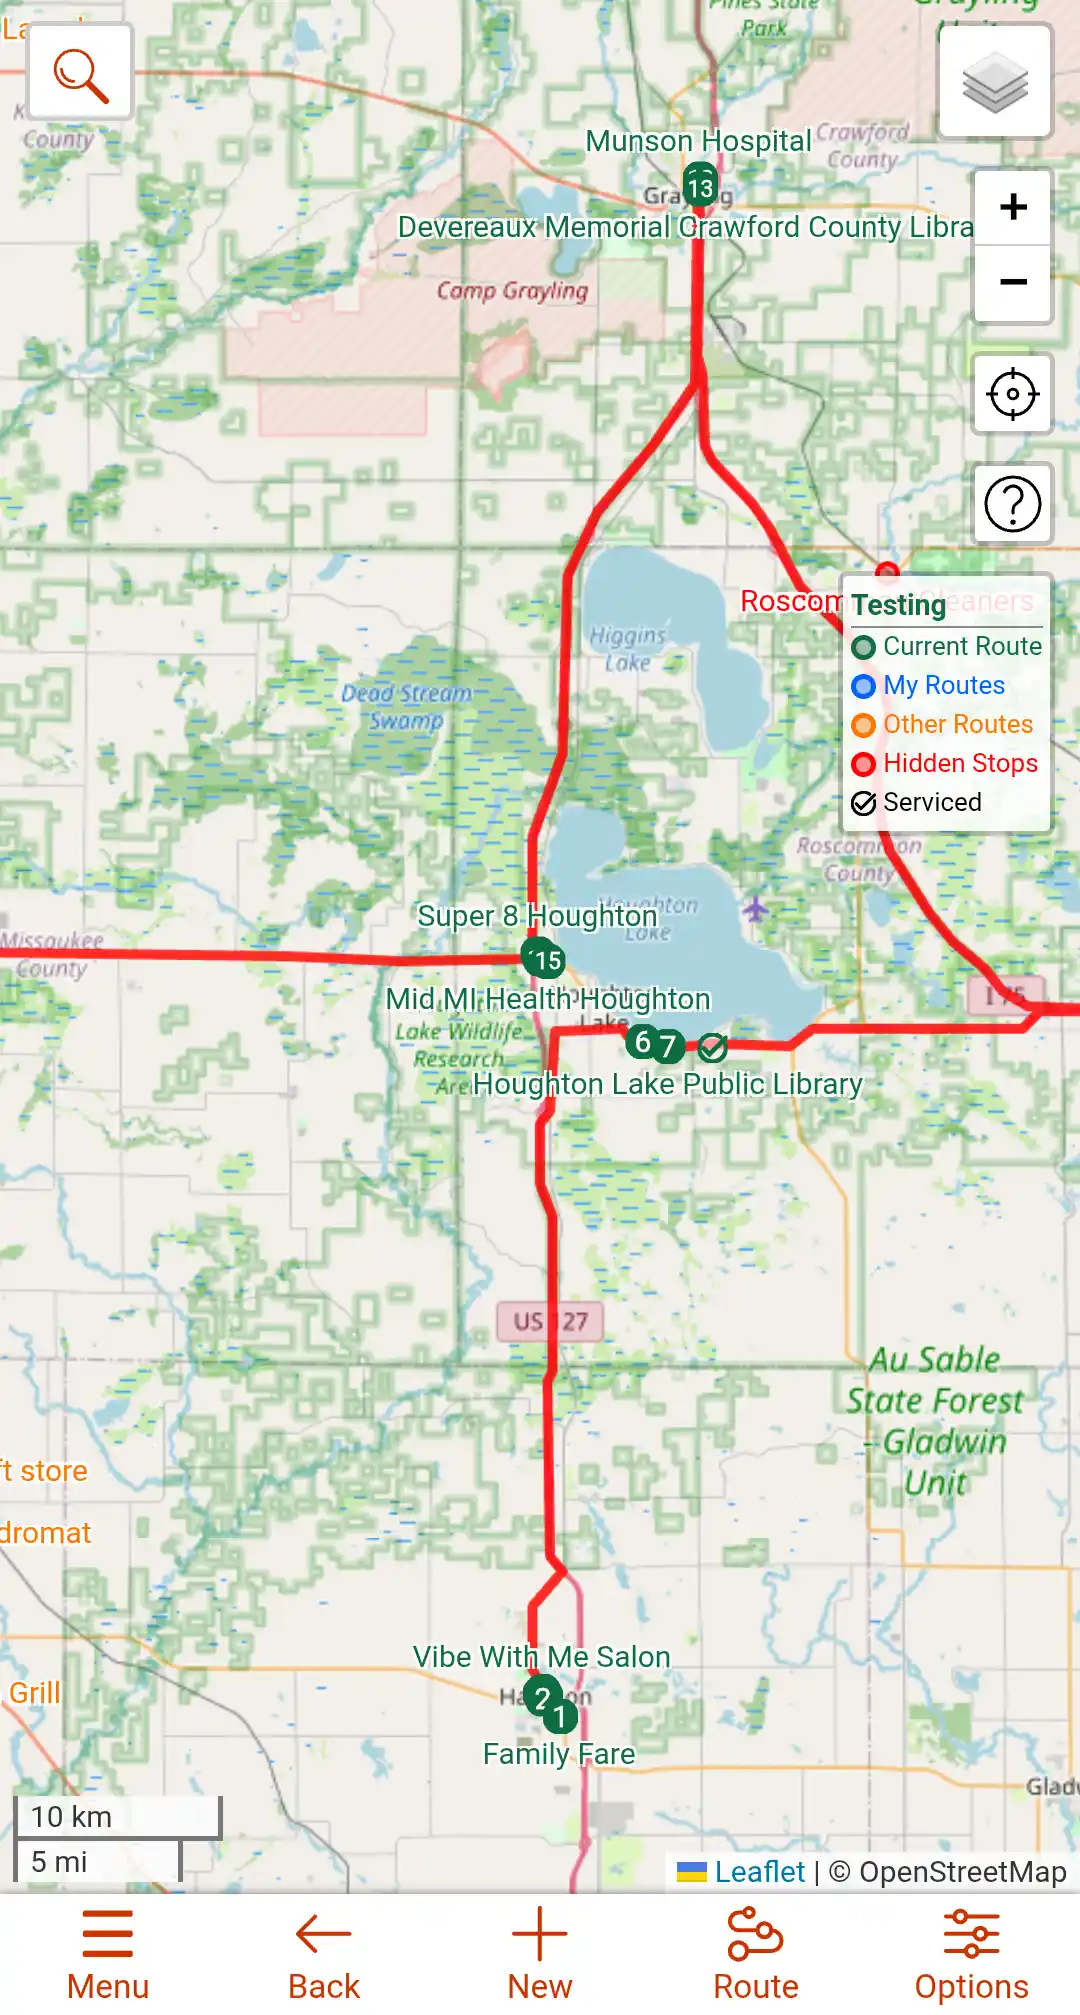
Routing Dialog
This dialog allows you to create an optimized route and display it on the map. When an optimized route is shown, the markers will change to be numbers in the order that the route is opitmized. Routing is not available in the Simple Site Mode
Auto Route Optimization
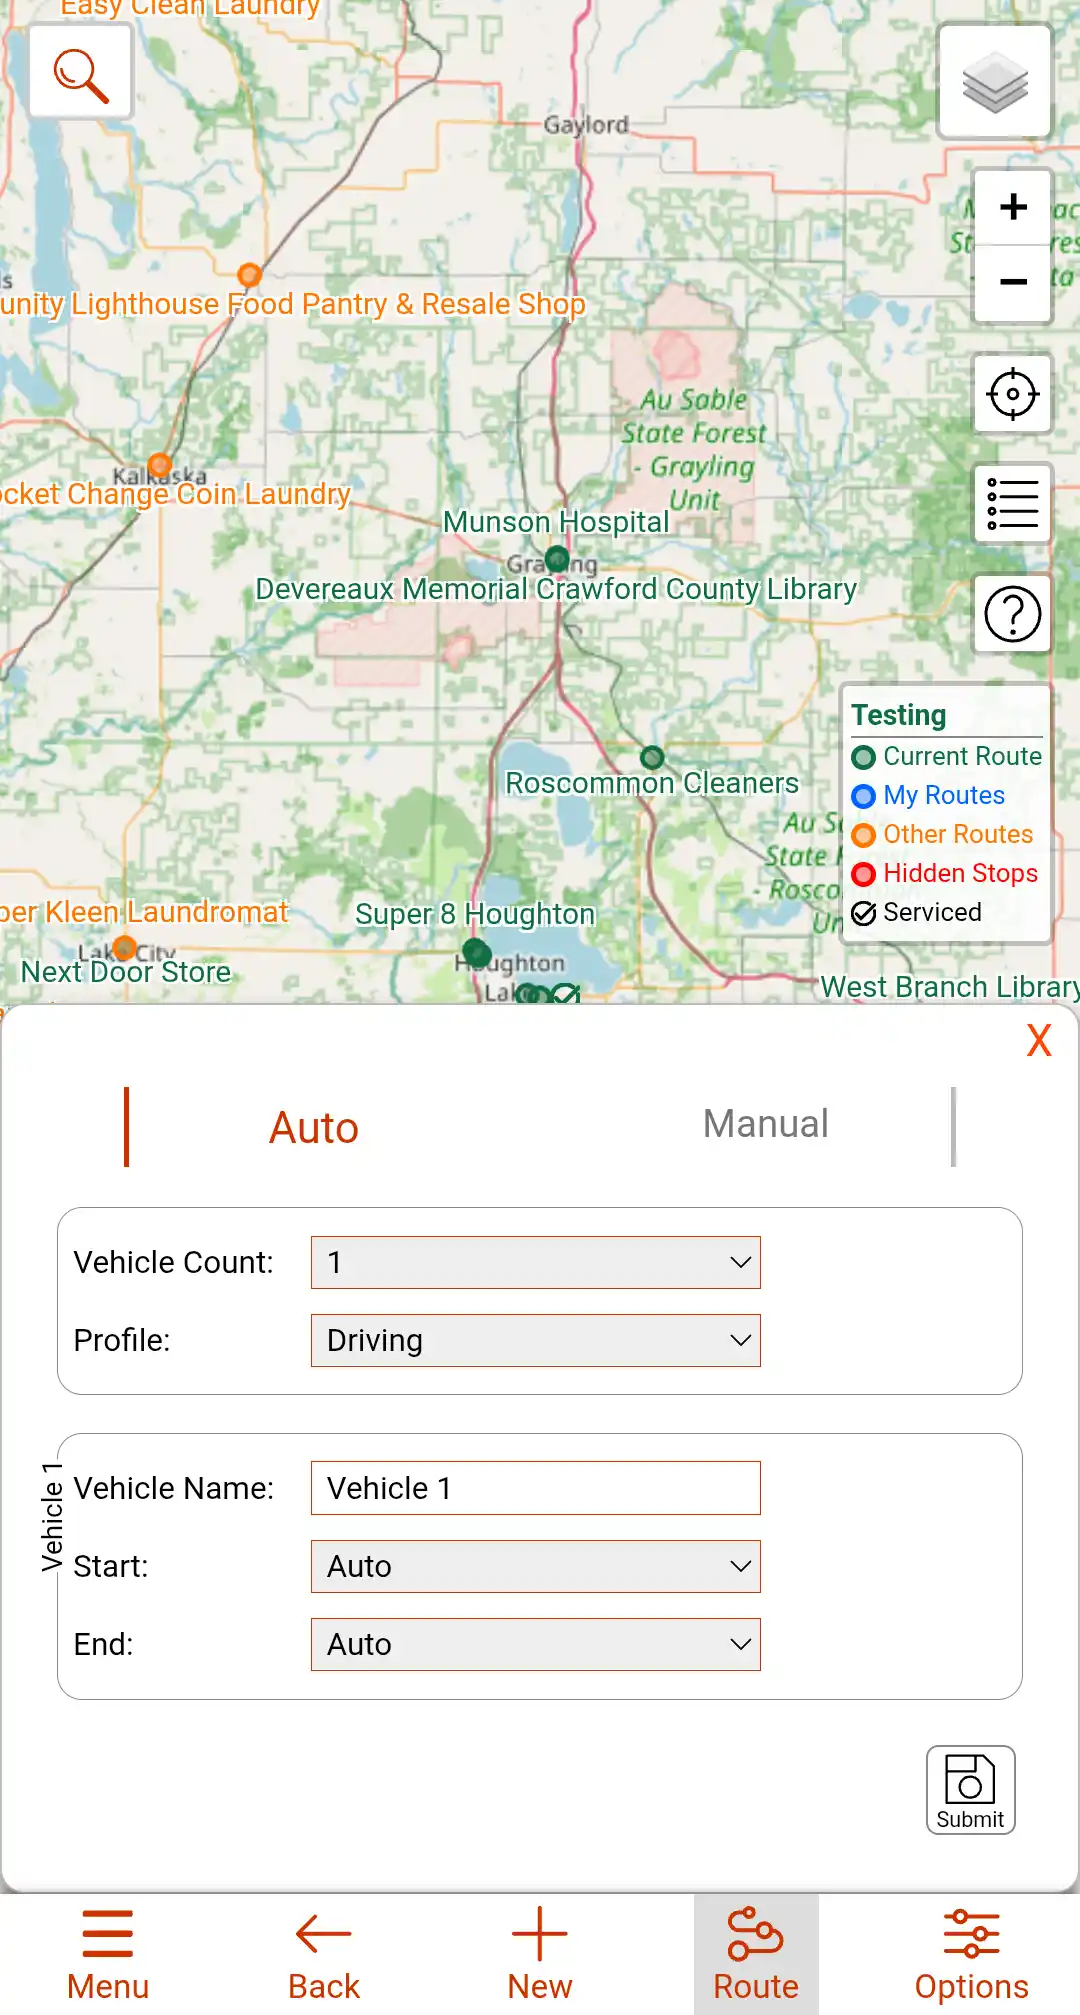
Using the Auto route option will make an optimized route based on the parameters you set. in the Advanced Site Mode you can add up to 3 vehicles. You can select the start and stop location from the stops in that route for each vehicle, or leave them on Auto. You cannot have duplicate start and stop locations either for the same vehicle or for different vehicles.
Manual Route Optimization
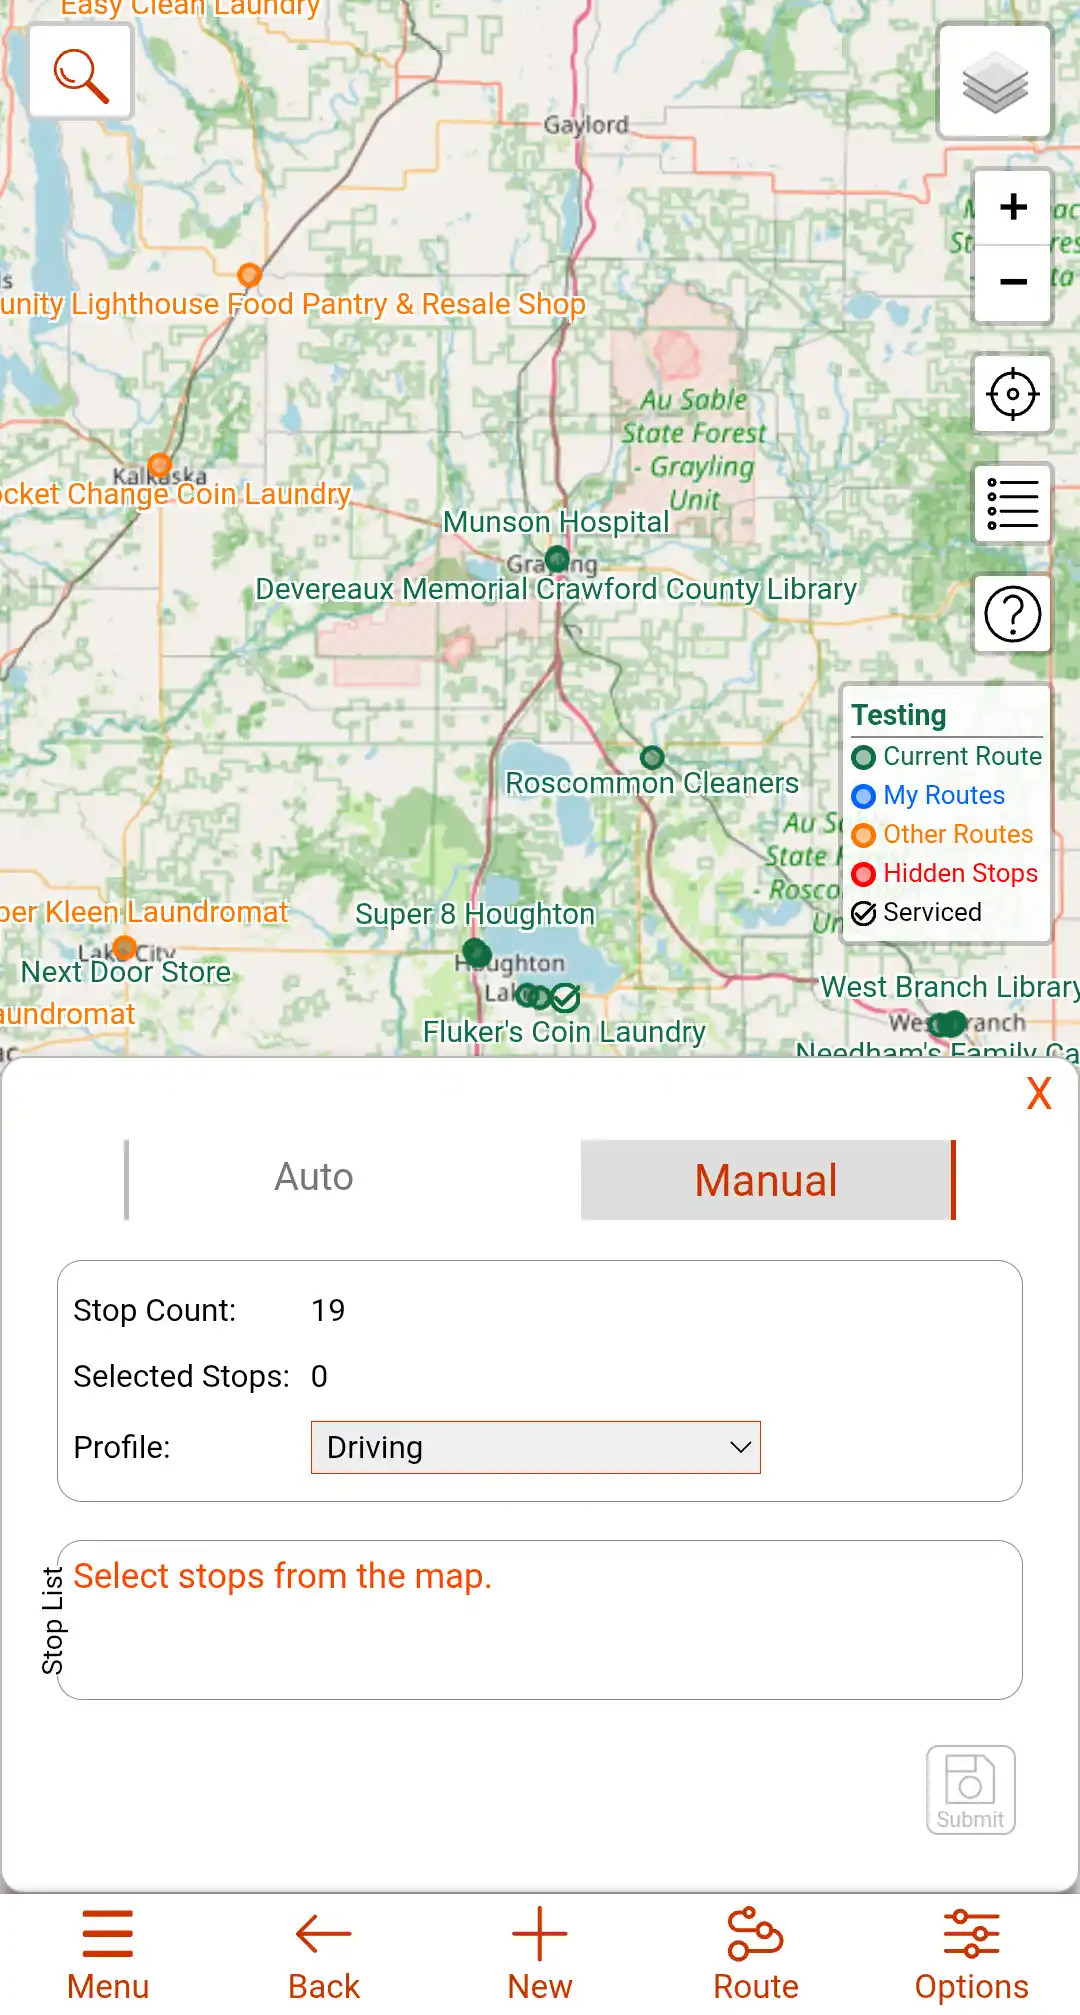
This option adds a route line to the map based on the order you want to the stops to be. You need to click each stop on the map in order to add them to the list. You do not need to add all the stops if you don't want, but the route will only be calculated on the stops you add.
Deleting/Clearing a Optimized Route
To clear or delete an optimized route, you can click on the route line it'self and the select either Hide or Delete.
List View
The List View option is another way of displaying your routes or stops. It is only availble in the Advanced Site Mode. This does not take the place of the map or even remove it, but displays over part of the map and can be used in conjuction with the map.
You can open the list view by clicking the List View button on the right side of the screen.
Route List
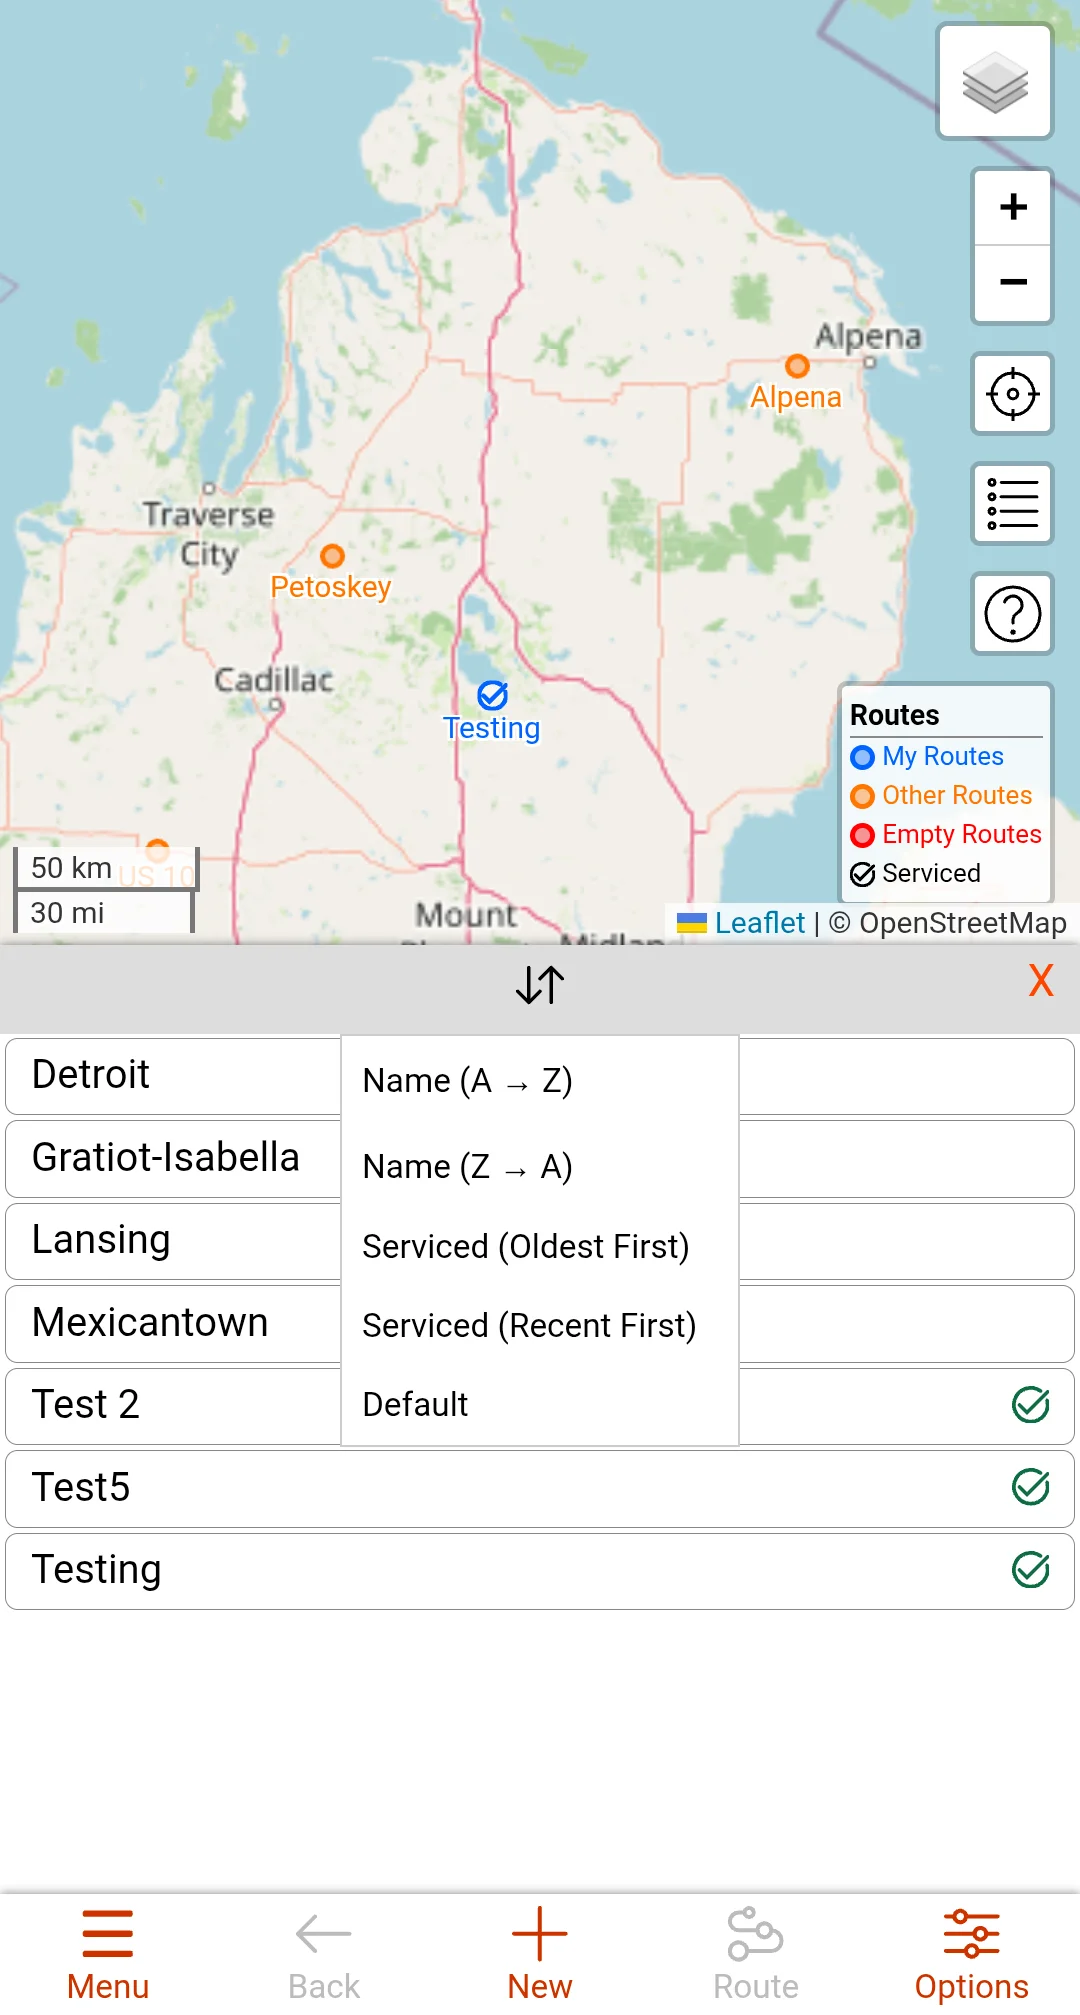
The Route List shows all of your owned routes. The Routes that are considered "Recently Serviced" will have a small green circle with a check mark on the right side of the route name. Clicking the route name in the list, or a route marker on the map will open the route view dialog in the list. This is the same dialog as is normally shown on the map, just inserted into the List View.
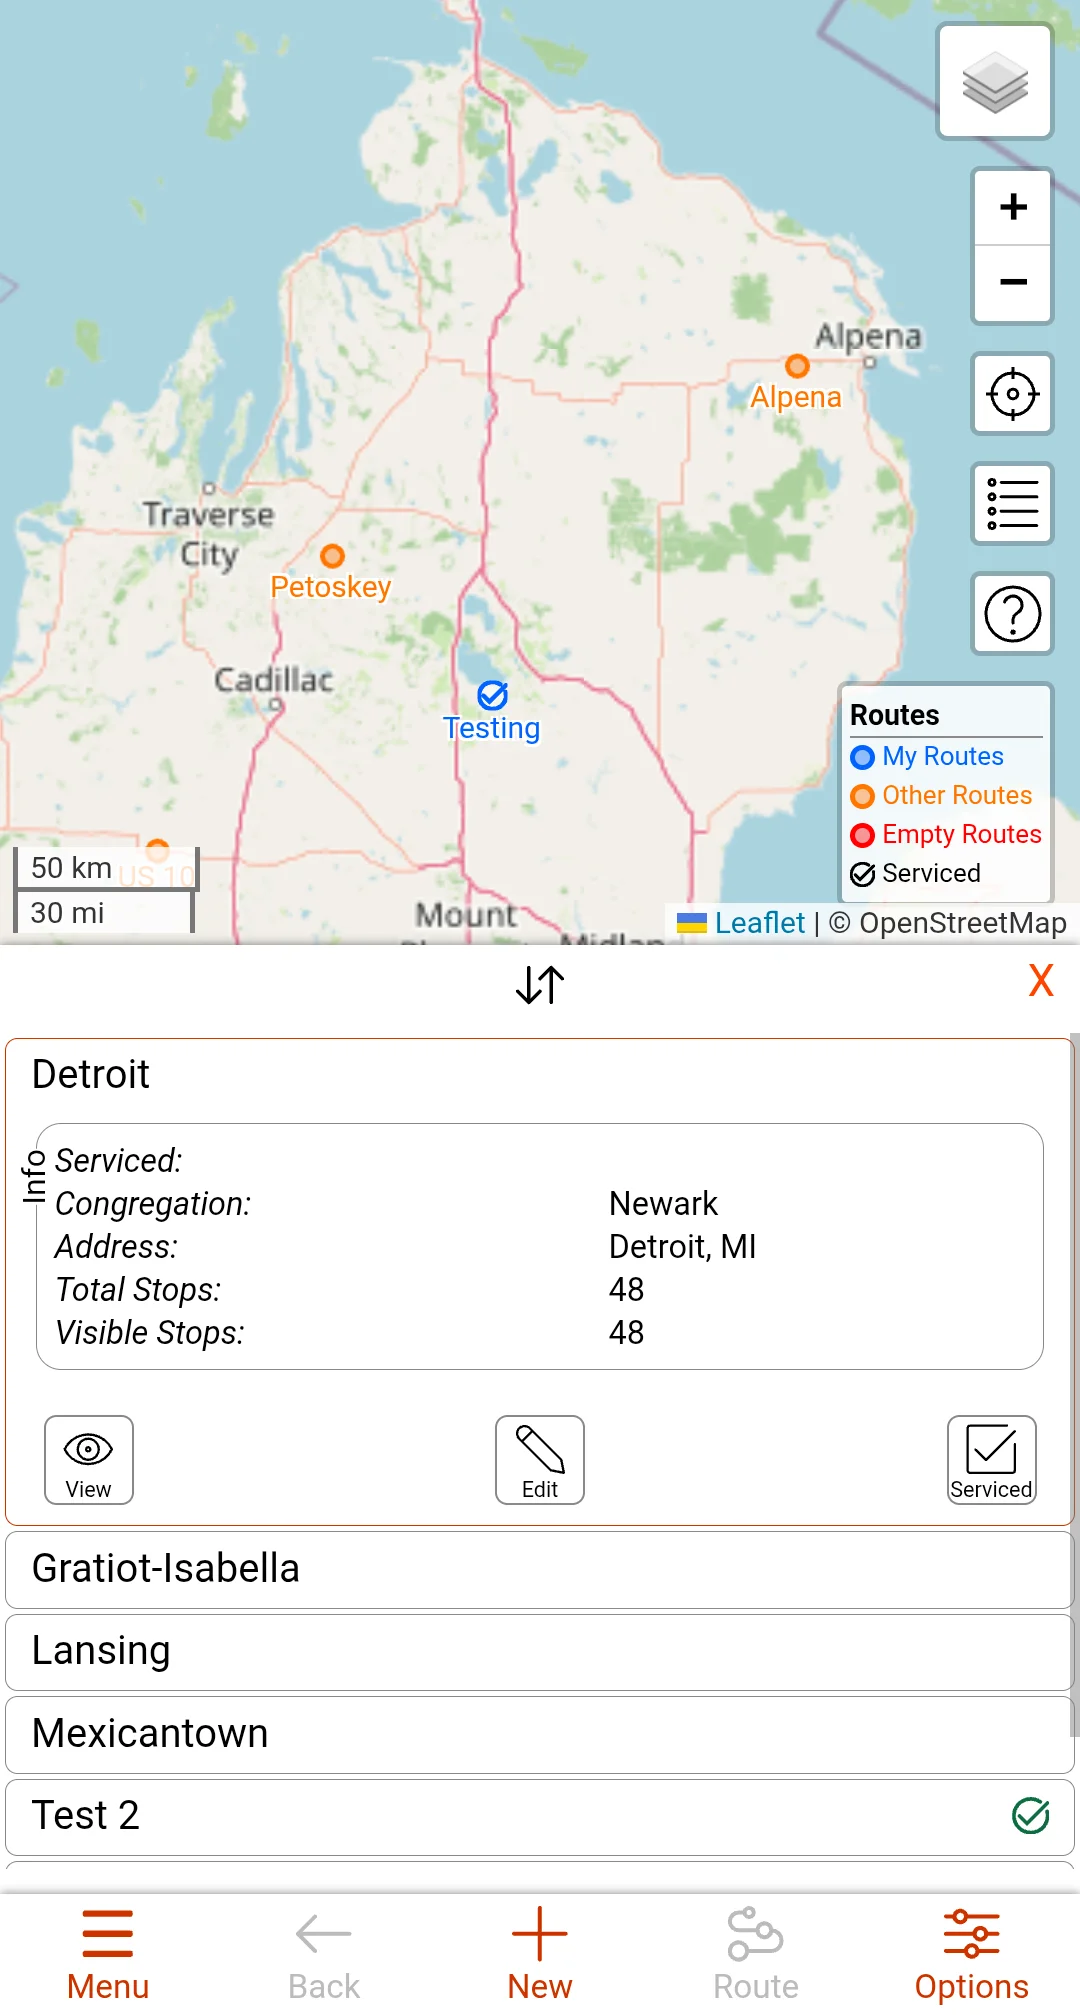
The default sort order for the routes is alphabetical. You can change this by clicking the sort button on the top of the list and selecting an option from there.
Stop List
The Stop List shows all of the "Visible" stop in the current route you have open. This does not work on routes you do not own. The Stops that are considered "Recently Serviced" will have a small green circle with a check mark on the right side of the Stop name. Clicking the stop name in the list, or a stop marker on the map will open the Stop dialog for that stop in the list. This is the same dialog as is normally shown on the map, just inserted into the List View. Hidden stops are always excluded from the Stop List.
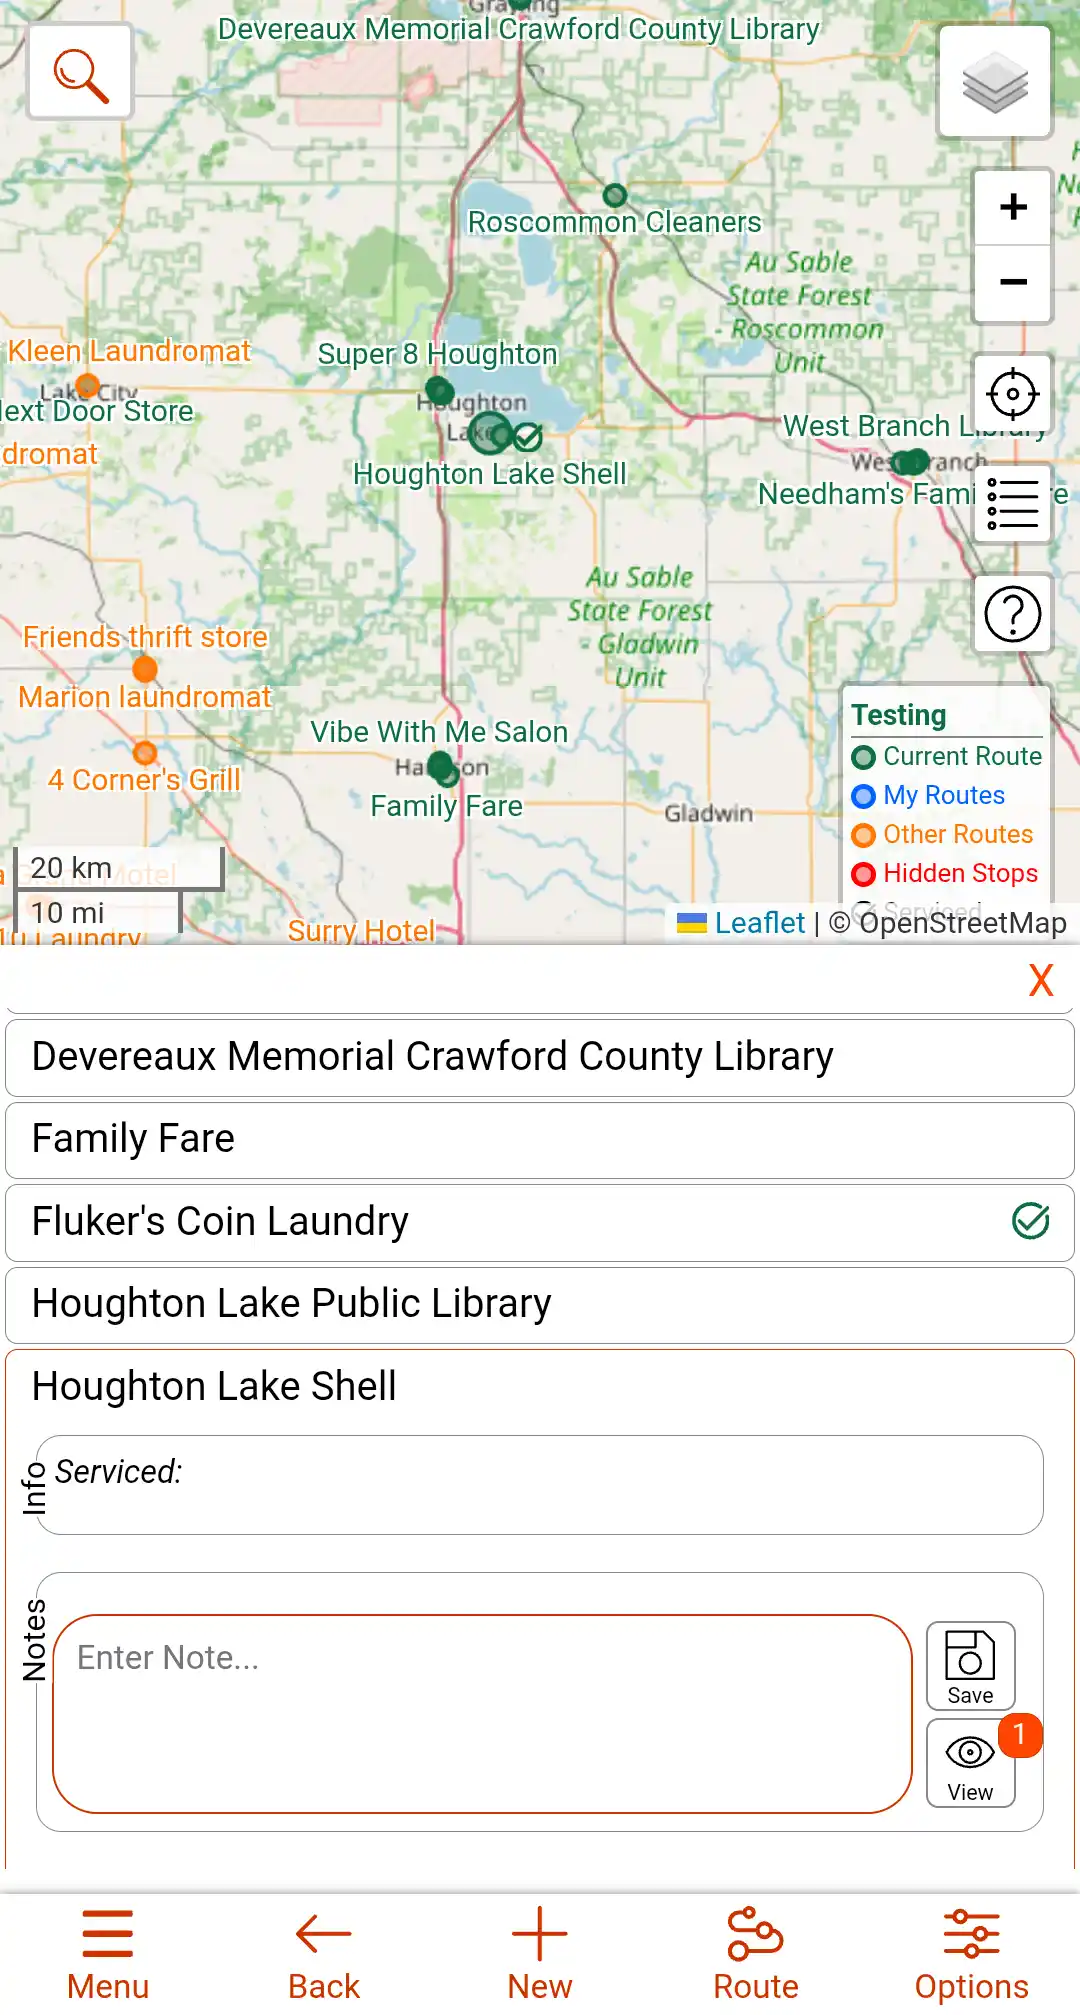
The default sort order for the stops is alphabetical. If you have optimized the route you currently have open and are showing the route line on the map, each item in the list will have a numbered circle to the right of the Stop Name unless it has been excluded from the route optimization. When you have an optimized route line showing, the stops in the list will also sort to be in the order of the optimized route. Any Stops that are excluded will be at the end in alphabetical order.